
State of the Intrepid – The Cargo Box

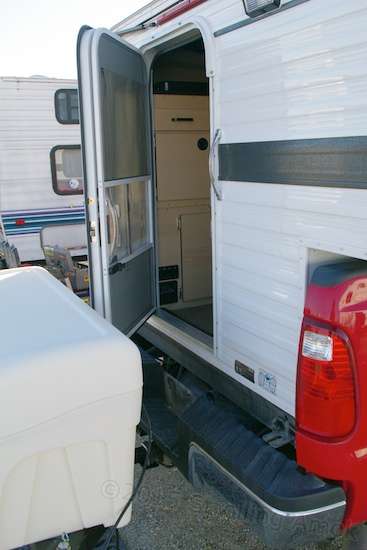
The StowAway cargo box as originally mounted in February of this year.
The “small” standard model of StowAway cargo box has been awfully handy, and is a clean way to transport goods in the swirl of dust that often trails behind the truck. The white color I chose is unusual and does show dust easily, but so does the black one, and the temperature rise inside the white version is much less. White also discourages heat-induced lid warpage that can compromise gasket sealing and the ability to latch the lid closed. That makes it appropriate for storing away those items which would quickly degrade if left in Yuma’s spectacular summer heat, like my old Pentax film cameras and videocam, as well as the e-bike’s spare battery. Wheel levelers, camera tripods, books, bike parts and tools, lubes and maintenance chemicals, you name it. Whatever could not fit in the camper’s twin benches (due to the added batteries) or posed a semi-hazard in an enclosed space, went into this cargo box.

This is a swingaway version, which can be locked at 90 degrees or swung to 180.
My StowAway is a swing-away frame version, which is a good thing on a rear-entry camper. Any misgivings I had about its frame strength under a heavily-loaded box are gone – I absentmindedly drove it for ten miles along a 65 MPH two-lane with the frame locked open (the box now perpendicular to the truck’s bumper) before I noticed it in the edges of the right side mirror. Oops. Don’t worry, if this is Alzheimer’s, I’ve had it since I was 20. Anyway, I expected frame twist and a fight to close and latch it when I pulled over. It looked good, swung nicely, and latched normally. Kaa-lik! The alignment aid on the latch, as usual, did not need to come into play. No effects whatsoever, other than shame and embarrassment. Considering how far the box was perched out behind, and how stiff the Super Duty’s suspension is, I no longer wonder about the system’s durability.

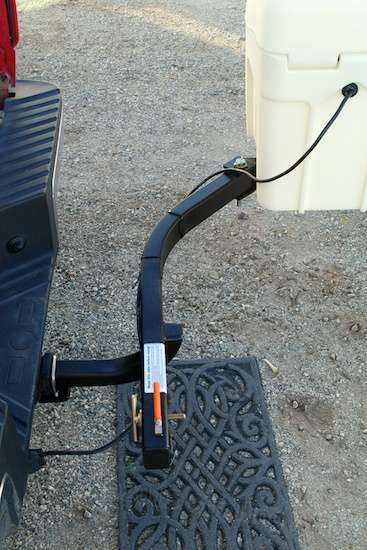
This pin secures the arm in both the open and closed positions.

Locks 2 and 3 are a lift latch (red handle) and a threaded bolt with a large T-bar and washer. Vibration doesn’t seem to affect it.
I chose the smaller box size because of its marginally smaller dimensions at a much better price, and the fact that it uses a flexible sealing gasket instead of open-air rain channels or gutters. It’s hardly a hermetic seal, but does keep the contents dust-free in that cloud of filth that often trails the rig on dirt roads.

Hey, don’t judge! How do you think I get the money to pay my expenses? Notice the lid seal, which works great.
If there’s one drawback other than tying up the truck’s hitch receiver, it’s ground clearance. Off-roading with it in rougher areas is a definite compromise. If your bare stock vehicle is in danger of grounding out on something at the rear, then the swing-away frame is, too. But please note that the only ground contact I found was while crossing a deep feature on a diagonal, where the hinge end of the frame could reach the dirt in back of one taillight. No other type of ground contact has become an issue, apart from the abrupt climb into my daughter’s driveway. Adding a Curt adapter to remount the frame higher pretty much ended ground clearance issues, but at the cost of moving the box and its frame further rearward, too. That required the addition of an inexpensive trailer lighting extension cord to keep the StowAway’s standard license and taillight bulbs operational.

The taillight extension cord allowed use of the Curt adapter.
On the good side, I can now enter and exit the camper doorway without first swinging the box out of the way. On the bad side, that makes a long vehicle even longer and makes camper entry more challenging, erecting a higher frame barrier to the truck’s rear bumper step.

Notice that the fixed section of frame ups the ante a bit when the Curt adapter is used. At normal height without the adapter, the frame makes a handy step.
If you must have more ground clearance than stock, the StowAway with a lift adapter added is not a perfect approach, but it is relatively affordable and works very well otherwise. I can only use so much box ground clearance anyway: along with its stock height and long wheelbase, the Ford’s fat dual exhaust pipes already affect ground clearance, and the front e-bike carrier cuts it up front as well. Lacking any protective plates on the Ford’s underbelly, let’s just say that I don’t do rock crawling, nor go on trails noted as inadvisable for stock trucks. And when I roll over questionable moments of trail, I go very slowly and listen. Pounding the crap out of machinery may invoke stardom on YouTube, but after the camera goes dark comes the reckoning.

This isn’t all that abrupt a wash. This is the original installation. Note the frame elbow and the (optional) caster wheel dragging in the sand.
If StowAway offered a high-lift version of their swingaway frame – which would be a very easy thing to do from a manufacturing standpoint – I wouldn’t be able to find any fault with this product other than tying up the hitch receiver. They already vary the horizontal stalk length to fit the application and clear any spare tire mounts. They are very unlikely to be talked into varying height though, since they don’t warranty the units for off-road use and would not want to encourage that. Might be worth asking with some plausible excuse, though – they are configured and built right here in the USA. Ground clearance for you may be less of an objection, depending on your own vehicle’s hitch height, rear overhang, and your terrain choices. I think that only the protruding hinge of the swingaway-type frame is subject to this issue. The fixed-frame version has no such protrusion to one side.
Original installation. It’s possible to squeeze in, but it’s a trial for one whose body has matured.

The added length of the Curt adapter moves the box up and back, allowing a full door swing and fairly easy entry from the side.
As for my particular application, the fully loaded weight of the camper plus the loaded weight of the box hanging out there compresses the Mighty Furd’s rear springs just an inch. But unfortunately, I’ve been thinkin’. First, a vertical inch at the axle is considerably more by the time you reach the rear end of the cargo box. Getting rid of that droop would noticeably improve overhang clearance and let me get rid of the Curt adapter. Second, continually compressing a leaf spring with no letup can cause it to take a permanent set over time, though whether an inch will do that is pretty debatable. But how best to raise it back up?

The StowAway arrives in two cartons, and it’s all well protected.
The overlanding shop that delivered and installed my Grandby has seen all kinds of systems come and go, as in go away when off-roading. Thus they have opinions borne of trial and tragedy. They advise against any form of spring “helper”, as in clamp-on leaf supports, wedges, and the like. They found that because these tend to point-load the leaf springs, that will eventually break them under the high stresses and movements of rough terrain. As a preference, I’m not a big fan of these approaches myself, nor of altering things such that the overload springs engage early. The jump in rear spring rates is too large for overall driving with lighter loads. This would make the Super Duty’s stiff ride become markedly more so, and improve the odds that the rig will want to oversteer (spin out) on wet/icy pavement. Considering that the truck’s diesel engine is already capable of hanging out the back end simply by tipping in the throttle on a straight but wet entrance ramp, I’m not going to advance that tendency to wet curves as well. This is no ten thousand-pound sports car.

The basic fixed section of frame in place.
Approach number two is like unto it, but without the spring destruction – sort of. An old drag racing tip used to be to install longer spring shackles, increasing the vertical distance between one spring end and the vehicle’s frame. This hoisted the back of the car up in the air a few inches, and for just a few bucks. Thing is, the spring also flattens and sags over time, lowering the car back to where it was, and now you need new springs.

Here the swinging section of frame is being added. Adding washers in the right places requires some finesse and persuasion, but it’s do-able.
Approach number three is to get rid of my one inch of sag by replacing the rear leaf springs with stiffer ones, or with springs having an increased arch or bend. If you’re flush with money, this is workable. However, the stiffer springs approach is only financially practical when you have a serious overload going, like a behemoth truck camper that really should have a more capable truck under it, designed for that load. Since we’re talking only one inch or several hundred pounds in my case, new springs would be like using (and paying for) a shotgun where a flyswatter is called for. Stiffer springs are a good idea if the extra bed load is never removed, and a bad idea whenever it is removed. Again, oversteer, and the more weight you compensated for, the more pronounced this tendency will be in those unexpected moments. If ride height is okay and you’re simply trying to keep a top-heavy load from swaying, a rear anti-sway bar is a better and less expensive approach. It too will tend to promote oversteer, but not quite as much, depending on the bushing material used to mount it.
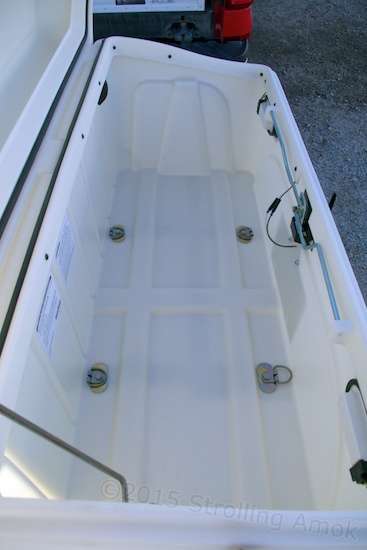
The box interior, here with option D-rings added underneath the bolts. Handy, but far from essential.
Approach number four is air-assist. So-called air shocks are one kind, where you can add to spring rates and raise the back end by adding air pressure to them. I’m not convinced these are a good idea in the long run, simply because they cost more and must be replaced each time the shocks wear out. In olden days, air shocks stopped holding air way too early, but hopefully that’s been improved since then. Part of my squeamishness is because vehicle shock mounts tend to be designed to handle shock loads and not all that much more. Turning shocks into springs can fatigue the shock mounts and snap them off. Heck, I’ve had a shock mount snap off when I simply had stiff new shocks installed, but that’s another story.
A clear photo of the frame construction, showing the standard anti-rattle gizmo on the hitch receiver.
Another air-assist that I’m aware of, and the approach recommended by the overlanding shop, is air springs. An air spring is a reinforced rubber-like air bladder that mounts over the axle and pushes up against the frame. Air Lift, Firestone and Goodyear/Stemco offer these, and unlike air shocks, these can take absurdly high loads. When properly inflated to 5 PSI or more, they are durable enough to last as long as the vehicle, and Air Lift warrants them as such. They are designed to restore ride height and support loads, rather than get the vehicle’s petute up high in the air. The strength for them in my application is that I would be able to add only enough pressure to get my proper ride height back, raising the StowAway. Handling need not be compromised. And, when respected, air springs can last a very long time. What’s respect? Keep at least 5 PSI in them to maintain their shape, so as to prevent rubbing and wear. On the bad side, at least one of the other brands warns against allowing the axle to extend down fully under normal air pressures (as on a shop lift), for fear of blowing out the bladder. This would be of concern to me on very uneven ground (like crossing a wash on the diagonal), but thankfully, Air Lift does not share that trait. Adjustable, long-lasting and almost affordable, a pair may well wind up on the back of the Mighty Furd, because it would allow me to avoid having to use the Curt hitch adapter, and would keep the rear springs from taking a set.

i added a small shovel, held by rubber clamps. By chance, the shovel helps keep the folding lawn chair up high and off the frame.
For all my harping on ground clearance, keep in mind that most bare cargo platforms are worse, and the most-recommended big tool storage boxes strapped to them are often not rain-resistant. While you’re perusing cheaper jury-rigged options or full-on competitors for use with a compact truck camper, throw the StowAway on your list as well. I notice that the frames are available without boxes and vice versa, so if you have some kind of funky setup going, it’s still an option in some form.

Yep, this isn’t the most convenient way to carry my folding lawn chair, but until I come up with a better way, it’s good enough. The straps last about six months in the sun.

The fishing rod holders? I’m too lazy to break down setups at the end of the day. Just stick it in the holder and relax.

I am so glad a van friend showed me this…I have been interested in an outside storage bin..and I think you covered it quite well…
Thank you Cathleen, and welcome! I realized just yesterday what I neglected to mention was the box’s 200-pound cargo limit, which I think I’m at least near.
AND I forgot to mention that some states (like mine) require taillights on things like this. Has to do with objects which project out a certain distance from the vehicle side or rear. If you’re just firing through on the Interstate you probably won’t suffer, but in traffic on surface streets, you’re a potential quota-booster, especially at night. Should you improvise your own box and truly travel, you might consider applying an add-on light kit from Tractor Supply or the like.
High demand for shoe shines on the road, eh? 😉
“If you can snap a rag, you can earn Big Income in the Shoe Care Industry! Low investment, high returns! Be your own boss! Discounted instructional programs available. Call today!” 🙂
I’m laughing out loud 🙂