
Intrepid Solar, Part 1

Roof beams marked in pen, the first solar panel is taped to protect paint, and placed about where it is planned to go.
Technically, the Intrepid’s solar system is fully up and rolling. I’m calling this post “Part 1″ because there’s still no place to stow the two Renogy 100-watt ground panels.
This is a long post. The executive summary is that three Aleko 100-watt solar panels and one 60W panel are now roof-mounted on the Four Wheel Grandby, using four pairs of 1.5″ x 1.5″ x 31″ aluminum L-angles that each span three structural roof beams. #8 x 1/2” self-tapping stainless steel screws were used as the fasteners. The roof panels feed a Morningstar TriStar MPPT 45A charge controller liberated from the Defiant, while the ground panels supply an Outback Smart Harvest MPPT 20A controller. A Battery Life Saver desulfator is wired in as well, controlled by an LED-lighted toggle switch. Four 104Ah Sun Extender AGM batteries have been stuffed into the Grandby’s bench seats. A rather complex wiring scheme has been used to minimize unequal draw and charging among the four batteries, with equally elaborate fusing to protect all positive and some negative cables running between the two benches. A 150-watt Samlex pure-sine inverter handles all AC power needs. There you go.
For those of you who are gluttons for punishment, here’s the nitty gritty. I was originally going to install one of the AGM batteries I have in the Grandby’s OEM battery compartment, pack in what electronics I could there or in the benches, and string 4 AWG welder’s cable to the remaining batteries in the benches. Welder’s cable is a bit different from common 4 AWG cable in that it is made with finer wires and uses a thinner insulating jacket. This makes it considerably more flexible for tight bends, and the jacket is still tough enough to resist wearing through. In theory, the finer wires also slightly decrease voltage drop, but in practice, you’d never notice.
Over time, I discovered that locating one battery at the Grandby’s wiring harness and placing the rest a considerable distance away was a bad idea from a battery lifespan perspective. The battery closest to the harness hook-up discharges the most, and also takes the most charge during the day. The other batteries rise and fall too, but not nearly as much, even with thick wiring connecting them. They will each “wear out” at different rates, and considering that it’s a really bad idea to replace single batteries in a pack independently, when the first battery goes, the rest must be traded in with it. Otherwise, the new replacement will quickly wear down to the level of the others, and never be able to recover.
From a weight distribution standpoint, locating all four batteries in the Front Dinette’s benches puts all their mass forward, where it affects vehicle handling less. But the main benefit is that it makes it easier to connect the pack in such a way that current is drawn more equally from each cell, and recharging is also more equal. There are four ways to connect four batteries: simplest, better, Perfect Version 1, and Perfect Version 2.
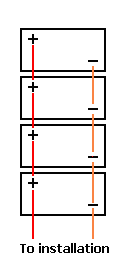
Here’s the simplest way, above. The lower you go in the diagram, the more amperage is pulled from each battery in turn. That wears out the bottom battery first, and when it goes, they must all go with it.

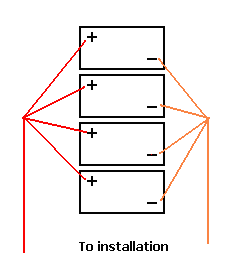
The above is what most folks do, and it greatly improves the results. The middle two batteries lag behind, but it’s simple to wire up.
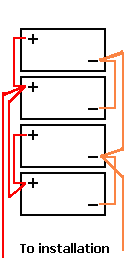
This one is an even better performer, with the only difference being a negligible difference in final wire lengths. If you can keep the batteries close to each other, “grounding distribution blocks” such as those used in big-amp car audio systems allow all cables to meet at a common point. Distribution blocks are like terminal strips. They replace a big ball of solder with a bunch of terminals that electrically connect to each other. Distribution blocks are normally fused, while grounding distribution blocks are not. In the situation above, a fused distribution block would require each line in from each battery to be fused, which is a needless complication compared to one big honking fuse on the main positive line in.
What a mess! But it achieves “perfect” balance, as depicted. It’s kind of a cross between #2 & #3 above, and gives each cell the same number of connections and wire lengths once you consider both positive and negative terminals. In my version, I loused it up a bit with splitting the pack up into two pairs and adding fuses between the two groups. Any time you have a significant wire run between batteries, you need to fuse both ends of the positive wire, since any short between the two still nets you a powered wire from one end or the other. I also added one negative fuse to ease the difficulty of running a cable through cabinetry, and one on the main line in from the pack, just because I had the fuse holder already and that’s a lot of amperage available. Call it voodoo.
One might think that splitting this group in two, one pair in each bench, makes cable lengths grossly unequal, since one pair is closer to the camper’s power harness than the other. But once the top two batteries are moved off to the passenger side bench, the main supply wires to them are actually pretty close in length. Though seemingly complex, this layout does what #3 cannot, at least without making many of the cables needlessly long in an attempt to balance the system back out. My setup is certainly no longer perfect, but it’s as close as I can reasonably get. It used some 26′ of positive cable in total, which is more than I wanted to see. It probably would have been better to use 2 AWG cable here, but I altered my wiring layout after I had all the parts purchased and shipped in, and a complete replacement of all the componentry at this late date was out of the question. Way more wire used than in layout #1, but not all that much more than layout #2, which is what I’d planned on.
Running cable between both benches required some drilling wood in order to do the installation right. That required a right angle drill attachment, the better of which is made by DeWalt. It uses a hex setup, so that it can take driver bits, drive sockets using an adapter, and hex-based drill bits. Those drill bits don’t grow on trees, so like virtually everything else in this project, they had to be shipped in. Yuma is a good-sized town, but its hardware stores are rudimentary at best. If it isn’t out of stock, it’s not stocked at all. At any rate, one cable runs through storage right under the front window, while two more traverse the rear interior of the dinette floor storage tray.
On the plus side, I won’t be using much amperage via the fridge, the 150-watt inverter, or the dual power outlets, so voltage drop won’t change much. It’s the charging that would be affected, since that can potentially involve more amperage. Fortunately, both the solar chargers are equipped with voltage sensors that relay a battery’s actual charging voltage, rather than taking the reading at the controller itself. Whatever voltage drop is occurring via the cable resistance, the controllers can ignore it and get a true picture of how things are going, as long as the sensing wires are attached to the “worst” battery in the stack, as arranged.
The two main wires make their way to the OEM battery compartment under the Grandby’s stove, where the camper’s wire harness terminates, as does its solar wiring output. It seemed better to hook up the 4 AWG cables there, rather than extend the small 8AWG harness or 10 AWG solar forward. There’s less line loss by extending the big cables instead of the harness or solar. Since research indicated that installing power-drawing accouterments willy-nilly and wiring them to the closest battery was a bad idea if I wanted to equalize power draw among all the batteries, I knew that all my new electronics should ideally be located in the same place and draw from the main battery cables where they ended inside the OEM battery compartment. The party was there, as far as helping the batteries to live in harmony.
A word about how the batteries are laid out inside the benches: badly. The AGMs are fully capable of being used placed on one end, and arranging them together side by side in this position makes for a very compact little unit. Hell, all four could very easily be stashed into one bench, with room to spare. The remaining bench would be empty! I had to rule that out because of the unequal weight side-to-side, but in pairing them two to a bench, I found out that access to the battery terminals would be nearly nonexistent. You can get ’em in there, but you can’t wire them up that way. At this point in time, I knew nothing about distribution blocks, and even with those, the needed wiring setup would be a thriller, with each battery needing to be pre-wired, with all leads going to a nearby joining point for connection to the main cables. Technically, it would work, but I didn’t know a practical way to carry it out, and some fabrication would be needed to secure the batteries and build a protective partition to allow dropping stored items in the remainder of the bench. I decided to punt, positioning each cell normally and in line. For protection from the flotsam shoved into the benches, I enclosed each battery in a conventional battery box, which is strapped to the floor. This layout steals a huge amount of space, comparatively speaking, but given my options at the time and my upcoming departure from the Yuma area, it is what it is, and it works. Maybe someday I’ll get exotic in order to expand my storage space, but I accepted the trade-offs and the system works. At least I can safely wedge some crapola in there and not have to worry about sparks and meltdowns. Given the time, materials and tools, the “on-end” layout would be the better, more efficient choice if you can deal with making it serviceable. If you’re relatively well off, consider replacing it all with one lithium battery.

Oh, the humanity! The benches are still presenting good, usable space, but those battery cases eat up cubic feet, not inches. The passenger-side bench is similar, but has no OEM electronics in it.
The Grandby’s solar input is plumbed such that the wires from the roof port and the rear wall exterior port are joined together in parallel inside the kitchen cabinet. That means that any roof and ground panels deployed will need to match in voltage, and their combined amperage will join where they come together and then head for the single controller. You get some losses through 10 AWG wire when you do this, but it’s livable and is the simplest and least expensive way to use the Four Wheel’s optional solar system of one 160-watt roof panel and one 80-watt ground panel. But jump the panel wattage up higher, and you’re going to be dropping a significant amount of charging power through those slender wires.
If you’re going to muscle up on panels, a different method is needed. I was originally going to stick with just the TriStar MPPT 45A, since it can handle 600 watts of panels wired in series, in a 12V system. Series wiring doesn’t stress thin wires much, since voltage is what is added up, not amperage. If you have four roof panels pumping out 80 volts and 5.5 amps, the wires won’t create much resistance to the flow because they don’t care much about ramping up voltage. They do care about ramping up amperage. Hooked up in parallel, you’d get more like 20 volts and 22 amps, which would create massive losses in that spindly wire.
So, I was going to rewire the roof and rear wall ports in one big series loop, combining the voltages of both roof and ground panels. It’s within what the TriStar can handle. However, my research showed that the output of a group of panels wired in series will virtually collapse in any situation where any of that group are in shade. The same situation in parallel will chop output badly, but not collapse it. Between roof and ground panels, that varying light thing is guaranteed to occur. A conversation with one of Morningstar’s engineers pointed out the fact that leaving the camper’s internal wiring alone and coming in to the controller with 80 volts from the roof and 40 from ground panels would make the TriStar profoundly unhappy. So, I’d get a far more situation-adaptable system if I treated each port to its own controller. I’d let the TriStar handle the roof’s 360 watts, and cut the rear port’s wires to lead them to the same area separately, where they would find their own controller.
I preferred Morningstar’s compact SunSaver MPPT 15A, which can handle 200 watts of panel. Unfortunately, it has no provision for remote battery voltage sensing to ensure a full charge. It’s intended for use in a compact situation, though it does still sense remote battery temperature. I was able to find an Outback Smart Harvest MPPT 20A for considerably less money. It has that temp sensing capability, and can handle 300 watts of panels if need be. A look at its online manual also indicated that, like the TriStar, it can also use a remote temperature sensor. Though both the controller and the batteries are inside the insulated camper interior, the batteries are essentially in sealed compartments, while the controllers are in a ventilated bin shared by the furnace and other electronics. It’s all inside the camper, but I prefer the temp sensing option, if it’s available.
Separating the Grandby’s solar harness actually turned out to be no big deal. Considering that the joining point is inside the kitchen cabinet, I’d dreaded the task, expecting a rat’s nest of wires difficult to access after the fact. I don’t like having to wire things, oddly enough. Gives me the heebie-jeebies. One error, and something cooks or blows. Imagine my surprise when I removed a small black Kydex panel in front of the sink, to discover the solar joining point, extra wire looped around and easily pulled out of the hole, with all the pertinent wires nicely labeled as to what they were and where they led to. Kind of stunning, actually. So many people add solar or get a third party to install it that I guess it makes sense, not to mention if it later comes back to Four Wheel, there’s no mystery as to how they built that one years ago. Nice. What I’d dreaded was made simple, and took only a few minutes to do. The extra lengths came in handy to allow dropping the rear port wire right into the OEM battery storage bin, too. Does it get any easier?
Each solar pair was easily connected to their own controller. My main interest was to get the two main battery cables to this bin, where they now had to be split into four cables leading to two solar controllers. That’s where a couple of distribution blocks came in, which kept extensions to the 4 AWG cables short and sweet. These blocks also fed four smaller-gauge outputs that allowed me to wire up the camper’s harness. All the fuses in these distribution blocks are redundant (not needed for my purposes), but adding appropriate fuses in place did allow me to connect to it the camper’s wiring harness, the Samlex inverter, and a BLS (Battery Life Saver) desulfator. In essence, these distribution blocks serve as the joining point for every wire and cable in the camper.
I’m big on desulfators, myself. Not the true cheapies which can harm the battery, but newer decent ones. I’ve watched my Battery Minder desulphating charger bring back a couple of AGM batteries that had been stored in heat for three years, without any maintenance charging at all. You’ll find plenty of experts who say they do not work, are a gold-from-lead flim-flam, and that even today, nobody can give a coherent scientific, fact-based explanation of how they do what they are claimed to do. Now, the Battery Minder is pretty temperamental as a charger, but it works fine as a desufator. They even offer a 180-watt solar charge controller that desulphates (I have one), but it is ancient in design and quite crude as a controller. Otherwise, in order to desulfate without access to 110VAC shore power, you need a desulfator that pulls its needed power from the battery itself.
That’s where the BLS (Battery Life Saver) comes in. It doesn’t use all that much power, but as any camper can tell you, a small power drain 24/7 really adds up. That’s why BLS recommends that its hookup include a toggle switch to turn it off when it’s not needed, or when the camper will be in inactive storage. Most of ’em come with simple battery clamps that let you move them from pack to pack in a service routine. My BLS is in the electronics bin, and I installed that switch, since desulfating batteries need not be done full-time. It’s a once in a while thing. They make a range of models from puny to Godzilla, and I chose the next one up from the bottom of the pile after talking with their rep. It seems that the smallest one can actively restore maybe 200Ah of batteries, but on my 400Ah pack, it would only be able to prevent further sulfation, not reverse it. I antied up, and will be letting it run for awhile, now that I have solar up and running. It has a little LED to indicate that it’s powered up and running, and that’s it. The toggle switch I got for it is lighted, and for some reason I figured it would light up only when it’s on, as an indicator, but that’s not the case. It never occurred to me that somebody might want to be able to find the switch in the dark. Uh-duh.

Okay, so wiring things up is not going to be a career option for me. The BLS desulfator is the gold thing at the top, and the Smart Harvest controller is below it. The device to the upper right with a fan is the camper’s multistage shore power battery charger.
So, by the time I jammed the controllers, the BLS, the distribution blocks and all the associated wiring in the cabinet, it was intimidatingly impressive. I couldn’t help but notice that Four Wheel had gone to extraordinary pains to secure and sheath all their wiring, since vibration tends to undo common barrel wire connectors. They use really exotic ones that merely involve wire insertion, but as a mortal, I fell back into substandard practice for my own wiring. But at least I tied it all down as tightly as possible wherever I had access to do so, using a wire clamp from 3M. It is nothing but a one inch square flat pad with an aggressive adhesive on one side, and a loop for a cable tie on the other. Seems to work well. The pad includes two small screw holes, in case the environment gets to the adhesive or the pull tension is just too great. I also tied a lot of wires together with cable ties, and sheathed some that ran through spots where vibration might cause insulation wear. I’d initially considered adding a pancake fan, such as a 12VDC computer-style fan in the cabinet to keep things cool, but a good look at the built-in vent that allows the furnace its intake air made me decide that it’d be unnecessary. All my equipment has big cooling fins and caution against heat build-up in the instructions, like you’re going to get burned. Never did detect any significant heat, myself, even on the TriStar pumping the full 600 watts through itself in full sun with aimed panels.

Ack. To the left are two distribution blocks, one positive and one negative. They split the 4 AWG battery cable into two 4 AWG controller inputs, as well as supply power to everything else on board. I ran short of red cable at this point, so don’t look too closely… To right is the mighty TriStar controller. In front of it is the toggle switch for the BLS, and an unused switch that could be used for landing lights or arming the photon beam generators. 😉
The notable exception for fins is the Smart Harvest. Not that it runs hot, but it has no cooling fins. Smooth plastic case. My big disappointment was that the vendor, AltEstore, sent me the optional remote battery temperature sensor for it, the same one that is used on every controller that Outback makes. It has a four-wire phone jack as a connector. Trouble is, the Smart Harvest manual says it uses direct two-wire insertion into clamp terminals, not a jack. Mind you, there is a jack receiver on it, but that’s labeled as a data port. I went to the Outback Power website and couldn’t find hide nor hair of my Smart Harvest, nor its smaller brother. This, for a controller that apparently came out in 2013. No references at all. Uh-oh.
A call to AltE prompted them to get through to Outback tech and then immediately call me back. They were as surprised as I that the RTS did not appear to be compatible. It seems that there is no remote temperature sensor for the Smart Harvest. I sent an email to Outback as a follow-up, asking if any two of the four leads on their existing RTS could be isolated and wired in to the Smart Harvest’s terminals. That returned a caution not to attempt to attach that or any other RTS to the Smart Harvest due to a risk of damaging the unit. As to the nonexistent RTS, they said, “The RTS for the SmartHarvest is actually in the works. I do not, however, have a time frame to when these will be released.” Combined with the very limited market availability for this unit and its non-appearance on their own website, I have to conclude that the Smart Harvest is an orphaned product. To AltE’s credit, they quickly altered their sales page to “call for availability” for both it and its smaller brother, and offered to take back both my Smart Harvest and the incompatible RTS. I declined.
First off, I had installed both already. In the case of the RTS, getting that long wire back out would be a true ordeal, since it was already sheathed and cable tied to other wires in its trek through the cabinet, and the double-sided tape on the sensor itself would need to be replaced. No way I was going to snake, wrap and secure all that wire again, and there’s a lot of vulnerable single-wire connections for the camper’s own devices in there, so there went $40, all told. I clipped its wires at the controller end to prevent someone “fixing” the unplugged phone jack by finding the wrong port for it. I decided to retain the controller only because I view the ground panels as only being put into play when the roof panels are shaded and useless – not very frequent for me. Thus 200 watts trying to charge 400Ah of battery capacity should be an uphill struggle, and both components are inside the camper, so any issues of a significant temperature difference between them should be not worth the concern. Nice to have, but not essential. The true voltage sensing is of much more interest.
The 150W pure-sine inverter was the only device not mounted inside the cabinet. That was to provide ready access to its outlet and power switch. Samlex recommended opening it up to replace its crappy cigar plug and thin cord with 10 AWG wire for my needed length to reach the hookup point. Except for the protective wire gland at the rear no longer fitting back into place, it went well. Samlex used common insulated blade terminals at the wire ends, so installing a heavier replacement line didn’t take long. I tested it with the 120-watt e-bike battery charger, and it handled it, no problem. I had the option to liberate and install my 300-watt Samlex instead, but that would get me into 8 or 6 AWG supply wire, and why do that to myself if it isn’t demonstrably necessary? Do I need 300 watts of 110VAC? I’m not seeing it at this point. No hair dryers or waffle irons on board. No doubt it won’t power my midget shop vac either, but that’s like antimatter in a rig like this. Everything is either smooth and wipe-able, or removable and washable.

With the Samlex inverter mounted out of the way but accessible, its new supply wires run along a slight gap and then back to the distribution blocks. The wires from the digital voltage display are the only ones leading to the closest battery. It’s powered now, but the camera’s flash washed out its green light.
Mounting the roof panels was intimidating, but went pretty smoothly overall. I had to first carefully locate the thinwall aluminum support beams underneath the aluminum outer skin. The Four Wheel’s lightweight roof is not merely one that you don’t walk on – you need to be careful where you place your hands and elbows while you’re supporting your weight while leaning over it. Solar panels can only rest on those beams. Four Wheel’s approach is to span all five beams with two long Z-mounts under their 160-watt roof panel, oriented sideways, then put sealant at the mounting holes and fasten it with two screws per beam with sheet metal screws. They then goop sealant all over the top to discourage water leaks through the new roof perforations. Z-mounts are kind of a zig-zag of extruded aluminum that bolt to the underside of the panel frame, extend downward to keep it lifted off the roof, and go out horizontally to provide a flange for mounting screws. It’s like a C-channel that missed a turn.
Hating the thought of drilling holes in the new Grandby’s pristine roof, I was originally planning to enter the modern era and use 3M VHB (Very High Bond) tape. It’s available in UV and weather-resistant versions and can generate some heroic bond strength numbers. Long used for holding automobiles and semi-trailers together, it’s proven. My own panel layout dictated mounts just long enough to span three roof beams, so I was going to slap a strip under each mount, and stick them down. Mentioning this to the owner of Four Wheel produced something akin to an anxiety attack. It seems that with aluminum’s poor fatigue resistance, grabbing on to the roof’s skin and going down long washboard roads could result in flex-induced cracks and leaks. The beams are all one inch wide, so I then reasoned that planting the tape directly over the beams and nowhere else could get around this. With a two-inch mounting flange, that would allow up to six square inches of tape per mount, certainly enough to handle half of a 20-pound panel resting on top of it. The benefit: no holes in the roof. Brilliant! Welcome to the twenty-first century!
As time went on, I let the idea flop around in my mind. Three issues reared up and started nagging at my confidence. One was my friend Matt’s reminder regarding me of the difference between theoretical perfection and cruel reality as far as “well, it should work” goes. The second was the fact that I could only get approximate with locating the roof beams, and draping tape off the edge of any one could start the flex train in motion. Third was the fact that, in case the layout needed to change for any reason at all, there was no getting those mounts back off without serious risk to that skin. Oh, there are ways to get the VHB tape to release, but they need good access, a lot of luck, and a willingness to harm/destroy whatever the most flexible component is. I chickened out.
So, screws it was to be, combined with decent adhesive sealant to keep the water at bay. All of the flexible sealants I’ve come across are intended for water runoff, not for immersion. In other words, they should not be submerged below a water line for long periods of time. That’s a concern, but fortunately, the Grandby’s roof beams contacting the skin are mostly front-to-back, and with some skin sag, the beams being the sealant locations, they represent the high points. At least that’s what I tell myself.
I perceived Z-mounts as problematic for getting panels back off again, since they can limit finger and tool access to any fasteners used to hold panel frame to mount. Once attached to the roof, I had no intention of ever disturbing any sealed screws again, ever. Panel removal to service wiring, diodes or connectors would have to be done by removing the panel from the mount. For that reason, I decided to use aluminum L-angle, sleeve the panel between the uprights, and apply sheet metal screws through them to go into the side of the panel frame. Four Wheel had cautioned me to use at least galvanized screws, to avoid corrosion.
That also got me to thinking about galvanic corrosion. Some metals do not get along in contact with each other. One will begin eating away at the other. I learned this when I wanted to replace the failed Muncie shifter on my decade-old Camaro with a Hurst shifter. It had developed the ability to engage two gears at once, requiring an impromptu slide underneath the car with a rubber mallet in order to be able to move it. The transmission had an aluminum case, and the shifter was fastened to it with threaded steel bolts. Easy. Undo three or four bolts, and slap the new shifter on. Those bolts would not move. I wound up taking it to a welder, who welded rods onto the bolt heads to force rotation. They’d work, and then snap off, or the bolt would break. More welding, more struggle. It took hours, and he was not real happy with the setup. There are compounds to slow down galvanic corrosion, but they do only that.
Today, I wasn’t about to rely on a steel sheet metal screw going into thinwall aluminum tube. I actually found aluminum sheetmetal screws, but just couldn’t get enthused about thread strength for such a short engagement. I finally settled on stainless steel, which is less reactive than plain steel. It kinda depends on the exact alloy used, but it’s much better in general. Since reach would make drilling and then driving screws in awkward on the center beams, I opted for stainless self-tapping screws, #8 x 1/2″ long. A lot of that length is devoted to the drill point itself, but my L-angles are 1/16″ thick, and the roof skin and beams are thin.
The first thing to do up top was to locate the roof beams. That was done entirely by feel. Prod at the aluminum skin, and/or run a finger along the surface while pushing firmly down. Fortunately for me, this worked quite well. With patience, I was able to confirm that all beams are one inch wide and apparently welded together in a jig, since they’re all very parallel. This consistency make it possible to use measurements from the roof edge to get in the ballpark and then confirm by touch.The roof surface tapers down once it gets close to the edges. Detecting just where this began was tough going, but I settled on eleven inches from the front and rear edges.
I was anxious about this marking stage, because too much error means a screw with nothing to bite into, or one that won’t be able to go in at all. Making a hole is bad enough. Making a hole that does nothing is much worse. Locating by touch is no slam dunk. In some areas, you can’t discern the rib and must move on, or it feels like it has moved a bit. Two of the center ribs, the ones supporting the roof vents, were easy, since you just pay attention to their mounting screws and use that as a beam centerline. It would have helped immeasurably had I left one of my L-angle extrusions uncut prior to measuring and marking the roof. A yardstick is too short and encourages drift. Since I figured no one would be officially inspecting the Grandby’s roof, I vandalized it with a fine-point Sharpie marker, as that’s what I had on hand. In retrospect, a dry-erase marker probably would have been a better choice. The Sharpie may take a couple of years to fade in exposed areas, and may stay intact underneath the panels.
The next step was to throw all the hardware up onto the roof, and see if my layout on paper was halfway correct. I taped the panel lower frame edges to discourage scraping the roof paint. The end result was gratifying. I had a bit more room than I’d figured on, and there was no hint of conflict between mounts that shared the center beam. On paper, mounts had shown up as needing to be 30″ long, but my first look up there suggested that 31″ might provide a little forgiveness in case of error. I was able to settle on a reasonable panel height off the roof surface, and marked the mounts for where each panel was along its length and where screw holes should go. I also marked the mounts with an individual identification, and marked each’s outline on the roof.

View from the rear. With everything placed and arranged, all of the mounts overlap the center roof beam.
Once all the stuff was back on the ground, I began drilling mounts. The plan was then to attach all of the mounts to the panel frames with the self-tapping screws, three per mount, and get these assemblies back up up on the roof for permanent mounting. Putting the mounts in place, I noticed an unsettling thing: the aluminum solar panel frame was thin enough that getting the fastener torqued tight without stripping the new threads in the frame was going to be a dicey affair. A power drill needed to be used to accomplish the drilling part, but I set its clutch way down and finished off the tightening by hand with a socket driver. I have a pretty good sense of when is enough, but I still managed to strip one. The DeWalt drill’s clutch setting was at 9, which was needed to get through the threading part and into the tightening stage. I realized that there were two things working against me here. It wasn’t solely the frame thickness allowing stripping. Standard practice is to use screws and bolts only in places where they push and pull, not try to slide sideways. Here, I was purposely using them as projecting pins that the panel could rest on. That’s okay, but that lack of wall thickness could possibly allow the screw to tilt in place, stressing the frame’s meager threads. The screw might slowly back out. My contribution to the issue was pre-drilling holes in the mounts, as if using the screws as pure locking devices. I should have let the screw itself do all the work, effectively doubling the material thickness. So, I added a couple of screws per mount in that way, and knew I’d need to eyeball all of the screws in a month or two to check for bad habits.
The next morning, with the panel assemblies on the roof, I spaced them up off the surface with a couple of 2x2s I scrounged from a dumpster here in the park. Looking at the Sharpie marks made it an easy matter to apply sealant to the roof where the screws would go. Then carefully plop the panel down and drive in the self-tapping screws. These needed even less torque to cinch up, at a clutch setting of 3. I’d then do the final tighten by hand. They seemed to hold purposefully, but had that same mushy feel as the panel frames had. And I stripped one. Suspecting such treachery the night before, I’d mulled over whether the drill points on the self-tapping screws might be a tad too big for aluminum, and resolved to drill a second set of holes in the morning, to double the number of roof fasteners. Again, the Grandby’s roof is just a little too wide to get one’s reach at center and start playing with both hands. Frankly, I’m counting on the bed overhang’s low profile, bluff front, and the Earth’s gravity to ease upward stress on the fasteners. For the mount to panel frame, I would have been better off not pre-drilling holes in the mount. In the case of the roof, it probably would have been better to pre-drill the roof beams with a slightly undersized drill (compared with the self-tap drill point), and then wrestling with a stainless version of a common sheet metal screw. Surely Four Wheel is not stripping panel screws.
Before the last panel could go into place, I had to connect all the panels in series and splice in a special SAE elbow connector to the wires. I have several SAE connectors, but this is the only “bent” type of its kind I’ve seen, and Four Wheel supplies two of them with each camper. It allows solar panels to be mounted quite low, whereas the usual straight connector is too long. It is best to hide this connection under a panel rather than let it be exposed to rain, where water can works its way in to the contacts, and corrode them. The only solution there is to pack it full of dielectric grease, and periodically check it. This panel, located on the driver’s side at the midpoint, is the only one that I mounted such that only enough panel screws need be removed to allow it to be hinged up for plug access. Hopefully, I will never have to find out how that works out. Done right, solar is boringly reliable.
Having said that, I was disappointed to plug the roof panels in just before final button-down, and descend the ladder only to find that the TriStar’s LED indicators were dead. No juice. Admittedly, it was just at sunset and the Smart Harvest was nearly dead now too, but I was hoping for some sign of life, like a battery charge status. I went back up and took a voltage reading: 80 volts. That’s good. The problem is somewhere between the roof port and the controller. I kept fearing that I’d reversed polarity when grafting in Four Wheel’s plug (which would blow the TriStar), but with all the double-checking I’d done, this was about as likely as my being swept off the roof by a pterodactyl. Besides, I’d already plugged a single solar panel into the roof port weeks before. It was now the end o’ the day, about 7 PM, and the small screwdrivers I’d need to remove the TriStar’s front panel were packed away. I called it a night.
The next morning, yep, it was still dead. No magical gnomes had helped me out overnight. I got the controller’s panel off and was taking all input voltage readings at the terminals. That was odd – they were up and rolling. Panel power was reaching the controller, and battery voltage was 13.4V. 13.4? If the controller were dead, the battery voltage would read 12.8. It was charging, alright. Were the LEDs fried? Head on the floor, I looked under some cooling fins and looked hard. Its very dim green LED indicated that it was still in bulk charge stage. So nothing was broken – with its back door open, the interior of the Grandby is apparently so bright that it dims out such things. Never been happier to make a mistake. The LED digital system voltage display that I installed later has the same issue. Shield it with your hand, or close the door, man.
As I finished up the panel installation, I stuck a few of the 3M cable clamps to the underside of the last panel, to lift the extra wire lengths off the roof. It’s a light load, but then again, the dark panels can get hot in the sun and make the adhesive fail, so we’ll see whether science can defy nature. I saw that the panel-to-panel solar wires were having to snake their way around the blade-like mount ends. I’d made sure to smooth them, but even a butterknife edge can work its way into insulation over time. Before the adhesive sealant had even set up, I closed up shop and headed toward the far end of Yuma (some 27 miles away) to obtain protective sheathing, usually called split wire loom, for the solar wires. I limited my speed to 60 on I-8, and never noticed any panels whirling off into the scrub, so I guess gravity and the bluff front edge of the bed overhang did their jobs. The 3/8″ loom size needed some stretching exercises with a socket driver shaft to make it willing to take in cable without simply folding under. Once on, it looks like it will help considerably. As a temporary help, I added several 3M mounts along the central beam where all the wires are. I say temporary in that even if the base pad survives exposure, the cable ties won’t. They tend to last about a year and a half before getting brittle and breaking. Hey, it’s something until a permanent address toward vibration smacks me in the face. I have a schedule to keep. Now realizing the intimate details of the topside wiring, I returned to what is now the electronics and household chemicals cabinet to install a 15A fuse holder on the positive lead of the incoming solar harness. There’s a 10A fuse in the rear wall line as well. I prefer to pick and choose my adventures, not have them waiting in the weeds for me to pass by.

360 watts may be wretched excess as far as roof panels go…unless you travel outside the ever-sunny Southwest and don’t want to be constrained by weather. With ground panels able to chip in another 200 watts, the next logical step is to study actual power usage for at least a year, and then decrease battery capacity if possible!
The climax of this installation was the roof lift effort. I’d added just short of 80 pounds of panel and mounts, evenly distributed front to back, but asymmetrically on the centerline. The rear of the roof is generally lifted first. Being reasonably decrepit, I feared an effort near my maximum. Nope. It took a decided shove up with the shoulder on the push board, but wasn’t as difficult as I thought it would be. By the time it’s high and just up to your arm strength alone, the optional 40# lift struts have kicked in and are doing much of the work. The front lift went much the same, even though that lift point is back aways from the forward edge. This lift is more sensitive to the weight being off to the passenger side, and it’s a good idea to favor it. Once high, the bar that you shove forward to help lever the panel all the way up helps considerably. Bringing the roof back down will require more care, both from an effort standpoint and the need to get out, lift this or that corner of the roof a little in order to tuck the fabric in and away from the edges before latching the roof down. It should be awhile before I have to seek mechanical assistance.
That’s basically how the Intrepid’s solar power installation went. As far as fasteners go, I recommend trying the drill and sheet metal screw approach before duplicating what I’ve done. Actually, I recommend not drilling the roof at all. Spend the big bucks and have the factory add the Yakima roof rack, then add a panel platform on that, however you want to.
Aside #1: During my research, I came across the concept of deliberately having more solar panel wattage than your MPPT charge controller can handle. Why on earth would one do that? Well first, I’m talking about something that is apparently exclusive to Morningstar products. Put 400 or 600 watts of panel on a SunSaver MPPT that’s only rated for up to 200 watts, and the controller will limit charging to its rated maximum. Morningstar calls this power shaving. The rest is lost to heat by the controller, which explains the big cooling fins and the recommendations for not installing it inside a breadbox. Other controllers will simply chop off output (at best) once their rated maximums are exceeded, and charging stops.
So, why over-panel and power shave? There are unique situations where it can work, and panel upsizing is normally very modest, not extreme. But it can be done. If your batteries are of a type that needs a limited maximum charge rate that you shouldn’t exceed, and your controller already maxes that out, you’re pretty much stuck for how long they can “stay on the charger” per day. The only way to extend the charge time for fixed panels, and make more power available for more of the daytime is to add panel wattage. Adding more panel power is usually cheaper than adding batteries or getting a bigger MPPT controller. The cost per watt of solar goes down as output goes up. In overcast or mixed-sun days when battery capacity becomes problematic in an RV, the usual solution is to add more battery capacity to tide you through (which I’ve done in my Grandby with very obvious drawbacks), add more solar panels to recharge the bigger pack, and replace the controller to handle the additional panel wattage.
In this scheme, “excess” panel capacity is put to work in two basic situations that revolve around marginal light conditions. At sunrise, the sooner a panel can get on board with any voltage above that of the battery, the sooner charging will begin. For fixed panels, a larger panel will generate more output than a smaller one, and do so earlier and throughout the morning. At noon, there is no advantage and the excess panel power is trimmed off. In late afternoon the advantage returns. It’s the same for poor sky conditions. Use a big enough panel, and you can charge fully instead of just nudging the battery a little. This really comes into play in the Pacific Northwest or upper Midwest, where prolonged lack of sun can be an issue. If your battery pack does the job and is as large as you care to use for space, weight or cost reasons, but isn’t big enough to cope with two days of overcast, then upgrading one component to carry you through usually means upgrading all three. With the Morningstar at least, you have the option to add only another solar panel, so that poor-weather recharging works better. Since the problem disappears in full sun, it makes little sense to pay for and fix what ain’t broke. Interesting, no? There are technical spec limitations on matching controllers to panels for this duty, but Morningstar offers what they call an “MPPT Technology Primer” in PDF format that covers this whole topic well. A caution: don’t try this at home, folks, not without a Morningstar controller and a willingness to follow instructions about matching limitations.
Aside #2: I’ve come across forum complaints about how hot pop-up truck campers like the Four Wheel and ATC can get in full Southwest sun. That thin tent fabric seems to let the heat radiate through, which is why both campers offer a form of interior liner. It’s not so much insulation as creating a dead air space in front of it. I’ve noticed that my camper stays cool as long as the top is lowered, which lets its sidewall and roof insulation come into play. Raise the top, and you can feel the heat jump up from its overnight low. I believe there’s a heat gain with the roof raised, but my doubts as to its violence are beginning to creep in.
It started when I went out to check the fridge thermostat adjustment in the Intrepid yesterday. It was 3 PM, 86 degrees ambient temperature. I’d been sweating in the Defiant, which was wide open at 92 degrees. Yet it was only 88 in the Intrepid, which was closed up except for two window shades on the shaded side. Odd. There was no air circulation at all, but it had climbed only 2 degrees? I assumed it would be like the hot box at an Arkansas state prison camp.
The next day I checked the fridge again at 2 PM. This day was 88 degrees ambient. It was an unpleasant 94 in the Defiant, which had remained closed up just like the truck camper until that point, windows shaded. It was 89 in the Intrepid, also closed up. By 4 PM, ambient had dropped to 87, the Defiant had increased to 97, and it was 92 in the Intrepid. Why the disparity between the two RVs? Perhaps the window shading style of the Intrepid is better at preventing a circulating hot air source, though this only applies to the windows in the tent section. The lower glass windows have curtains. The door window shade was up, letting in afternoon direct sun. It’s hard to imagine through-airflow as boosting heat more than sealing off does, after a day of sun on that tarp.
I don’t know, but maybe I’ll get a clue once I hit the road. Until then, I suspect “they doth protest too much”. Try a round in the Defiant travel trailer!
…Now, to work on the ground panel storage rack.

I’ll have to read this again in the morning. I might want to take notes.
Glad you’re finding something worthwhile in it, JR. It is a bugger to saw through, isn’t it? I should have split it in half. Notice that some of the info is, “don’t do what I did!”, but at first blush, the installation all seems to be working and staying together. Actually, the most important takeaway is probably to keep wiring from moving during travel, or when accessing stored items. Four Wheel has this down pat.
“Don’t do what I did !” is a great lesson. lol
Seems to me keeping most everything that isn’t supposed to move from moving is a big part of mobile living.
Well, I’d hate to paint a “look what I accomplished” picture that didn’t accurately portray how it actually went. Not helpful to people considering the same thing and interpreting it as a “how to” that works perfectly. How right you are on your thinking about movement, too – fast and loose is not good unless you’re really into cleanup and/or repairs.
wow, that is quite the adventures in DIY episode. I think it’s put me off solar DIY for the time being, especially on a FWC.
I was following along, step by step, wincing at the stripped screws. Gripping stuff. 🙂
Thanks for the info, I’m sure that it will come in handy down the line.
Aw, keep in mind that insisting on wretched excess with anything will serve as its own punishment. Probably the majority of buyers wanting solar opt for the factory options for batteries and roof solar, then maybe add their own ground panel. They most often feel it’s more than what they need. Some go roof-only and add a ground panel or bare suitcase once they find that winter low sun and the roof panel can’t feed their fridge. Most dealers doing an after-delivery roof install would likely know and use the factory parts and procedures. Four roof panels is kinda asking for trouble anyway. I think that the Overland Explorer guy with the JTAC used the less efficient but workable self-adhesive strips, once he had his built with vents along the centerline. No complaints. You might try to contact him to get particulars. If I shied away from the roof and didn’t mind dealing with a couple of ground panels all the time, I’d just order batteries or the battery prep. With those packages, everything is just waiting for you to hook up your controller of choice, plug in your ground panel, and go. Other people have installed roof panels and simply showed the end result without complaint, so I really do suspect that either they are stoic, or I made an unfortunate choice of fasteners.
lol, that’s good. It’s good to know that there are variations on plug and play that I could choose. Sometimes I’m happy enough to muddle along with extreme DIY scenarios, but I never want to end up like some youtubers I watch who go through one cheap battery after another, never suspecting that they were ruining them over and over with insufficient charging and maintenance.
Pingback: Not So Smart Harvest | Strolling Amok