
Fun With Awnings
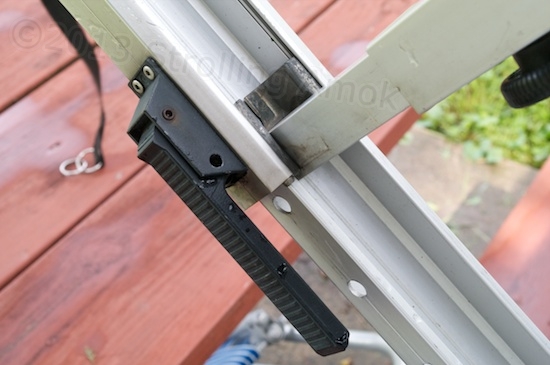
The awning has two of these telescoping arms. Yanking out the handle disengages a pin from a hole, and the arm can be retracted. Easy, yes? The square post coming toward you is just a brace.
Early one recent morning, I awoke to find a large thunderstorm approaching, and I could tell that it would be a windy one. The forecasts here rarely mention potential wind speeds, so I clambered out to retract the awning. Unlike the solar panels, it does react to winds much over 10 MPH. The retraction process is quick and easy: just pull a locking handle on each arm that holds the awning out, and allow each arm to telescope to its shortest length. Then unlock the roller and allow it to move up toward the trailer, gathering the fabric as it goes. It’s a lot like a big window shade. Trouble was, one of the two locking handles failed just then, and that arm stayed extended. The pin that it controlled couldn’t be persuaded to retract with tools, and the handle was riveted on, so it could not be removed. The rain began, and I found that the awning does not slope enough to drain all water, so between the wind and the trapped water, this posed a problem. One of the poles holding up a solar panel was pressed into service to bulge the center of the fabric up and it helped, but not enough. A quick consultation with the manual suggested a “wind and rain” position, which involved shortening just one arm, causing a pronounced slope to one side. It worked.
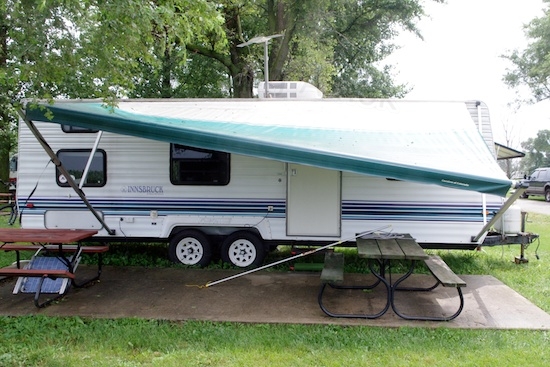
The awning in the “wind & rain” position. It helps a little with wind, and a lot with rain. And, if you’re careful, you can still get the door partially open to get back in.
Once the storm had passed hours later, I broke out the power drill and removed the handle by shearing through the handle’s rivets. Looking up the nearest “Carefree Awning” service place, I was at first optimistic. My model, the Fiesta, was still in production, and I had the assembly’s original part number. I called in, and the service person thought they might actually had some in stock! It was not to be, however. They had handles, but my number didn’t match what they had and was not on their list, so they asked me to email them a couple of photos to look for an interchangeable part. No soap. My handle was obsolete, no longer available, and not close enough to what they had to fake up a repair.
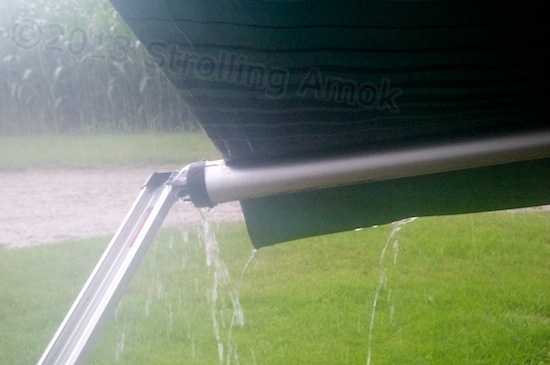
The view out the office window after the rainfall had lightened up a bit. One could harvest drinking water in the desert this way, except that it usually rains only enough to wash the dust off the fabric.
A dilemma, to be sure. A new awning, at $600 without installation, was clearly not an option. True, the fabric is full of pinholes and all the plastic mounting brackets are brittle from the sun, but I don’t use the awning much because of the usual wind conditions I’m in. So I did two things. I wrote Carefree an email asking for another option, and while waiting for a response came up with a couple of Rube Goldberg fixes. At less than a dollar for a carriage bolt and a self-locking nut, I faked a new “pin” to mimic the original handle’s pin. Another option was simply to slide in a $6 cotter pin that includes a wire retainer, but I’ll only escalate the quality of the fix if warranted. In the meantime, Carefree wrote back saying that the handle design had changed in 1997 and that the current handle can be retrofitted in as long as care is taken to locate it, and pop-rivet it in so that its locking pin lines up as needed. I may inquire at the dealer about that, the potential stumbling block being the cost of the $25 assembly and the fuel required for the 70-mile round trip (about $20). The bigger issue is actually that rivet. If, like the originals, it doesn’t allow access from the rear without disassembling the entire arm, then it’s not gonna work out for me. No way to reach full extension on the telescope without disassembling the whole thing and dealing with a powerfully-sprung roller to boot. If I can get access through one of the locking holes, I’ll have it made, except that I gave away my pop-riveter before I left. “Why on earth would I ever need a pop-riveter?” I thought to myself.

See the pin? Pulling the handle forces it to retract – but not today.
Tested later in decent weather, the carriage bolt setup works okay. It’s a little fiddley since you only want to pull it just hard enough to free it from the hole it’s engaged in, and extending the telescoping arm is clumsier without a nice projecting handle to yank on, but it’s do-able. I was able to bend the original spring so that it constantly tries to push the nut and bolt into the nearest hole, so there’s little worry about it popping out and disappearing on the road. The new setup is clearly not as good as the original factory assembly, but it’s good enough to do the job.
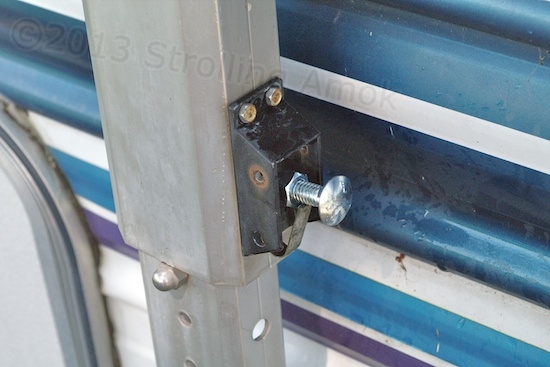
Voila! Its cost makes it beautiful.
The only iffy part of the thing is the two fasteners that replace the pop rivets. In hindsight, it would have been better to disassemble the handle in place, leaving the rivets alone. They’ve now been replaced with two shortened sheet metal screws biting into 1/8th-inch thick aluminum. Not the best. The good news is that all they do is keep the handle base from falling out of its tight-fitting rectangular hole. There are no side loads or extraordinary push-pull forces in normal use. As always, use in the field will determine ultimate success or failure.

you have my sypmathy. Awnings are nice but certainly problematical. At least that has been my experience in a Class C and now in a travel trailer. you came up with a good solution. RVers have to be problem solvers.
Thanks, Pam. CHEAP RVers need to be problem solvers, anyway. If I were going to use it frequently when boondocking, I’d get the new handle. But, this trailer spends a lot of time rocking in the wind out there in the desert, so in my mind a legit repair isn’t justified when the budget is tight. I never bothered to open it once for the first nine months I’ve had it!
Dad, I’m glad to hear you engineered a solution for the main issue. But let’s not forget the pinhole sized holes in the fabric and dried out brackets. Two words; duct tape.
Hark, do I hear a celestial choir? “Duct Tape, Duct Tape, O salvation of man’s repairs gone awry!” I actually used it on the road coming here, when one of the two catches on the office “emergency exit window” failed, and the air pressure was trying to flex the glass outward and pop the remaining catch open. I wasn’t pleased with how it looked, but was proud of how it did the job. Proud, I say! Proud!