
The Aurora Frankenstein
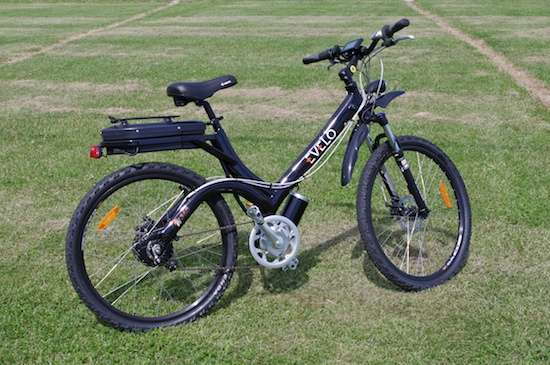
The stock Aurora, as originally delivered. From here on, it’s just a myriad of bolt-on details.
[Boredom alert: This post is an incredible 8,900 words long, which may induce coma in certain persons. The first half consists of much whining, and relates how the various modifications to the Aurora came about, as a methodical ordeal. The second half gets down to the specific parts used, with links. So feel free to skip on down to the subtitle “Modifications Parts List” if you find your eyes beginning to dance around in your head. Or, just look at the pretty pictures. Gearheads will want to saw all the way through, if time allows.]
Turning a more powerful Evelo Aurora into a rough approximation of their more practical Luna model is not necessarily an easy thing. In my peculiar situation, it’s difficult, even if you restrict the types of modifications to the “bolt-on” category. After all, there’s no place inside my dry trailer living space to work on it, and it certainly can’t be left disemboweled outside in Midwest thunderstorms. Tain’t the kind of project that can sit around unused for weeks or months, either. It needed to have new parts grafted on and be put into service, pronto. With just two months to order, receive, and then modify to completion, I was on the clock. It appeared to be difficult, but do-able.
The principal difficulty is certainly not bolting the parts on. It’s finding parts that will both do the job and fit first time, out of the box, sight unseen. The assortment of frame styling oddities that define the Aurora’s unique appearance also work against accepting many conventional bicycle accessories. (And yes, I’m still receiving unsolicited compliments about the Aurora’s appearance.) Evelo Customer Service can help resolve some compatibility issues, but it’s a big accessory industry out there.
If you haven’t been following this series, you may ask why I’d choose this e-bike in the first place, then. You need to go back and read the earlier posts (Part 1 & Part 2), but the short answer is that the Evelo Aurora is the only production e-bike I could find that includes the powertrain features I want: 500 watts in a mid-drive configuration, NuVinci 360 gearhub, and both throttle and pedal-assist control. Plus, a minimum 10Ah battery and front suspension as well. Mid-drive e-bikes are uncommon, and the Evelo Aurora is the needle in the haystack, as far as my unique needs are concerned. As mid-drive e-bikes go, it’s well-equipped and affordable as a starting point.

The Aurora is now convertible for each day’s tasks. This is basic Heavy Hauling mode, with 100 pounds of groceries towed behind.
So the Aurora slips smoothly into the “Foundational Requirements” list, but then kicks and screams as it’s being unceremoniously wedged into the “And I Also Need…” list. The 500-watt Aurora is offered as a very capable leisure/exercise/hobby bike, but not as an upright cruiser mountain-trail pack mule. That’s too odd. Evelo’s rather gutsy 2012 4,000-mile Trans-America trip used an Aurora laden with a generous tote bag strapped to its integral rear rack. Everything else had to be pulled behind in a bike trailer. (The Aurora made the trip needing a ball-bearing replacement, while its B.O.B. Yak trailer flatted a tube and blew a tire.) So here I am, needing it to live outdoors full-time, abused for years instead of months, and carrying extra equipment over much more varied off-road terrain. And it needs to ride like its Luna kin: rider upright.

With fenders, rack and basket clipped on, it can run solo on errands, or use the trailer to take laundry to town or safely carry photo/video equipment and a lawn chair to local events.
First order of the day was to replace the Aurora’s seat, which is good enough for who it’s for, but a lingering death to me. Conventional bike seats have already done enough nerve damage to me over the years that my hornless Spiderflex seat was the first thing that had to swapped in, and quickly.
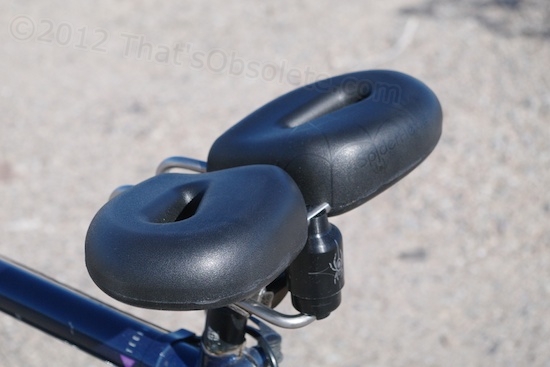
The Spiderflex seat is one touring item that prevents the nerve damage caused by conventional horned bicycle seats, and in comfort. Looks wonky, works superbly.
The second issue was to get the rider position ergonomics straightened out. Evelo kindly sent me a Delta handlebar stem extender to raise the handlebars, but since the handgrips must also be moved rearward, recommended a narrow aluminum Nitto cruiser handlebar with the assurance that the bike’s assortment of cables and wires were long enough to still fit. Changing these parts over is no big deal – except for the excellent Ergon mini-grips. They’re held in position by friction, and I’ve had enough past experience with grip swaps to know that I didn’t want to struggle, cursing for an hour before I stabbed my hand with a detergent-coated screwdriver. Nevermore. So I delegated the handlebar mods to a local bike shop. Let them stab themselves.
But hold on. Before I could hand it over, I had to check out anything else I was going to add to the handlebars. Now and then, you find things that can’t simply clip on, but must be slid on over one end of the bar and tightened. That would require removing a grip again. The bars are already carrying the LCD display, brake levers, throttle and shifter collars, and grips. That USB power port in the display made me start thinking about mounting my Garmin Nuvi GPS up there. Mounts for iPhones and even iPads are readily available, but a holder for my particular model of Garmin, not so much. I did find one though, even if it’s really sized more for a motorcycle handlebar. I ordered it and a special 1-foot USB adapter cable, figuring that it would be long enough when the GPS was mounted somewhere on the left side of the handlebar.
With the GPS mount in hand a week later, it was clear that waiting to swap had been a good idea. No way was this mount going to go on without sliding it over one bar end. It took a healthy dose of fumbling play to realize that real estate along the new handlebar was at a premium despite its longer tube length. To keep the need for longer wires and cables away, it’s a narrow bar, and much of it is taken up by aggressive bends. It would be an easy matter for the GPS to partially block being able to see the bike’s display or its control buttons. To avoid that overshadowing would tend to skew the viewing angle of the GPS off to one side instead of directly facing the rider. Not good. With no handy ball & socket GPS mount in sight, I’d have to have the bars swapped in and then simply keep relocating the GPS mount to some halfway-acceptable position back at the ranch.
Fenders were a big issue, even though I wouldn’t need them even 90% of the time. Why? The Bonneville Salt Flats, an item that looms large on my bucket list. I want to see some of the land speed record attempts that take place there, and there’s no way I’m going to take the Mighty Furd on the salt again to get photos up and down the course, even if that were allowed. The vestigial split fender perched on the front of the Aurora is more of a styling statement than a protective device, and some way had to be found to protect the Aurora’s electricals and metal from thrown salt.
Bonneville’s salt is especially awful. From pictures of some of the competition vehicles that have run there, I figured it would be a fine, powdery dust. It is. But it can also be a moist, granular clay of sorts. It’s very easily caught by the tires and thrown, and builds up in thickness at a rapid pace. Then, it clings with a tenacity that defies being washed off even with a high-pressure wand. Use high enough pressure, and you’ll drive it past seals and seams into areas that you really don’t want it to be.
Such bike fenders are called “full-coverage” and are not often seen these days. The bikes that use them provide integral mounting lugs to hold their thin support struts. The affordable Aurora lacks those lugs of course, but its front suspension greatly complicates the issue. Rear fender mounting is not normally as much of a problem, but the Aurora’s frame design limits even that possibility. Ever helpful, Evelo recommended one set that requires the use of “P-clamps” adapted from electrical conduit service to attach fender stays, plus a spacer or two to wrap around frame and fork members for a tight fit. I looked at more fender designs than you can shake a stick at, and finally came up with one other possibility, however dim.
That was the “Speedez Fenders XL” set by Planet Bike. Designed for temporary use on mountain bikes, they are made to fit bikes with front and rear suspensions when no other fender style will fit. I ordered a set for a trial fit.
Moving rearward, I was determined to mount a more serious and pannier-friendly rack. I’d already bent up and weakened the Aurora’s Samsung rack while hauling a rolled-up mattress topper back to camp during its first-ever use, and it wouldn’t accept my milk crate basket without butchering. I just wanted it off of there. Panniers are simply the equivalent of saddlebags for bicycles. Not that I had my heart set on panniers, but I wanted an adaptable carrying system able to accept those, or rack-top bags, or open baskets. I had particular usage needs in mind, but for some things, you don’t know until you’re out there just what changes you’ll be needing to handle the various errands at a particular campsite. A rack system that could only handle one type of carrying device would not cut the mustard.
The hunt for racks that even had a minimal chance of fitting the Aurora proved elusive, mainly because its battery is already occupying the traditional rack space. And, lacking rear seat stays (tubes that run from the seat area to the rear axle bracket) would tempt some panniers to get sucked into the wheel spokes. The rack would need to offer special frames that would hang down to prevent that possibility. The absence of rear stays also complicated how most racks mount at their front end. I was in trouble, accessory-wise.
After a long search, just one rear rack appeared to be a possibility, the Topeak MTX BeamRack. This is a wonky rack that clamps firmly onto the bike’s seat post, and nothing else. The bad news was that it has a 20-pound weight limit rating, and going above that can cause it to gradually swing off toward one side. After all, its only point of contact is the seat tube. Of the BeamRack’s four variants, only one had a chance, the “A-Type”, designed for extra-small and small bike frames. The Aurora’s frame is neither, but the only way for the rack to mount to the seat post and still clear the battery is for it to angle up, way up. The Aurora’s frame is rated at 20”, which is actually quite tall, so the needed seat height for me doesn’t expose very much bare seat post to clamp to. No way I was going to guess and hope on the Internet, so I found a local bike shop. They had a different Topeak rack variant, but were willing to special order me the A-Type and then simply return it to stock on a refund if it didn’t fit. Done. The guy behind the counter suspected that the seat post would need replacing with one that held the seat further forward and out of the way, giving a bit more open space to the rear. Time is precious, so I ordered that too, in a preemptive move.
When it showed up a few days later, I hauled the Aurora over for the moment of truth. It fit, sort of. At my needed seat height, it slightly interfered with both the Aurora’s stock rack and the existing seat support hardware. Good guess on bike shop’s part. Dismounting the Samsung rack from the battery case and replacing the seat post with the new one would make it fit, just barely. The new seat post located its seat rail clamp further forward, to get out of the way. The new post was far too long to go very far into the Aurora’s curved seat tube, and would have to be carefully cut, since the Aurora doesn’t supply enough straight receiving tube to allow for much adjustability. But, with everything just so, it would work. Note to self: Don’t do anything to make my legs any shorter, or there won’t be enough exposed seat post to accept the BeamRack’s clamp. My clothing inseam is a rather stumpy 31″, so you may not have this issue in getting enough exposed seat post for the BeamRack.
On the way out, I picked up a Topeak MTX basket to match, a generously-sized coated wire basket with a slide/clip system that holds to the MTX rack securely, yet can be released and removed in an instant. It’s large enough of hold the Aurora’s spare battery, which is a rare capability. Even the biggest expanding bags can’t do that. The basket is also slightly more capacious than my milk crate, so I figured it would be the best first-choice carrier to start with. Both of these items cost considerably more in a bike shop than can be had on the Internet, but I feel that going back home to order after getting my answers at a shop is not an acceptable option for me. It’d be one of those “I feel dirty!” moments. These guys pay for stock, have rent, taxes, lights, heat & A/C, and have to eat. Paying them for their help and for being convenient is a humanity thing. People helping people.
I had thought hard about various front carrier solutions, and became pessimistic about weight capacity, shifting out of position, and ease of dismounting. Plus, they would probably compete with the fenders for mounting space. The only acceptable solution I found was a front rack made by Thule, which mounted to the front forks despite the suspension system on them. Ultimately, I shied away despite its excellent fit and strength, mainly because if I can avoid carrying weight on the front forks, I will. I don’t like the steering problems caused by weight fighting the steering action up there, nor the idea of weight bouncing around on the unsuspended part of the fork. I often find myself having to thread my way between potholes and broken pavement, and perching weight over the front wheel makes that more difficult.
But, frequent minor supply errands aside, I regularly need more weight and volume capacity than most regular bicycles can provide. Think of bags of laundry, and food consisting mainly of produce. Enough perishable and bruisable food to last for a week or two. Two sets of large rack bags with big panniers would do it, but would take forever to carefully stow aboard. Not going to happen on the Aurora anyway.
The solution: a bike trailer. If you’ve been reading along in this series, you know this is already a done deal. There are many brands and styles to choose from, and I’m not going to go through all the options here. Some mount to the seat post (already occupied in my case,) and some mount to the rear axle. Some have two wheels and some have just one, leaning with the bike. My prior experience with kid-hauling two-wheelers pushed me away from the latter, since they are happy to tip over on rough ground, and make threading the gauntlet of bad roads more difficult. Except for that, they’re great. The gold standard for one-wheelers is the B.O.B. Yak, oft-used by long distance cross-country cyclists. Trouble is, I didn’t know if its axle mount would fit a full-fendered Aurora with it’s funky NuVinci hub. Evelo assured me that it would.
One other modification came to mind just before a test charge up a hill near my campsite in Sandwich, Illinois. It was mostly a gut-feel thing about the Aurora’s lowest gear not being low enough for conditions in the Great Southwest. Waiting to alter anything later, on the road, would be close to impossible. So I pedaled up Sandwich’s soft-earth climb over grass, which was not brutally steep, but the combination of slope and soft ground sucked power like nobody’s business. With all mods needing completion promptly, I inquired about sprocket changes with Evelo. Their advice was to change out the 48-tooth front sprocket to a smaller one to give the motor (and myself) more leverage. If I limited the new sprocket to 44 teeth, I might not have to shorten the chain. This sounded good to me, since I was looking for a little more leverage rather than an ability to pull out tree stumps.
So, I dropped off the Aurora at the bike shop for both this change and the handlebar swap. It partly succeeded and partly didn’t. Changing out the front cog, an easy procedure on a normal bicycle, proved a challenge for the bike shop because it involved disemboweling the ratchet mechanism of the drivetrain, a nasty business. They wound up calling Evelo for a talk-through and apparently succeeded, though the new chain protector ring had to be slightly modified before it could fit over the Aurora’s ratchet drive cover.
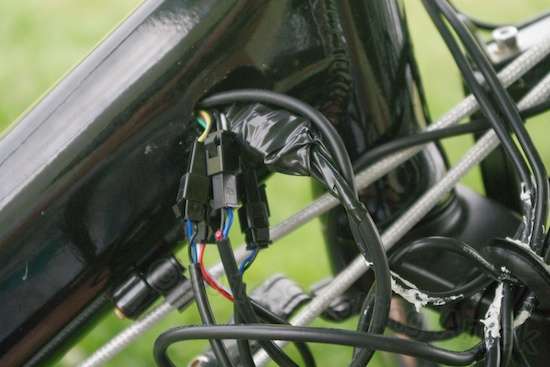
The other issue involved the handlebars. The shop had succeeded in swapping in the Nitto handlebars, despite the two straight grip areas being too short to hold the grips, collars and brake levers. They had to trim off some of the Ergon grips to pack it all on. Not a problem. The problem was that the various electrical wires running from the bike frame to the components on the new handlebars were way too short. The Delta stem extension to lift the bars higher was a definite no-go. This was a show-stopper for me. If I couldn’t get the handlebar grips up and back, I would be pedaling bent forward, putting too much weight on my wrists and hands to be able to go very far. Prior to purchase, Customer Service at Evelo had assured me that wire and cable lengths were more than long enough to accommodate the combination of parts they recommended. Now, I figured I’d have to splice in extra lengths of wire, something I’m loath to do with electronics, especially when the clock is ticking.

The installation of the Nitto handlebar alone showed that wires coming out of the frame were too short already, overstressed in a left turn and killing the idea of raising them with the Delta Extender.
Disappointed, I emailed Evelo, who apologized and assured me that the wires were long enough, but that the extra available length was still inside the front section of frame. They sent me a link to a video outlining just how to ease the extra wire out, hopefully without ruining the existing connections to plugs and sockets that the wires led to. These are simple computer-style connectors, which explained Evelo’s earlier recommendation that the hole in the frame that the wires came out of be sealed against moisture. The rubber “O” gasket they fit works fine for normal usage, but 24/7 weather exposure on the road calls for a more aggressive seal to slow down corrosion on the internal connectors. It’s a risk management thing.
Coaxing the wires out of the frame to give more available length wasn’t that difficult, and I began wrapping the internal connectors with tape while I was at it.
I had to wait a week to try to ease the extra wire lengths out, because of rainy weather. I also used the time to build up my nerve, because I wanted to wrap some premium electrical tape around the connectors to help protect them for the long haul. Both Evelo and an engineer friend of mine recommended shrink wrap, but I was reluctant to leave things hanging out long enough to measure and locate tubing of the needed diameters. Past experience with shrink tubing had also left me unimpressed with its ability to shrink enough. I was also reluctant to separate all of the various connectors to get it on, for fear of one accidentally retreating back inside the frame tube, so I simply faked it with tape – really good tape. The connector wire attachments shown in the video looked fairly flimsy, and it looked all too easy to pull hard enough to separate wires from connectors, a situation which could leave me with a wire in hand and a connector deep inside the frame tube.

With the connectors tucked back inside and the extra wiring left outside, I now had enough wire length to raise the handlebar.
My, those wires were packed in there, catching on each other as I urged more length out. I was able to get all the connectors out except one, which appeared to be caught on something inside. I wasn’t going to insist. I taped what I could, and reinserted the minimum. I was relieved to find that there was now enough wire outside the frame to reach what I needed, and everything still worked, so I hadn’t broken any connections. Rather than goop more RV sealant around the wire entry hole in the frame this time, I drooped the wire bundle downward just outside the hole, wrapped the area carefully with the 3M indoor/outdoor electrical tape, and added a cable tie to keep it bundled and provide a drip point for water prior to the taped and gasketed opening.

My hope is that drooping the wires down and wrapping the rubber seal entry point with tape will discourage rain entry into the frame.
With both the Nitto handlebars and the Delta stem extender finally in place, it was plain that the handlebar grips were still too far forward. Still not there yet. With time closing in, I ordered a short-reach handlebar stem on the Internet, and it helped.

Installing the new short-reach stem and Delta Extender got the bar into final position, so each black wire could be individually adjusted before sealing the frame back up.
The Planet Bike’s Speedez fenders wound up fitting very well, as it turns out. They are no big deal to install and remove without tools, and stay nicely in place even on rough roads. You basically set their integral mounting pads against the frame or fork members, and loop stretchy rubber wraps around them to hold them in place. Their one black spot is that one of the molded locking lugs came through incompletely molded, and a few of the vinyl caps meant to protect you from the fender stay rod ends were missing. Fortunately, the locking lugs are designed to work a couple of ways, and the alternative method of wrapping the rubber cords works okay. Their downfall for Bonneville is that the crossmembers on the Aurora’s rear frame and front forks are the same as any other bike, and keep the fender close to the tire. Moist salt buildup may quickly cause interference between the tires and the fenders. We’ll see. Even fitted close, the fenders do interfere with the bike trailer’s standard mounting fork. The Speedez rear fender’s mud flap binds up against the trailer fork, and the plastic fender alone is close enough to cause rattling, The only way around this is to purchase an optional longer-reach B.O.B. 28 fork intended for use with 29″ bike wheels.
The rear fender mounts fit along the frame stays, working around cables and derailleur fittings.
The front end of the fender is held well enough by this plastic support that can be bolted to the Aurora’s crossmember. It’s left in place so that the fender can just be slid into it, and strapped on.

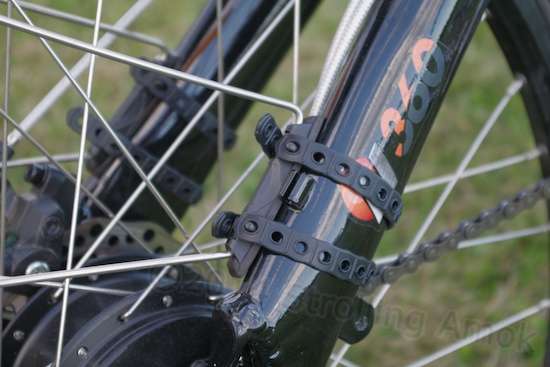
The front fender mounts to the fork, right over cable ties holding the Aurora’s speed sensor.
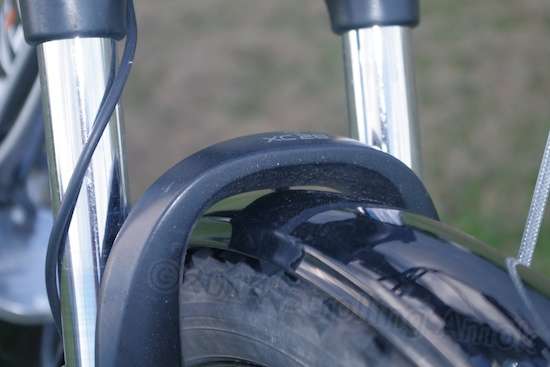
That fender slips nicely under the fork’s crossmember.
Whether to install a longer trailer fork to clear the bike’s rear fender was debatable. As-is, the Ibex’s own little fender is so short as to be useless in the wet, and more so on the salt, allowing the wet crystals to roostertail and scatter forward into the cargo basket. Without a fix to the Ibex’s fender, the trailer can’t be used at Bonneville, and whether its fork clears the bike’s rear fender becomes moot. The YAK trailer’s fender technically fits and offers much better protection from spray, but unfortunately does not clear the Ibex’s stock 2.125″-wide tire.

The Planet Bike’s rear fender, when adjusted for Salt Mode, interferes with the trailer fork, which moves up and down against it. But fixing this without also fixing the trailer’s rear tire salt-throwing problem won’t cut it.
A Schwinn bell went on the right side of the handlebars, an odd addition until you bicycle in Quartzsite over the Winter. A drinking bottle holder clamped onto the handlebars rounds out the additions, and this little item was not that easy to fit with a full Kleen Kanteen 27oz bottle, because the bottle’s weight tends to cause the mount to slip with the violent vibrations that riding can create. A happy (so far) bottle carrier position was finally found.
These days, riding the modified Aurora points out that the mods make it acceptable, but not quite fully there yet. The smaller front sprocket turned out to be the hit of the week, since even a mild jump from a 48 to a 44-tooth sprocket works wonders for hill climbing and launching uphill with a loaded trailer, all without running out of breath at top speed. The difference is unnoticeable in normal use, but stands right out when pure bottom-end grunt is needed. I found this out when experimenting with a shortcut across dried mudflats on the way back to camp with the trailer, when I hit a softer section. Down into it the tires went (less than an inch), and only the quick application of full throttle, downshifting to the lowest gear, and notable pedaling effort saved the day. (It was semi-firm stuff that simulated a steep uphill climb.) The battery was just about gone, and gave up before long, shutting down the drive system during the hard pull. No matter, I knew it would not make the entire trip and had packed the spare. In I went, and I noted that the first battery had survived 39 miles before dying, a notable accomplishment because of this mud and the previous 9-mile trip with a 100-pound load in the trailer.
By the way, running the battery to shutdown is recommended against by Evelo, as it can shorten battery life – especially running it flat and then letting it sit without recharging. Toting the trailer in this sloped area seems to produce a workable range somewhere between 32 and 39 miles, which I consider to be pretty darned good. Most of those miles were spent at pedal assist level 3, halfway up the available range. This was while trying to maximize range by watching the wattmeter, speed and gearing choices. Once you get down to 1/4 battery reserve under power, you know it. On a flat, it’s fine, but on a relentless grade, you’re limping along in the lowest gears. Mind you, it keeps trying until it flashes a warning or quits, but you become aware well ahead of time that it’s time to think about swapping batteries or taking it really, really easy if you want to make it all the way back. Careful use in this last stage can milk a surprising number of extra miles out of the pack. Unfortunately, the replacement spare battery sent by Evelo can’t be locked into position either, but this is more of a problem because of vibrating loose on washboard roads than it is an issue of theft. I’ll have to work on correcting the misalignment.
Rider position is much, much better but still isn’t quite 100% there yet for me, and part of the problem is that I’m “long-waisted”, which is a nice way of saying that I have stumpy legs for my overall height. This issue may take some doing to solve. The Nitto bars, for all their bending and contorting up, forward and then back, wind up placing the grips surprisingly close to the original bar’s position. Their narrow bullhorn styling means that moving them back much further with an even shorter steering clamp may aim the handgrips into one’s legs in a turn. Yet you can’t simply swap for a set of ultra-wide newsboy bike bars, because the brake cable lengths will become an issue. These cables are currently at what I consider to be their limit now, the result of both height and the aimed-forward brake handle direction. Somewhere out there, there’s gotta be a handlebar that’s a cross between the flat stock bar and the swoopy but compromised Nitto cruiser. If I could magically relax the severe bends in the Nitto a bit, I’d be happy. The current hardware would probably work fine for most folks. For now, enough weight is off my hands to make the setup workable, but I’m still leaning a little forward, which eventually encourages numb fingers and a vague aching between the shoulders on long rides. But at least I can do what I consider long rides now. The upper limit will be determined by any further tweaks I make to the pedaling ergonomics. After that, it’s muscle conditioning, butt conditioning, and circulatory system (or lack of same).
Actually, I recommend against modifying the Aurora for an upright rider position in general, if you don’t actually need to. Being fully upright in the seat takes a lot of weight off the front tire, and the weight of the battery pack magnifies this. On low-traction surfaces, especially those that squirm out of the way, like mud or sand, this lack of weight on the front tire makes it prone to side-slip. It simply lacks the traction to be able to follow through on steering corrections. The result is that the front wheel is more prone to work its way out from under you. This is a trait common to many if not most upright bikes, not just the Aurora. Leaning forward perceptibly improves this trait, so if I could utilize the Aurora’s stock setup, I would. I’m changing it not because I simply prefer upright pedaling or think it’s the best. It isn’t. I’m changing it because I’m adverse to pain. It it weren’t for that, this mods post would be much shorter.
Overall, as a remarkably lethargic, soft-core bicycling enthusiast, my impression of the Evelo Aurora as the basis for getting a transportation tool out of a leisure e-bike is highly favorable. It’s extremely early in the game yet, but it’s been no finicky dilettante. It’s been in hot sun and thunderstorm downpours. It’s been through thick mud, wiping the excess off the tires with the frame and crossbars. And yes, it has been on salt.
Modifications Parts List
Spiderflex seat installed in place of stock. Maximum trip length increased from a periodic eight miles to every-third-day battery capacity limit or five-hour seat time, whichever occurs first. So far.
Topeak QR Beam Rack MTX Bicycle Rack. Rubber shims are provided to accommodate different seat post diameters. This Topeak rack must be removed for any Aurora battery removal or swap, but this is quickly done without tools. (The Aurora’s battery can also be recharged in place.) With a 20-pound rated limit, it works well with light to moderate loads and does resist rotating around its mount quite well. It may sometimes work its way just slightly toward one side under heavier loads.

The Topeak MTX A-Type rack just clears the seat at my ride height, and on the Aurora, slopes down toward the rear to just clear the battery case. Its quick-release feature makes getting the battery out easy.
Topeak MTX wire basket. This coated wire basket is sturdy and of high quality, a well thought-out design that surprises by fully living up to its claimed features. The basket slides into place on the MTX rack (only) with a tongue and groove system, and is held positively and released easily with a large and well-located button lock. Its carry handle works very well, easily tucking itself out of the way. The one liability of this integrated rack/basket system is that its small plastic tongue and groove slide design can allow an unevenly loaded basket to be released from the rack on a violent bump. The side loading overpowers the rack’s retaining groove, which deforms and allows the basket’s tongue to pop out. In practice, this is not a problem as long as you keep this potential issue in mind when loading the basket with oddly shaped, heavy items. That done, this system performs admirably.

The Topeak MTX coated wire basket is sturdy and generously sized. No need to haul the trailer whenever this basket will suffice.
Samsung carrier removal. This was necessary since it interfered with the Topeak rack as installed at my needed seat height. Removal of the carrier requires disassembling the top cover of the battery case for access to retaining nuts. Reinstalling the cover is problematic, since its five sheet metal screws will tend to refuse to re-enter the Tinnerman-style fastener clones used, deforming them and making them useless. I was never able to get the hang of doing this reinstallation as-is, and wound up having to drill out the receiving holes in the lower case to a much larger size, to give each screw the freedom to aim itself for proper engagement. That’s a nuisance, but only needs to be done once.
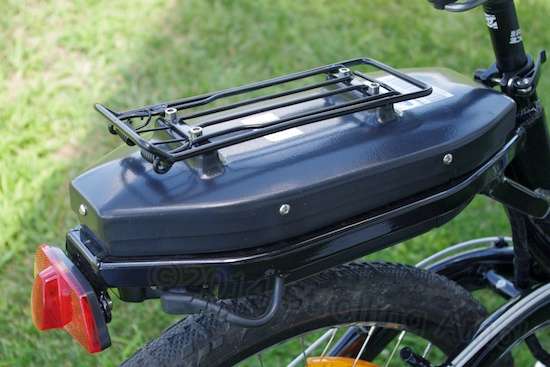
The OEM carrier rack had to be removed, which requires disassembly of the battery case to get at four nuts inside.
Raceface 27.2mm Ride seat post. This change was necessary since the Spiderflex seat support hardware interfered with the Topeak rack beam at my needed seat height. The seat can be slid forward on the stock seat post, but is better used with a seat post which clamps the seat along the post’s centerline rather than a clamp that hangs off to the rear. Any new post will require cutting to length in order to be usable in the Aurora’s curved frame.

Doesn’t look like much, but the Raceface seat post moves the seat hardware forward just enough to open up some more space between the seat and the bike’s battery, where the Topeak MTX rack will live. That bend in the Aurora’s frame requires that the new post be cut to length.
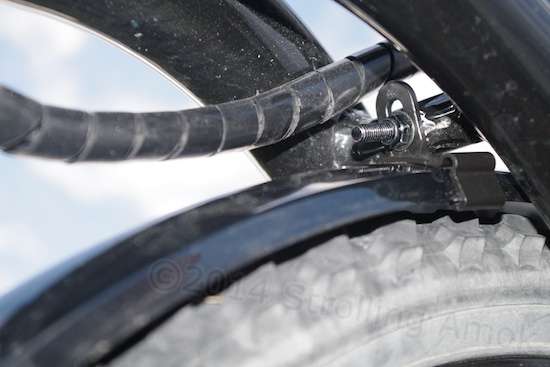
Front fender removal. Other than providing a place to mount the headlamp, the Aurora’s stock front fender serves no particular purpose. It is a “split” design, each half of which is held by a separate mounting bracket. Being virtually unsupported, the rear half quickly flexed, fatigued and broke off from air resistance when the bike was mounted in the Ford’s front carrier (and doing 50 MPH). Not surprising. I removed the rear bracket entirely, and the mounted the headlamp directly to the front bracket once the front fender section was removed from it. This change was quick and easy. Although this bracket is thin and lets the headlamp shake incessantly on rides, it does not seem to pose any functional problems and should last quite a while.
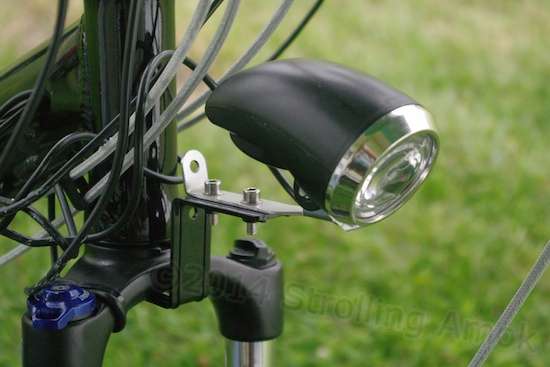
This may not be the most elegant solution, but utilizing the existing fender bracket is the easiest way to get the headlamp back on after the fender is gone.
Nitto Swept-Back B302 Alloy handlebar, 25.4mm dia x 485mm width. Although these bars are aluminum and of very high quality, they are more style than substance in changing a bike from mountain bike to cruiser. Their main asset is to provide a little more lift, and a mild hand repositioning rearward compared to the stock flat Aurora handlebars. The Nitto bars are quite narrow, and since they provide an “aimed-forward” hand orientation for that cruiser look, yet intentionally try to keep the hands located forward, the result is a lot of aggressive bending within a small space. This results in short straight sections which prevent remounting unaltered grip and control hardware. The Ergon grips had to be significantly shortened to fit, once the brake handles and shift collars were positioned as far on as possible. Evelo’s main concern in recommending these bars is that the brake and shift-related cables would be too short for wider cruiser-style bars, and this is true. However, the “aimed-forward” hand positioning of the grip area on these bars create their own problems as far as cable stress goes, putting needless bend into each cable near maximum length. A slightly wider bar with grip areas located farther rearward appears to me to be quite possible with my setup, as long as the grips (and cables) are aimed more inboard than the Nitto’s. The main limiter will then be the wire bundle connecting the display with its 3-button controller, which should be located within easy reach of the left handgrip. The problem will be finding such bars, if they exist.

There must be a better way – the Nitto B302 bar grip length is too short for all the Aurora’s controls. Notice that even with the shortened grip, the brake handle still had to be mounted on a bend.

The biggest issue with wider handlebars is the black wire going from the display to the 3-button control pad.
Delta Alloy Stem Raiser. With bicycle hardware having advanced nicely since I was last involved, the Delta Stem Raiser makes it possible to inexpensively raise existing handlebars up to 3.5 inches from stock. This item is recommended by Evelo for this task and is very easy to install, using a hex wrench.

The Delta Stem Extender (black) raised the handlebar enough to get it into workable territory.
Wiring modification. Wires for the handlebar-mounted display and various controls are too short to safely allow for raising the Aurora’s handlebars using add-on devices. More wire is concealed inside the bike’s frame, however, and Evelo will send you a link to their video that described how to extract this extra wiring. I recommend getting the rubber seal out with a plastic-bladed screwdriver or similar, to avoid paint damage. Having seen the connectors, I recommend against doing this if you are ham-fisted or tend to yank on things when you get impatient. These are thin wires, once they reach the connectors.
Wiring weather protection. Evelo recommended for my unique usage and transport style that I shrink-wrap the in-frame connectors and use silicone sealant around the rubber pass-through frame gasket to positively prevent water from entering and becoming trapped in the frame, since that could lead to wire corrosion and loss of function. This mod is entirely unnecessary on any garaged Evelo bike, and possibly unnecessary on any bike left outdoors, especially if a simple bike cover is used. I chose to use high quality 3M indoor-outdoor electrical tape instead, and I suspect it will do the job. Using this approach, I recommend aiming the wire bundle downward as it exits the frame, to discourage water from bleeding along each wire to enter through the rubber gasket.
Handlebar stem. The Aurora comes with a decent adjustable handlebar stem that’s capable of putting the bars where they are needed – except in my case. This is a long-reach stem, and holds the handlebar too far forward for comfort. It also demands more wire length than a short-reach clamp. So, I swapped in a short, high-lift clamp in its place to get my upper body more upright. That’s the Dimension Threadless Stem – 60mm x 125 deg. x 25.4 Clamp (Silver). It doesn’t have much reach, and what reach it does have is cranked up nicely. Tons of angle and reach variants are available, but be careful of keeping the 25.4mm clamp size intact to fit the Nitto handlebar.

The new Dimension stem is easy to install, and gets the handlebar up and back.
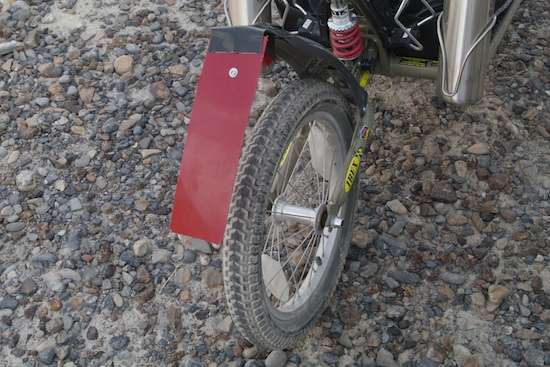
Fenders. The Planet Bike SpeedEZ ATB temporary fenders fit surprisingly well despite the Aurora’s various small fittings, cables and cable ties being in the way. They are no big deal to mount and remove without with bare hands, and are adjustable as far as the bicycle itself will permit. In my usage, they need to be backed away from the tire as much as possible, which on the Aurora isn’t very much. But they do work once in place, and are free of rattling and flexing. Made of polycarbonate, don’t confuse these with plain ol’ “plastic”. They will last awhile. They are held on with small rubber stretch straps, which will have a limited lifespan under full weather exposure, so the fenders are best removed when not required. Replacing the straps with cable clamps also appears possible for a semi-permanent installation. I added a long strip of hardware store gasket material to the front fender’s mudflap to extend spray protection to within an inch of the ground, to try to protect the Evelo’s motor from salt spray.

To help keep spray off the motor, this rubber flap is held by the only fasteners at hand: 1/4″ bolts and nuts.
Problem Solvers water bottle cage mount. This clamp is meant to allow mounting of a water bottle cage on the handlebars, and it does a good job overall, even with the extra weight of an oversize metal water bottle in place. Sheer physics intrudes though, and locating the clamp approaching horizontal is necessary to prevent violent vibrations from allowing a gradual position shift. I may gravitate to a different solution in the future as a result, but this is working for now, with care.
Iris King water bottle cage. The Iris King water bottle cage, a hand-formed stainless steel affair, is an untrendy but elegant design that works superbly, especially with slightly oversize Kleen Kanteen water bottles. Bottles are easy to extract and remove, and holding security is perfect no matter what. Imperious to UV rays and weather, these somewhat expensive pieces are a one-time-only purchase. Basically, the last bottle cage you’ll ever need. They also happen to be just about the only cages that don’t require dismounting from the BOB Ibex bike trailer in order to transport it and the Evelo bike together on the Hollywood bike carrier. There’s only one other similar clone cage I’m aware of. All other bottle cages cause interference. King Designs being a one-man operation, I wouldn’t put off any someday purchase should he get sick of bending and welding steel. If retailers are out of stock, ordering through his website will result in near-instant fabrication and shipment at what may or may not be a slightly higher price ($18).

The Iris King cage is one of the few water bottle cages that can be left in place when the Ibex trailer is mounted into the Hollywood bike carrier.
Schwinn Expandable water bottle cage. These are inexpensive cages that I bought at a local Walmart. This model can be adjusted with a knob to vary holder width, allowing some pretty sizable convenience store water bottles to be held (on the Ibex trailer). Oddly, they can’t be made to fit even the slightly oversize Kleen Kanteen bottles, which flop around inside like a drunken Weeble. Their highly-stressed partially plastic design probably won’t last more than a couple of years in the sun, so their replacement with another couple of King Iris cages is inevitable once I check bike carrier clearances in position.

The Schwinn Expandable cage (at left) straddles the carrier’s upright nicely, but is designed solely for large-diameter bottles.
Kleen Kanteen water bottles. I’ve purchased plastic water bottles for years for biking around. For short-term rides on garaged bikes, they’re fine. For longer rides in heat or sun, they almost immediately impart a taste into the water that, depending on the exact resin used, ranges from unpleasant to nearly undrinkable. They also begin splitting after a year in the sun. Kleen Kanteen leans heavily on Eco-guilt to market their ware, since one of these 18/8 food grade stainless steel bottles can replace thousands of plastic throwaways. Fine, but the real draw of these bottles is that they work. There’s no plastic lining sprayed inside, like in soda and beer cans, or aluminum bike bottles, either. Water tastes just the same as when you first poured it in, and stays that way for days. They last and last even in full sun. I got four Kleen Kanteen Stainless Steel Bottles with Loop Caps (threaded stoppers) for the trailer, and one Kleen Kanteen Stainless Steel Bottle with Sport Cap (with a typical push-pull nipple). All of these are the larger 27-ounce bottles, and smaller ones are available as well. The big difference here is that, because you can’t squeeze the water out as usual, special valving is fitted which allows flow. I expected problems pulling the water out, but it’s a gusher, yet neither the valve nor stopper gasket seep water when inverted. Yes, the pretty stainless bottle does surface scratch with use in cages, and careless handling can potentially dent it. I may abuse my equipment, but I’m never intentionally careless with it, so after considerable use, I see the Kleen Kanteen as another one of those products that, like the Iris King bottle cage, is a no-regrets bargain. I will never go back to tasty plastic, if I can help it. It works that well.
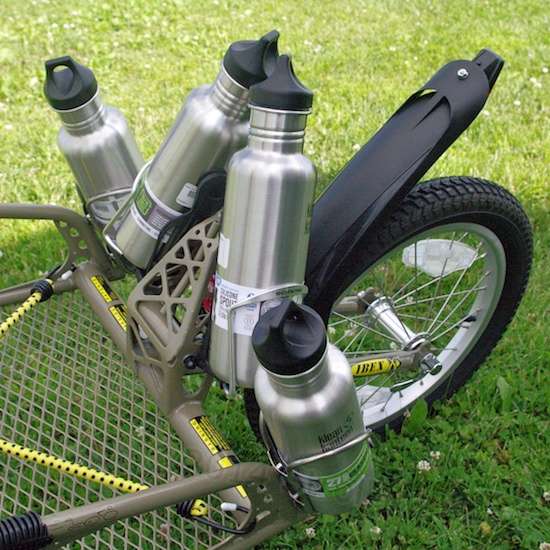
These are the threaded stopper models, with one sipper-type on the bike’s handlebars. The Ibex is already prepped to mount four cages, and I figure from past experience that the desert is no place to skimp on available water storage.
The water bottles can be cleaned out with any sort of bottle brush or the Camelbak Bottle Brush Kit like I have, which includes a small brush for valves, drinking tubes, and the like.
RAM GPS mount. This handlebar mount for the Garmin Nuvi 4.3″ family of GPS units holds solidly. Limited to a single clamp screw, it must be mounted to the handlebar from one end, and requires gasketing to take up any sizing difference slack. Although it is adjustable for rotational angle relative to the bar direction, the GPS will remain facing straight away from the bar section it’s mounted to. There is no ball swivel. So, the bars you choose and where you mount it can make a big difference. The Nitto bars are not the best choice for this, their narrowness and severe bends causing a cramping together of competing components. I have since that time found more appropriate GPS mounts, now that I have more research time available. The Nuvi’s display itself tends to wash out in such an exposed situation, and is of limited value except where it’s absolutely required to pick paths through to the destination. An iPhone or similar device seems to be the better, brighter choice for “normal” use, though not without eating cellular data. The Garmin’s advantage in the boonies tends to be better coverage of and labeling of dirt roads.

The Ram mount makes it possible to use the GPS on the Aurora, though the display is dim in daylight.
A Startech USB2HABM1 1-foot USB2.0 A to MiniB cable links most Garmin GPS units to the Aurora’s display charging port, making it possible to extend its use far past the onboard battery’s time limitations. The display’s port must be manually activated with the controller to turn charging power on. Your own GPS may have a different USB port than a MiniB. The Aurora display’s port is the standard A-type.
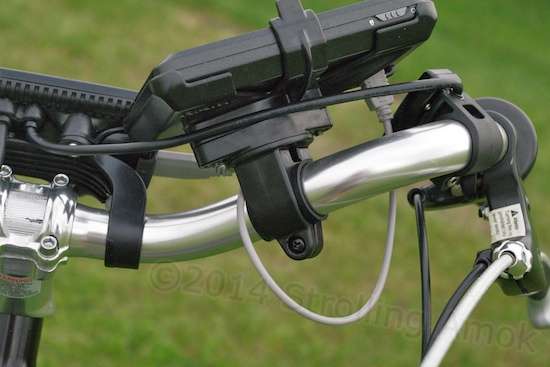
This one-foot grey USB cable links the Garmin GPS with the display’s power port for long rides.
All-City Cross Ring 44-tooth x 110mm chainring or front sprocket and matching chainring guard, though just about any brand 44T, 110mm chainring and guard will do as well, at least with the NuVinci residing at the other end of the chain. Unneeded for any conventional recreational riding with the stock Aurora, a smaller front sprocket allows both its mid-drive motor and the rider additional low-speed leverage when the going gets especially tough. In my application, I see it as a worthwhile investment, and an investment it is, not for the sprocket and protective cuff ring, but for the labor to install it. Without proper tools, experience and fortitude, it is a task best left to a shop with some mid-drive experience. My shop, a highly-experienced upscale bike shop, was stumped by the Evelo’s ratchet drive, and required a walk-through with Evelo by phone. I was told that the parts needed some minor trimming to fit. Some three hours later, it was back together and working. The result is markedly better rough trail and uphill climbing ability, particularly when the battery is on its last half of power capacity. Evelo has mentioned to me that sprockets below 44 teeth may require that the chain be shortened, since the NuVinci’s automatic chain tensioner has only so much range it can handle. The regulated stock 20MPH top speed is unaffected. The 24-25MPH programmable limit is moot with this setup though, since I haven’t gotten it over 21 on the flats. Then again, it no longer chops power off at 20 when pedaling faster downhill, which is nice. The NuVinci’s full ratio range is pretty good compared to a common derailleur bike, but is no match for a wide-range mountain bike gearset.

This All-City 44-tooth chainwheel and guard make a noticeable difference in low-speed grunt.
Heng Shin Maxxis tires (now out of production). These 26 x 2.10, 20-year-old tires came off my old Raleigh MT-200, and I never gave the Aurora’s relatively treadless stock Kenda Kwick 26 x 1.95s a chance to show their stuff off-road. I took one look and didn’t have much faith in their ability to handle rough gravel or sandy climbs. The old Maxxis combines an aggressive tread with tips that blend in to form a continuous center rib for vibration-free pavement riding. The Kendas remain the best all-around choice for normal e-riding, and were okay on grass and dirt, though surprisingly noisy on pavement. The Maxxis are continuing to do well on the rough stuff, and I suspect I’ll be sad when they finally wear out and have to be replaced with something else. Offroad tires with a center rib are difficult to find.

These thin Kenda tires are just the thing for an e-bike, since their thin construction lowers rolling resistance.

The Raleigh’s 20-year-old tires are now more grey than black, but have otherwise aged well and are very good all-’round desert tires.
Slime Thorn-Resistant Thick Smart Tubes. These are the old-school approach to dealing with the frequent issue of the small goathead thorns so common in areas of the Southwest. I had been getting at least a puncture a week with standard tubes. The Thick Smart Tubes not only work, but hold air for much longer periods than standard tubes. I had also previously found the standard-thickness Slime tubes to be ineffective, but so far, no issues at all with these. Install and forget. The modern approach is to buy pricey armor-belted tires, or insert a puncture-resistant liner between the tire and the tube. Their benefit is much less rotating weight than Slime tubes. Maybe one day. The Slime sealer itself has the potential to gum up the tire valve, but since the stuff is water soluble, removal and cleaning with a wet Q-Tip can clear it. No such problems for me since I’ve had mine. Their only issue on the Aurora is that their short stems barely clear the new-style deep rims.
Just for the sake of completeness, the Ibex trailer has a few add-ons of its own to make it easier to use. It hooks up to the Aurora’s NuVincu hub with “10×1″ BOB’s Nutz. Attaching to the bike’s axle means that even if the Ibex is attached to a bike with a rear suspension, the front end of the Ibex will be rigidly supported. The only suspension action will occur in the trailer’s rear end. This would seem to make the extra $70 cost of its suspension debatable, and it is. This doubtfulness is reinforced by the danger of repeatedly bottoming it out, which leads to BOB’s recommendation to always set the suspension aggressively to any load. Although some 3” of travel is available, jumping off curbs, diving into deep potholes, and surmounting large rocks can lead to suspension damage. After using the Ibex where I do however, I’ve been inclined to leave the setting toward the softer end for those loads needing a softer ride to avert breakage. It works, and works pretty well – as long as you ride smart. There is risk, but it is fully manageable, and to reap the benefits of having a suspension in the first place, it needs to be set so that it can function as one. Rigidizing it unnecessarily turns it back into the YAK model with provision for disaster relief. If you’re the type who gets a thrill out of pounding the bejabbers out of off-road equipment (and you know who you are,) then BOB’s recommendations are for you. If you’re simply interested in getting eggs and bananas home over a known route, then you have options. My own take is that a static load that compresses the suspension less than half an inch is fine. Any more compression than that calls for the next stiffer setting. Note that my decades as a product designer doesn’t mean I’m an engineer. Use my practices at your own risk.

The Aurora doesn’t use a quick-release axle skewer, so 10×1 BOBs Nutz hold the Ibex’s fork nicely and will not let it go.

The Ibex’s rear suspension is adjustable for spring rate, something I’m avoiding as much as possible.
As for mods, a Wandertec SAX-BOB thick woven nylon cargo liner was picked to ease the packing of loose items in the Ibex’s open frame. Held in place by nylon straps and buckles, it takes a couple of minutes to secure, but then isn’t going anywhere.
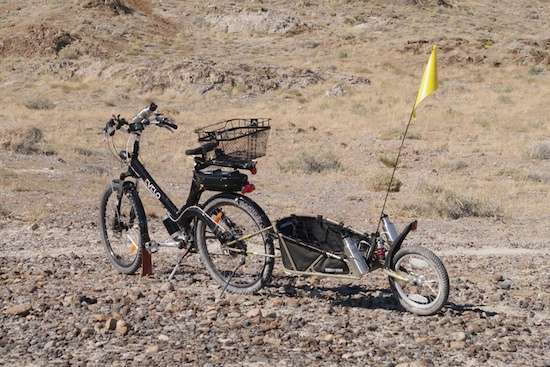
The Wandertec cargo liner and net contain and secure things like nobody’s business. Used out where it’s always dry, this combo does the job.
Then a Wandertec Cargo Net was obtained to keep items from bouncing out of the trailer. I keep a couple of flat 24″ bungee cords handy as well, just in case.
By the way, I’ve fitted a Kenda extra-thick thorn-resistant tube on the Ibex trailer’s 16″ single rear wheel, but since I haven’t yet subjected them to the acid test of Arizona, it’s anyone’s guess. It is not self-sealing.
A Greenfield Stabilizer Kickstand is designed for adding to the rear frame stays of a bicycle, but also happens to fit the BOB Ibex and YAK trailer forks superbly. The Aurora’s kickstand is strong but hard-pressed at times to support both the top-heavy bike and a loaded trailer. The wide-stance Greenfield makes this a non-issue, and is worth every penny. One of those bulletproof products that carry no lingering regrets.
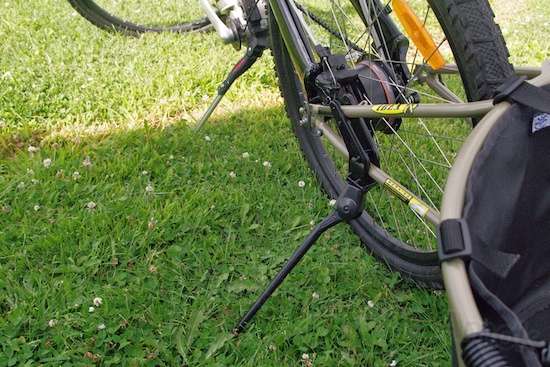
The Aurora’s kickstand can hold the unladen bike, and that’s about it. The Greenfield stand attached to the trailer fork does the job better, and tucks out of the way.
Just for the Bonneville salt, I juryrigged a crude fender extension to dissuade thrown salt from being tossed forward into the bed. The trailer is about the only way I can get a folding chair to rest on at events, as well as carry bags of photo and video equipment, and extra water. Without it, I’m standing in the sun and heat nonstop all day, two cameras strapped and a monopod to me, and my pockets stuffed with batteries, lenses, DV tapes, memory cards, water, etc. This fender extension is nothing more than a flat section hacksawed from a polypropylene dishpan and held to the lip of the fender with an L-bracket. The large gap between the two is spanned with a few inches of 3″-wide Gorilla tape. Peel back the tape, undo the nut that holds the OEM reflector and the added L-bracket, and it’s off. Ugly it is, but does it work?
Woof! It’s a beast! But hey, it’s temporary and is held on by one nut.
At the front of the trailer, I could have fitted another bike mudflap extension to the rear Speedez fender to match the one added to the front fender. Otherwise, tenacious salt will be thrown directly onto the Ibex’s front fork and pivots as well as the exterior of the Wandertec nylon liner. This does not appeal. What I did instead is to cobble up a temporary protective fork shield that attaches to the trailer fork instead of to the bike. Almost as crass as the trailer’s rear fender extension, it consists of nothing but some leftover hardware store gasket material (rubber-based), punched and held to the fork with four cable ties. Although the gasket is not long enough to reach down as far as I would like, the wraparound effect along the inside of the fork is pretty promising. Once I leave the Bonneville Salt Flats, it can be removed by cutting the cable ties.

Rude ‘n crude, this rubber flap to protect the trailer works, and doesn’t interfere with the Planet Bike fender.
In order to make the full rig suitable for use on the Bonneville salt, that meant the bike’s fenders had to be willing to coexist with the trailer fork. They aren’t. The standard Ibex fork had to be replaced with the “28” model to allow more space around the bike’s fender. This new fork is designed for use with newer 29″ bike wheels, and works fine. It also spreads to attach to the bike’s axle much more easily, eliminating a set pattern of placements and yanks to get it just so into position. The “28” simply slips into place in seconds. There’s no extra expense if you select a vendor who will supply it in place of the standard when ordering the trailer. It probably should not be used without cause however, as it may tend to be more flexible, an issue that comes to the fore with truly heavy or badly distributed loads.

The longer Ibex fork makes all the difference for fender clearance.
If you want to know about the Hollywood Sport Rider SE2 HR1450E electric bike carrier and the Curt front-mount trailer hitch receiver C31008 that fit my specific 2008 Ford F-250, those are covered in a previous article. Use caution in pricing the bike carrier, since Hollywood also offers a similar but much less expensive SE HR1450 model for ordinary bicycles.

Wear it proud. The Hollywood 1450E can hold two e-bikes without breaking a sweat. I highly recommend using it for only one e-bike, simply because using a lesser carrier at its weight limits is risky.
——————————
Please note that most of the links in this article lead to Amazon, for which I’m an affiliate-in-waiting and may get a few pennies tossed my way out of Amazon’s pocket, should you purchase that item. Other links go to sources that Amazon does not offer the same products for, vendors with whom I have no relationship except as a past customer, and whom I can personally recommend to you as excellent sources.

Great write up as usual…that Spiderflex looks quite interesting…I am very very tempted to try it.
Thanks, Eric. You probably should try the Spiderflex unless you stand a lot and depend heavily on the seat’s horn to keep the bike from shifting from side to side. I don’t, but if I did, I’d still be using the Spiderflex, but with a round dowel secured under the seat frame to mimic a lowered seat horn. My son tried the bike and thinks the Spiderflex is very comfortable, too. Frankly, it’s best not to wait until a hornless seat is the only way you can stay on a bicycle.