
Solar to Go

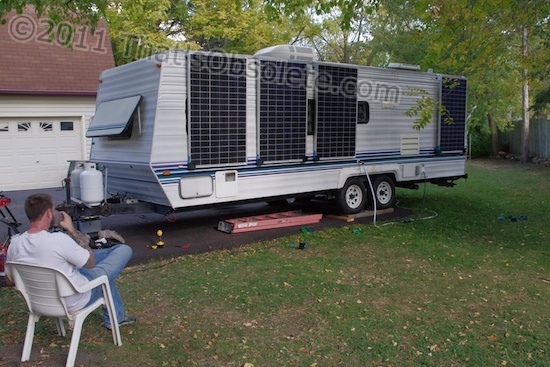
The Enterprise, parked in a residential lot in Indianapolis.
Originally posted 10/15/2011
Electrical power is technically not needed for RV dry camping at all. You can keep fresh water in dispensing jugs, use propane or kerosene heaters, and get light from candles and propane or kerosene lamps.
Electricity only comes into play when you build systems in that are dependent on it. Like most travel trailers, the Innsbruck depends on 12 volt battery power for its water pump for washing up and flushing the toilet. Interior lighting, since converted to LED bulbs, also comes from the camper’s battery. The furnace and water heater use this battery, too. Both use it to auto-ignite their propane heaters, and the furnace needs lots of power for its fan to run for any length of time. If you’re going to use electronic gadgets of any type, power will be needed for them, too.
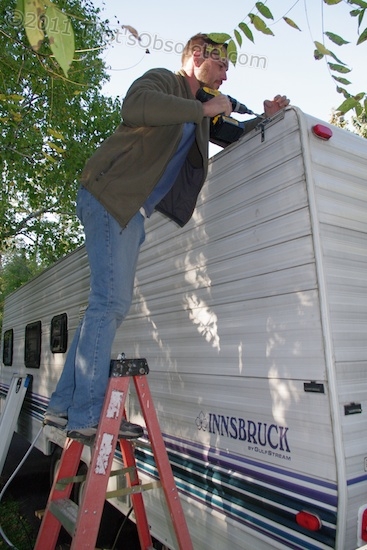
Tom, installing the hanger eyelet system he designed.
Most RVs come with at least one 100Ah battery, which is good for at least one cold night. Some come with two, and many people equip their campers with up to 400Ah-worth of cells. By rationing how they use power, they can stretch the service they get for quite a while. By adding solar panels to the roof, the batteries can be recharged during the day, if the sun is out. This lets folks use their laptops for awhile and do what they need to do. No, you can’t ever run the A/C or the microwave on battery power (except a few fringe wackos), and a toaster or hair dryer is a bad idea, too.
Regardless of how much battery power they decide to carry onboard, the normal configuration practice is to route all solar panels through a single massive solar controller, and pass the charge on to a combined battery pack. If they can afford it, they add a battery monitor to get a true state of charge of the pack – discharging a deep charge battery beyond 50% of its capacity greatly shortens its life. Using just 20% is much better, if that were possible. This type of setup is nearly ![]() universal among full-time RVers.
universal among full-time RVers.
-

Preparing to drill for mounting the hanger hooks.

Naturally, I’ve taken a different road. I like to be able to spend quite a while on the computer on any given day. I’m excruciatingly slow in composing and typing, and like to be able to scan film and photos, print, transcribe recordings, listen to music, watch movies, and generally squander precious electrons. This is not a temporary or seasonal vacation – this is my home. One has to pay for such extravagant preferences in an RV, however. And pay, I have.
I have 700Ah of battery capacity onboard, which puts me into the “mobile office” category. However, I have split that capacity into four separate circuits based on function. Each circuit has its own 195-watt solar cell, solar charger, and connection outlet.
- One panel and single AGM battery under the bed runs my CPAP machine, a high-priority device that needs to be kept available no matter what the weather.
- One panel and two common flooded batteries on the hitch tongue power the camper’s original equipment wiring harness for lights, furnace and water heater ignitions, and water pump. Pretty important systems, except for the furnace – it’s quite inefficient and so is not normally used. I heat with a small electric portable when on shore power, and a propane Mr. Heater when boondocking.
- One panel and two AGM cells in the forward closet power the various office devices.
- One panel and another pair of AGMs in the same closet offer a backup office power source.
Why split up the solar panels, batteries and circuits by function rather than combine then into one interwoven pack? Three reasons.
- The solar chargers I’ve selected, the BatteryMinder SCC-180, can only handle an absolute maximum of 200 watts, which translates into one solar panel each. I have a strong liking for BatterMinder products from past experience, and see these controllers as an excellent choice for moderate-power systems. Just a personal bias. Each pumps out a maximum of 16 amps, which when split between 2 batteries, still provides a hearty charge that should very easily top off both under good weather conditions and proper panel aiming. They are simple to understand and hook up, and are temperature sensing to protect against overcharging. They can also sense when another charging source is hooked up and will back out when that’s the case.
- The Innsbruck’s original wiring harness is undersized and probably corroded here and there. I can avoid having to create a new wiring harness to distribute the power from one big pack all over the trailer. I’m lazy and have no time or skill to plumb wire inside walls. I’d much rather punch an individual pack’s outlet right through a nearby exposed wall and be done with it.
- Since the solar panels are temporarily mounted to the roof rail rather than permanently to the roof itself, I’d like a system where I can hang out one panel to bring up one particular pack in a timely way. With a combined system, one panel would be useless because charging would be so slow. All panels would have to be mounted, or nothing.

See how it works? Lift the panel and engage the hooks into the eyelets. With one person, you’re aligning blind, but the more often you do it, the easier it gets.
This doesn’t mean that when a pack is exhausted, that the device it powers is necessarily done for the day. It’s easy to string an extension cord from an unrelated pack to the needed device. It’s also easy to recharge any pack by using a conventional 120V 8A BatteryMinder charger from shore power, when available.
Just two inexpensive power inverters are used. The CPAP machine runs directly off 12VDC so no inverter is needed for it. A Samlex 150W inverter runs my 28” LCD TV and DVD player, and can safely power an AA battery charger, electric shaver charger, or what-have-you. A Samlex 300W inverter powers the entire office system. That’s it. Got them from SKingCompany.com, and order processing and shipment was very, very quick. Highly recommended. If I go through one pack, I can switch to the backup without shutting down thanks to a UPS power supply in the chain.
“My work here is done.” All four 195W panels hung in place.
I have to say that the Samlex inverters were not my first choice – but should have been. They work, and work well. I had originally fallen for the two “frugal” choices, AIMS 180W and 300W inverters. Big mistake. The 180W unit complained mightily and caused the TV to flicker and fail on a 100W load. The 300W unit momentarily puked and quit each time anything was done on the computer screen despite only a 120W measured load. Still waiting for a refund from the vendor, TheInverterStore.com.
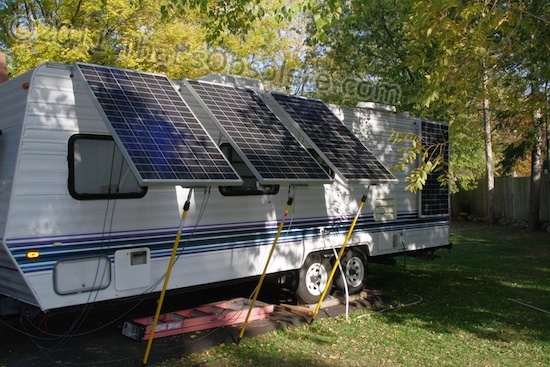
With articulated sanding pads mounted to the panel edges, telescoping painter’s poles allow an adjustment range from 6′-12′.
To get the system set up, each panel is hung using its hook and loop catch at the camper’s top rail. Wiring cable extension cordsets are plugged into the MC4 wires and plugs from each panel, and they are in turn plugged into SAE sockets at four points in the camper’s sidewalls. Each socket is prewired to the four solar chargers and the four battery packs. Then each panel outward edge is individually raised to an optimum position and held there with a telescoping painter’s pole. Each panel can be adjusted from aiming toward the horizon on the driver’s side to about 30 degrees past vertical toward the passenger side. It’s a pretty quick setup, but does require several feet of clearance on the driver’s side of the trailer.

An early shot of the forward office area showing two pairs of 100Ah deep cycle batteries on a platform in the front closet floor. Yes, a 27″ iMac is an idiotic choice for an RV, but it’s what I already had.
The inherent drawbacks with this type of system keep me from claiming that anyone else should use it as well. It only suits my particular situation, and my tolerance for inconvenience. Those big solar panels weigh 40 pounds each and must be stored inside the camper when not in use – there’s just no space available anywhere else. As a result, they clog up the passageway between the living area and the front office. You have to suck in your gut and shuffle sideways to get past them. They also have to be placed directly over the frame, because stacking them against the outer wall causes the floor to droop just enough to warp the outside doorway a bit, making the door bind. That could be an age thing. Between the weight of the office batteries and books, and the solar panels, the hitch is carrying a lot of weight – more than it should. It doesn’t seem to be causing any problems, but I wouldn’t recommend attempting to tow this camper with a 1500-class pickup.

A closeup of the pole system attachment.
It’s conceivable that the solar panels could simply be kept mounted and lashed to the side of the camper for travel, but I’m uncomfortable with that at this point. Thanks to work by my son Tom, the hangers have proven to hold tight even when the rail-mounted loops were bent down from accidental abuse during initial usage. But it’s a gravity-based system, and is simply not intended for holding the panels during bad roads and high air speeds. Not going to try it. It would really need a completely different permanent-mount hinge system with locking catches at the lower end of each panel.
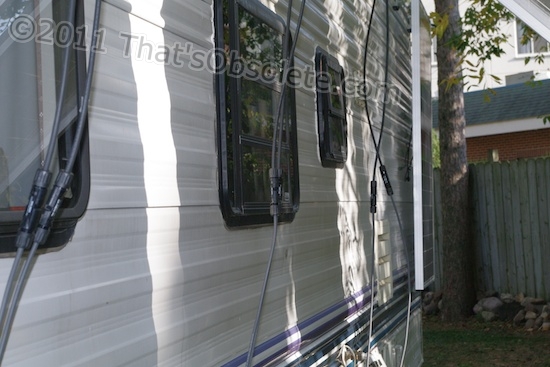
MC4 cables are added to get the panels’ power to an external connector.

Each panel cable ends in an SAE plug that leads to a controller/charger. This one is frame-mounted and charges the external battery pair on the trailer tongue. The others lead to AGM batteries inside the camper.
