
State of the Intrepid – Solar Power Mods

You want trauma? Try drilling and sinking sheet metal screws into a pristine, seamless 1-piece top sheet, where every screw must intercept a supporting thinwall rib somewhere underneath. And it’s up to you to figure out exactly where those aluminum ribs might be.
The Grandby by default came with an electrical system intended to be powered off the Ford’s twin starting batteries. This is not a bad way to go if you travel a little each day, don’t use much power, and preferably swap in some Optima AGM deep cycle batteries under the hood to deal better with the dual-purpose stresses. Lots of overlanders do this, but it starts to make less sense once you begin to stay planted, use more power, and/or don’t care to lug along a generator and gas can. Stranding your own vehicle by depleting its starting battery is seldom advisable.

I recommend wiring an inexpensive digital DC voltmeter to your battery to get a rough idea of its state of charge. This one is perched on top of a Samlex 150-watt pure sine inverter.
I was already sitting on five 3-year-old AGM batteries, as well as a suitable solar charge controller and four 200-watt solar panels. Whoops, overkill! Right? A distinct lack of storage space and roof acreage prompted me to keep just four of the batteries and the controller. Couldn’t I make do with fewer batteries? Yes, definitely. Just two 104Ah batteries would possibly do the trick even with the fridge running in hot weather, powered by maybe 300 watts of panels on the roof, or 200 watts on the roof and a 100-watt ground panel. I’m not dead sure, because my batteries aren’t new, and the Dometic fridge runs full-time in hot weather. But the lure of 400+ Amp-hours of battery capacity just sitting there prompted me, by whim, to use it all. That, however, means more solar to feed them, and that posed a problem. Dual roof vents cut what will fit in the remaining space on the roof, and only one existing 200-watt panel would fit up there.
The solution seemed simple. Slap all the lightweight semi-flexible solar panels that would fit on the roof, and throw the remainder on the ground, staked down to keep the usual Southwest winds from blowing them away. I was ready to order the camper based on this approach, but then tripped over a conundrum. Several distributors, including Renogy, had suddenly withdrawn these panels from the market. The only survivors were small warehouses stocking a few obscure improvised brands, and marine manufacturers offering their products at marine equipment prices. Yow. Lastly, a very few outfits offering an entirely different (pre-existing) construction marched on unaffected, albeit with very poor watts per square foot ratings. There was no way I could get near enough wattage from these on my roof. The failure rate of semi-flexible panels, their relatively short warranty period, and the butchery needed to remove them after being adhered to a thin aluminum roof made me call a halt to my plans to order anything. All stop.
As I perceived my options, I could take my chances with any leftover semi-flexible panels that I could still scrape up and hope that none would fail for many years, or drastically reduce my power requirements and mount a less efficient but much more reliable old school solar strip, or do what I could with conventional framed panels and live with the weight complications. I settled on the latter, knowing that the various inherent drawbacks to this “high capacity” approach would likely result in a system that only a mother could love.
The basic question then arises: “Why try to force so much battery capacity into a small, lightweight pop-up truck camper, since the cost and weight penalties of the resulting whole system are so significant? Since the majority of the cost was already covered by reusing existing equipment, the answer is easy: perversity of character. I have a penchant for wanting to find out exactly where the limits of acceptability are when I have a desire to find the edges of a performance envelope. Where does questionable become unacceptable? Might there be a way to make high battery capacity practical under solar? Given that my batteries are significantly aged, how much rated battery capacity will be enough with the equipment and usage patterns that I will actually be using? How much power will I be using, really? What about that fridge/freezer that seems to run full-time in hot weather? Calculators and new batteries in a pristine system are not real world. Where will the 50% discharge 12.2V limit show up in my usage, and will I be able to stay within a 20% discharge level, where battery lifespan greatly extends? Is 416Ah battery capacity really wretched excess in practice, and how many years before remaining capacity proves inadequate? How much practical storage space will be stolen by such a battery system, and how can it be wired to equalize power draw and charging? How much wattage in conventional panels will fit on the roof, and how much will that extra weight affect the ability to lift/lower the FWC’s roof, as well as put the roof at risk of damage in use? The factory options for solar power are pretty good, so why do so many buyers think it’s great, but then quickly start adding onto it later, piecemeal? So, my quest became not to come up with a system that I could recommend to others, but to attempt to find the limits of what could be considered workable. That’s what this particular post is about, so I recommend against doing what I have done unless you share the same perversity of character. I had to make decisions in short order, based on the existing equipment available at the time. They might be different now – I don’t know. I’ve learned much from my oddball installation, but still lack many of the basic answers I want which can come only with additional time and use. So, don’t try this at home.
Starting over with new specially-sized conventional framed panels resulted in 360 watts on the roof, which is okay for full sun but marginal in less-than-perfect conditions. 416Ah of rated battery capacity requires a bare minimum of 416 watts to ensure a full recharge under decent weather conditions. I’d need ground panels, preferably another 200 watts total, to be able to keep the pack reasonably happy no matter what. (Even more panel wattage would be advisable in the Northwest and Midwest.)
Here’s the deal. The basic guide is that once you determine/guess how much battery will do the job for you in Amp-hours of capacity (all true deep cycle batteries use that rated value), the rule of thumb is to match that number in panel watts. In other words, 100Ah of battery capacity should have at minimum 100w of solar panels to recharge it. This standard value assumes full, strong sun every day. It also assumes that there are no power-hogging devices that will interfere with the daily charging process, such as a cooler or refrigerator. Imperfect weather or devices that interfere with charging dictate that this ratio should increase. 150 watts per 100Ah is a good all-round ratio that minimizes the charging problems caused by all-round weather. Whether it can overcome power usage by interfering devices is up to direct observation. Whatever the setup, batteries must end the recharge cycle with a full charge, or the batteries will methodically “walk down” in capacity, and the internal buildup of sulfation will greatly shorten their service life. Any quality solar charge controller will spell out what voltages it makes the battery reach, and for how long. If the controller is not allowed to reach the end of its cycle, whether by interference or cloudy weather, this can be spotted by keeping an eye on a battery voltmeter while charging is underway. I’ve found that a ratio of 200 panel watts per 100Ah of battery capacity can overcome both charge interference and moderate overcast, though not necessarily both at the same time. Still, to be able to watch a battery pack fully recharge in full overcast or in rain is a happy experience. Regardless of setup, if you’re not completing a charge nearly every day, you don’t have enough panel power for your area and can expect to pay for the lack.
Just to be clear, these ratios apply to setups primarily dependent on solar power for recharging, and which are depended on for significant amounts of power. You can get away with “substandard” setups if you use only token amounts of power, or if you travel daily and use the vehicle’s alternator for recharging. Because usage and travel style varies between individuals, it’s generally a bad idea to duplicate someone else’s system just because they think it’s the bee’s knees. Often, when you return to look at “this is all you need” systems a year or two later, you’ll find them altered to have become something else. A good fit between your usage and your solar system means that you’ve practically forgotten about it – you just use it and have no plans for expansion or modification. Thanks to the Outback controller and the inoperative ground panel system, the Intrepid’s solar system has not reached this point yet. It’s fine in clear weather and some sun exposure, and its capacity carries it through a hot cloudy day or two, but those ground panels are needed to be able to park it in cool shade, or to get it through a longer run of murky weather. I don’t have the 1.5/1 ratio I need yet.
A brief infatuation with compact and lightweight lithium batteries was theoretically interesting, but in addition to the sobering up-front cost, too much remained experimental at that time. Since then, the only proven substantial advantages seem to be space and weight. The claims of an available 90-100% discharge have not panned out where lifespan is a factor – if you want them to live, you’ll need to add more cells and limit daily discharges to 50%, same as lead-acid. Even then, the much higher number of cycles predicted to be available has not turned out to be the case, either. The long-term overall savings of lithium battery packs is still there, but you’ll have to be willing to chase it down to get it, rather than sit back and assume that it’ll just happen for you. I’m not an early adopter of high-cost, unproven items.
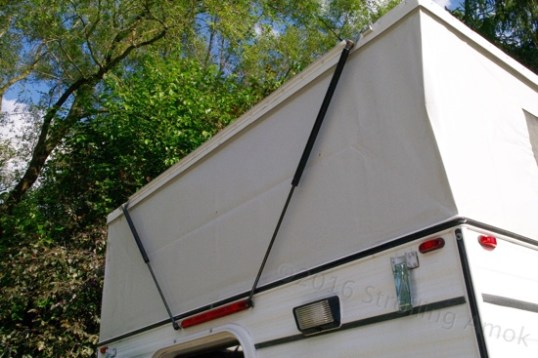
Pneumatic lifts, similar to what’s used on car hatchbacks, help lift the roof. Torsion springs on each of two interior lift panels also help with the initial grunt upward, then the cylinders take over.
I wound up ordering my Grandby with the most muscular roof lifts available. Without anything added to the roof, they are actually too strong and can raise the front end of the roof by themselves. Adding my 360 watts and the associated mounts added some 75 pounds, which makes the roof lift a bit of a chore now, but it’s still do-able with some grunting and whimpering. Lowering the roof to prepare for transport is not quite as straightforward as one might assume. Yup, gravity takes over, but if the roof has been left raised for a week, stiction on the front lifts can make it necessary to pull the front end of the roof down, at least at first. The flexible wall fabric needs to be inspected at the corners to make sure that nothing will get pinched, and that requires methodically lifting each corner from the outside and moving the canvas as needed, if necessary. That’s fairly easy in front, even with the solar panels. The rear corners are another story, because for some reason, the rear of the roof is notably heavier. What I do is grab my $30 truck bed divider, a telescoping pole with a ratchet handle on its side, and adjust it to fit between the camper’s floor and the rear lifting board that distributes force across several roof ribs. Work the handle maybe 20 times, and the roof is up far enough to check and adjust the canvas from the outside. To lower the pole, you move a release, lift the handle fully, and at the same time support the roof with your other hand to let it ease back down gently. Done.
Technically, I could have added ground panels and run the whole shebang through one MPPT controller, but that’s not a good idea when the roof is in cool shade and the ground panels are out and away in full sun. Running some panels in sun and others in shade, wired in series, collapses output throughout the system. Better to separate them into two independent systems, each with its own controller, feeding a common battery pack. FWC’s recent products already come with solar wiring leading from the roof to a battery compartment, so I ordered FWC’s optional “battery prep package”, which includes battery wiring and a battery separator to keep my enthusiastic and mindless overnight power usage from draining the Ford’s starting batteries. The battery separator model that FWC uses allows the Ford’s alternator to recharge the camper batteries during road trips, but does not allow the camper’s solar system to recharge the Ford’s starting batteries at any time. For emergencies only, I get around this by packing a low-power car battery charger and 50’ extension cord that can work off the onboard inverter, but the cleaner and cheaper solution would be to upgrade the model of battery separator in the field. It costs $61 versus $58 for the base model, so I’m not sure why it’s not a factory option (without giving it much thought).
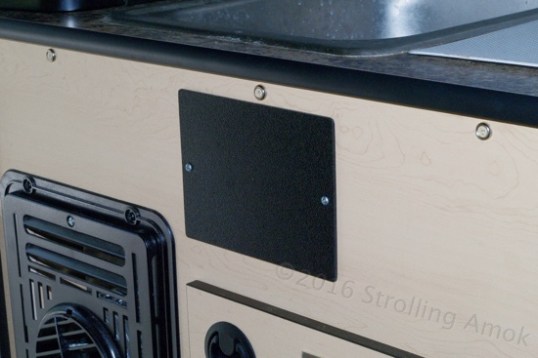
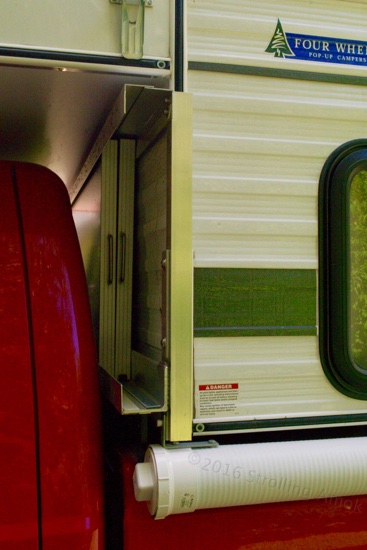
Behind this black coverplate is the junction of labeled solar panel wires from the roof and the rear wall. Whether they should be ignored or not depends on how sophisticated a setup you’re planning. At any rate, such easy access makes the task a breeze.
The FWC camper’s solar wiring harness is both easily accessible and clearly identified with tags, so it was an easy matter to separate the solar coming from the roof from the solar coming from the rear exterior wall plug, for ground panels. As delivered, the solar wiring joins the roof plug with the rear wall plug, then heads for the battery compartment/solar charger. Since I wanted the roof and ground panels to act independently via their own controllers, the roof panels are now connected to my trusty Morningstar TriStar 45Amp MPPT controller, with a temperature sensor for the batteries. That trims back charging when the batteries are hot, so that they don’t overheat and overcharge, which can damage them. When the batteries are cold, it ramps up power and ensures a full charge. I chose a 20Amp Outback SmartHarvest MPPT controller to feed in whatever the ground panels generate. In theory, the two controllers read the same battery voltage and feed in whatever they detect is needed, independently. The panels in shade won’t boost battery voltage much, while the panels in sun will take over and push charging voltage up where it should be. One controller handles the charge, while the other effectively backs off. With both in full sun, they both pour it on, each shutting down to maintenance levels once each’s proper voltage peak has been detected.
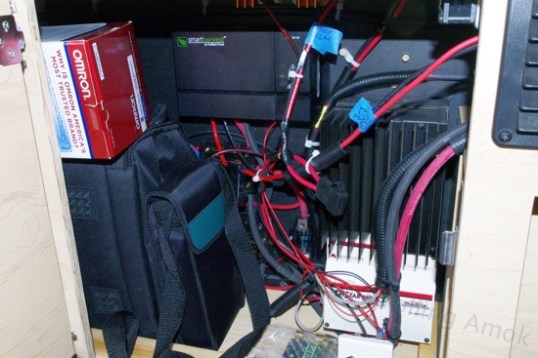
Oop. The original battery compartment has been repurposed to hold wiring junction boxes, fuses, dual solar charge controllers, a battery desulfator, and odd storage. All wiring still congregates here as if the batteries still lived here – except that they’ve been relocated to be inside the dining benches.
That’s the theory. According to Morningstar engineers, neither controller senses the presence of the other – all they care about is proper voltage levels they see at the battery pack. Trouble is, the Outback controller cares – and cares very much. The first sample I got went nuts all by itself, running solo. Its replacement worked okay in brief solo trial runs, but was all over the map again when running alongside the Morningstar, triggering LED warnings and spiking voltage up and down on a hysterical rampage, such that it forced the Morningstar to warn of critical voltage and then shut down until each tantrum was over. Does not play well with others. Outback doesn’t really have what I’d call an engineering staff in their USA office, and your choices are to either listen to them shrug, or hear them offer to ship out yet another controller. They have no idea why it’s misbehaving so spectacularly, solo or in combination, and the fact that no remote temperature sensor is available for it is not good when the pack is in a closed cabinet. It has the technical capability, reflected in ads and manuals, but they chose not to manufacture the sensor, and they warn against grafting in other sensors. Well, thanks a pantload, Chet! Morningstar engineers listen, ask questions, double-check basics, and offer things to try, no matter how much time it takes on the phone. Not much they can do when someone else’s product is pumping voltages up to critical, though. All of this Outback discovery occurred late in the game, just before departure, so for the time being, I’m running on just the roof panels, which are undersized for the different areas of the country I’m visiting. When I return to my home base in the Yuma area, I’ll be swapping in Morningstar’s SunSaver MPPT and be done with it. Sometimes, saving money on a controller is not worth the agony of living with it.

The driver’s side bench with two of the four AGMs on board, with protective cases. They steal much space, but not all of it.
The passenger-side bench while goofing around with basic fit issues. All four AGMs squeeze easily into one bench, but the wiring and access quickly become an issue, which is a shame. With enough huffing and puffing, I can get them in and out, but cabling and service become a nightmare.
As for the batteries, I wound up stuffing them into the dinette benches, inside battery boxes to keep terminals and wiring protected from stored items. Yep, they take up a lot of room, but not all of it. They are linked to each other, a plethora of fuses, and the controllers with a fairly elaborate routing of 4-AWG welding cable in an attempt to equalize the draw on each battery as much as possible. The fuses are intended to prevent either of the two battery pairs from powering any shorts anywhere along the line. One fuse might be okay for one close-knit pack, but once you start physically separating the components of a single pack, the connecting wires are powered at both ends, and my goal here is to learn from the unhappy mistakes of others. Very unhappy, involving combustion. The front dinette Grandby offers ample opportunity to string cable where it doesn’t show, if you’re willing to drill. Overall, the battery system works well and, left on solar power, presents no issues.
On shore power, I have an anomaly that I have tried to resolve with IOTA Engineering for proper battery recharging while on shore power. This unit is standard on the Four Wheel camper. The problem I saw was that the IOTA IQ4 power converter pumped battery pack voltage up to 14.5 volts – for two days. It would not drop. That heated up the batteries a heap, and I turned it off. An unexpected side effect is that the quick battery voltage sag that occurs when batteries age (like dropping from 12.9 to 12.6V quickly, then taking a long time to lower further) has disappeared, at least temporarily. The batteries act like new. This is similar to when a controller “equalizes” batteries to try to get rid of sulfation, but the time and temperature here were exaggerated and could damage the batteries. In my case, if I was lucky, it apparently cleared off sulfation remarkably well, and that’s it. If not, the beneficial effects will be short-lived, and one or more cells in the pack will eventually show damage. At this point, I’m just being optimistic and enjoying it. For what it’s worth, a pack-powered battery desulfator has been running on the pack full-time. Whether that made any contribution to health during the overheat is up for debate.
When talking with IOTA, they told me that their converter/charger is programmed to charge the pack to 14.8 volts for 4 hours, then drop to 14.2 volts for 8 hours before dropping to a 13.6V float charge. The 14.2/13.6 voltages are not out of line with what the TriStar solar charge controller provides, nor what with my Life-Line AGM batteries can take, but the length of time that the batteries are held at the 14.8 & 14.2 voltages is comparatively excessive. The initial 14.8V bulk charge is high, but the temperature-compensated TriStar has reached 14.7 volts regularly, if only for a short time. The TriStar, once it has reached its peak, will then drop to 14.4V for an hour and a half before going into float and holding at 13.7V. No trauma there. Trouble is, there is no temperature compensation with the IQ4 unit, so the unit can’t dial back charging voltages in hot weather, when the batteries can’t take high charge voltages. Combine hot weather, the batteries being in an unventilated bench (which maybe I should do something about) and the very long high voltage exposures, and it’s little wonder that my batteries overheated. The warmer they got, the more that voltage needed to be dialed back to prevent overcharging (and further overheating). A second trial on an 80-degree day got battery voltage up to 14.3, then 16 hours later it had reached 14.5V, indicating to me that the charger was still locked in bulk charge mode, attempting to reach 14.8V. It does not recognize failure and give up. The battery temperatures were normal. The IOTA 30A charger is capable of pumping out 400 watts, which should be very adequate for 416Ah of battery capacity, so why it can’t seem to attain its 14.8 bulk charge spec is a mystery to me. However, keep in mind that FWC uses this unit to charge packs less than a third of my capacity and has no problems, so my “wretched excess” may be contributing here. Locking itself into an eternal voltage war is not too good for the batteries, and more powerful IQ4 units are available independently, but the Grandby’s shore power system is limited to 30 amps input, so ramping up power is not a good plan. The IQ4 is not adjustable.
At this point, my impression is that the IQ4 is simply too aggressive in its timing routine for AGM batteries, and that its very long charge times at high voltage, combined with hot weather, no compensation for temperature, the mysterious lack of ability to reach its trigger voltage, and my lack of battery ventilation poses a risk of damage to my batteries. Given that battery service life can be expected to be cut in half at each 18-degree rise in temperature, this “hot weather and shore power” combo is a concern. Aside from testing, I’m not enthusiastic about hooking up to shore power and just switching on the converter to let it do its thing on the batteries. On those rare occasions, I’ll prefer to monitor voltage and time it myself, then turn it off. That will not lead to a very good charge when the solar system can’t help at all, but it’s better than hammering the batteries for 12 hours. Since I’m no electrical engineer, my ability to solve such mysteries is very limited. FWC is stumped, and IOTA seems to feel that their unit’s behavior indicates some problem or incompatibility elsewhere in the system. Couldn’t be their product. Fortunately, I don’t use shore power very much at all, and when I do, the Intrepid’s solar system is capable of pampering the little-used battery pack with the IQ4’s circuit breaker switched off, which is how it stays. Now, a real man would cut the system down to just one of two batteries just to see what happens to those charging rates. I have too much else on my plate for such shenanigans, so I’m not bothering. In my present usage, I don’t need to care why it doesn’t work, and don’t want it stressing my AGM batteries anyway.
Well, the ground panel storage rack has done its job commendably. It’s only too bad that I haven’t had the opportunity to yank panels in and out to get more power.
The custom aluminum ground panel rack mounted to the camper’s front jack mounts has obviously not been used much on this trip, thanks to the wonky Outback Smart Harvest solar charge controller, but the rack itself has presented no issues at all in carrying the panels. It’s just there, holding the twin panels securely. It traps the panels without holding them tightly, so I may hear a slight shift on rough ground, and that’s about it. This rack approach is much more expensive than the usual “under the camper bed platform” holder, but if you’re using one big, heavy ground panel or a couple of smaller ones that can’t both fit, it’s worth considering as a more secure alternative, particularly on a stiffly-sprung vehicle. You just need to make sure that you have the necessary room to add it to your particular installation, or can space the camper rearward a little, as I did. The available gap varies with the vehicle that the camper is installed in.
In retrospect, the options open up as one’s power needs decrease, so I view the Intrepid’s solar installation as too eclectic or experimental to apply to anyone else’s rig. It’ll work fine for me once I replace the Outback ground panel solar charger, but I recommend against anyone mimicking my entire solar/battery system on an FWC, even though the Dometic fridge can run the batteries down 25% in one dark overcast 90-degree day. Trying to support 400Ah+ of battery capacity on this type of truck camper calls for a lot of compromises toward the Dark Side, and unless you’re going to use all of that juice, it isn’t worth it. If you are going to use it, get your wallet warmed up and try to avoid adding more than 40-50 pounds of solar panels to the Grandby’s roof, with mounting points for it as far from the midpoint as possible. Shorter roofs are inherently stiffer, and aren’t as sensitive to centered loads.

People often ask whether I’ve visited this or that national park yet. With access to private camping offering views like this, I’m not seeing the point of rattling down any checklist. Near Wickenburg, Arizona.

To solve the controller fighting problem I dumped the second controller and wired the secondary bank of panels through a diode and switch. Add in the second bank manually when needed on cloudy or short charging days and switch off when the main panels start regulating. The second group of panels is mounted vertically for travel on the side of the rig, in a way that can be locked in place or removed. They are wired through a plug so that they can charge while parked, or removed to a more favorable location and wiring extended.
Uhmm, I’d have to get the full-on explanation for that, John, since I’m not sure how/why the one-way check valve action of a switched diode would handle the various sun/shade situations. I’d like to blame it on the recent surgery, which left me with a few less operating brain cells, but nah, it’s just me. The vertical side-mounting of the “extra” panels, I get!
The diode is only there to block reverse flow so there is no need to shut off the switched panels at night.
I don’t often use the switched panels in summer, or after mid Feb. Then there usually is enough sun to top up the battery bank in the morning without the extra.
The switched panels are added in the morning if it is expected to be a cloudy day, and I am going to be around for the day. I have two analog ammeters, one on each panel group , mounted where they are easily visible.
The analog meters, are 50 mv movement meters with a homemade shunt made from a measured length of wire connected across the meter terminals and rolled up in a ball inside the meter box. A digital ammeter was connected in series with the analog meter for calibration, and the wire cut to make the scale read correctly.
When I see the regulator on the main panels ,(via the meter) cycling on and off ( which in my case is set at 14.4 volts measured at the batteries), I use the switch to manually disconnect the switched bank. The regulated panels continue on line to make up any more charge as needed.
This system has been in use in my case for about 8 years.
Maybe I didn’t answer your question fully. I just caught on to what you were asking.
Solar panels should be considered as current sources. Each panel just adds to the total. Shade on one just reduces the total current going to the battery bank. Switching several offline does the same. Reduced current reduces the rate that the voltage of the battery bank increases . The regulator does not care what current is going into the battery bank and from where it comes. It measures voltage and it just takes longer to reach “full” when the current is reduced.
Oh, I gotcha. Most framed panels have diodes already in the junction box, so I wondered. Thanks. I’m glad this system works well for you AND that you have the presence of mind to stay on top of it when necessary. I usually get distracted and lose all sense of time when doing things. Thankfully, your system just cycles on and off instead of self-destructing – unlike my oatmeal breakfasts. If I forget to set a timer, there’s no end to the things I can ruin. It must be nice to be an electronics buff, eh?
OK, that will do for now, but I’m waiting for them to perfect that SolarGen roof paint stuff. Comes in dozens of colors, sticks to just about any surface, is waterproof and unaffected by ambient temperature, self correcting in partial shade, self repairing in case of scratches and nicks, battery sensing so acts as it’s own charge controller, and produces about 75 watts per sq. ft. in full sun. (Just be sure to stir the contents of the can thoroughly before applying with a 3/8 nap roller to get even power production.)
Once I’ve got that on the roof I’ll sit back and wait for the consumer version of the Personal MicroFusion Generator which I expect to be about twice the size of my thumb and plug into a proprietary port (I suppose the port will be pricey but can’t have everything!) directly supplying all the 12 volt power I would ever need in an RV.
Of course once the Mach2 version is available I’ll have to upgrade because then I’ll also have enough power to run my electric, articulated 6-wheel drive RV (Independent drive at each wheel with triple redundant computer control of course.) at everything from rock-crawling to highway speed for up to 23 out of every 24 hours. (If that hour for generator self diagnostics and repair becomes an issue I could always buy two Mach2’s and swap them out every 12 hours or so but I don’t think that will be necessary. . .)
Dear Greg,
Please ship me a container of whatever it is you’re taking, and let me know your current dosage.
Thanks,
😉
Aw dang-it!! Just once I’d like it to be real and not just another wishful hallucination. . . BTW, my shrink says I can’t have anymore of the good stuff so that’s all me baby!!
Awesome.
so here I was all proud of myself for making it through your whole post and understanding everything, then I run into John’s dual panel setup and I’m lost.
Are the ground panels feeding into the controller, or directly to battery without a controller? And what happens to the controller when the voltage ramps up too high? Are the panels matched? What happens if they are not?
Leaks are fixed, looks like they got a bad batch of silicone, it peeled right off when they touched it. There is nothing quite like having a dry spot to hang out in now that the rains have come to stay until spring. Sigh.
The moveable “ground” panels are the ones fed through the switch and diode without a controller. Only two of my five panels are matched, which does not seem to pose a problem. The oldest was bought in 1990 and still puts out the same amps. It was originally on my live-aboard boat and was moved to our first RV in 1997. The newest two panels were added in 2008 and were originally fed through a second regulator.
When I could not solve the dual regulator fighting problem after two months of trying, I installed the switch and blocking diode as a temporary measure. So far it works just fine.
Over charging is still possible with this setup, but so far (8 years with this setup ), battery life seems to be about the same (5-6 years). We travel, only solar boondocking, about 9 months of the year for the last 21 years. The battery bank gets good use.
When the battery reaches its set-point the fixed panels (which feed through the regulator) start cycling on and off, which reduces the total current entering the battery. The ground panels still are still feeding the battery bank until I notice that cycling is occurring. I then switch them off until later in the day when sun is reduced. If miss the exact moment by an hour or two I don’t worry. It is not bad to bring a battery occasionally to a higher voltage, and is sometimes built into better chargers. This is called equalizing where battery is brought to a voltage around 16.6 volts for 8-10 hours, thereby forcing the cells within a battery to have an equal voltage on each.
And I have a controller which is not affected by overvoltage , unlike some of the cheaper digital regulators sold today. They MUST be connected to a battery before connecting to the solar panels.
thank you for clarifying John, I think I get the gist of it. You are basically using the controller as a monitoring device so that you know when to unplug the uncontrolled ground panels, right?
Good to know. When I talked to the local salesman, he made it sound like it would never be any problem to connect another set of panels with their own controller to the battery.
Glad your leaks are now fixed! And glad that John replied!