
Revenge of the Catch-22

Per my last post on the topic of solar panels for the Mighty Intrepid/FWC Grandby, I had a decent planned setup with a 100W solar panel at each corner of the roof, each panel being held with a 20.5-inch long ABS adhesive mount fore and aft, for aero and dependability reasons. I figured that would be long enough to catch a couple of structural roof ribs under each one, and apply an abundance of adhesion to hold to the roof securely. The only real limitation was that I could come only so close to the roof edge because of tapering of the roof’s thickness.The panels would be held to the mounts with horizontal screws. The panels might be closer to the start of the taper than I liked, but it seemed promising.
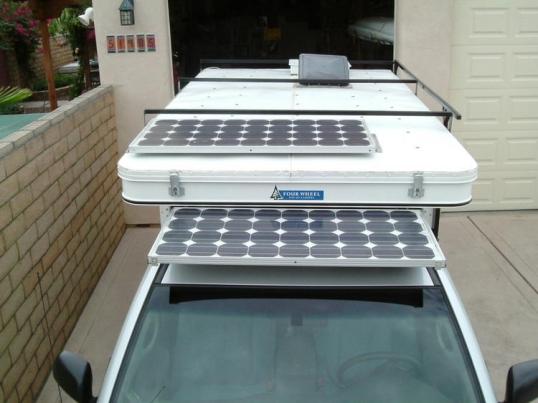
As for using ground panels to add solar power, stowing a solar panel in slides mounted under the Grandby’s bed overhang has been done for awhile. After all, that platform is engineered to carry a heap of weight, being a 7″ or more vertical aluminum extrusion wrapped around the bed perimeter. Plywood forms the mattress platform, and a 20-pound panel hung under it should be no big deal, right? Given that the camper is now installed and that drilling holes from underneath is hit or miss because of its closeness to the truck cab’s roof, I thought about attaching a panel-carrying set of rails underneath, held by 3M VHB (Very High Bond) tape and supplemented toward each end with screws, since drilling there from underneath is not a problem. But what was the facing surface under this platform? There are a few different versions of VHB tape, each tailored for certain surfaces. I emailed Four Wheel Campers to ask.

This is what holds the bed platform, so there’s no concern about hanging some weight under it – as long as it’s done properly.
What I promptly got back was a reply saying, “If you could please call us at ___-___-____, we can discuss a number of issues at the same time and wrap this up for you.” Say what? I’d expected an easy answer and a wish of good luck. So I called, and was immediately patched over to a speakerphone where their Service and Parts guy and the owner of FWC, Tom Hanagan, were on the blower. Their concern was my intention to use adhesive, and the fact that the 3/4″ plywood used for the bed platform is faced with Formica on the bottom to ward off moisture. There was some concern that the VHB-backed fully-loaded new panel slides might overpower the bond that the Formica has on the plywood. After all, it’s not 34 pounds of panels at rest, it’s 34 pounds of panels bouncing violently up and down. You don’t want to unintentionally delaminate the Formica. Tom suggested that I might get away with it as long as a number of screws toward the end were added. I hadn’t told him that my plan was to give each panel its own carrier beside the other, not doubled up in a single rack. That would help a great deal. Issue solved, in my mind.
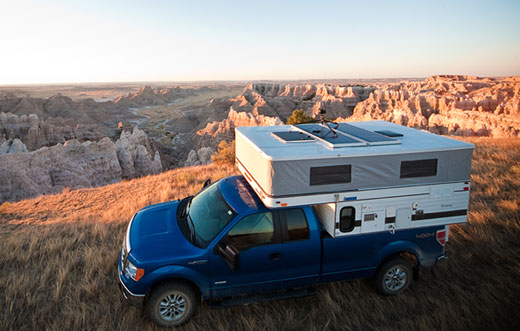
Not applicable to my use, but an interesting idea as long as you’re willing to always park aimed southward.
Note that his concern here is not to tell the customer what to do or not do, but to try to advise on any planned mods so that the end result is a successful one. Virtually everything on the FWC camper is designed to do its job well – and no more. That would add weight, and more weight requires more strength, which also tends to add more weight that needs even more strength. Modifications tend to head over into territory where something may well become compromised, and Four Wheel highly values its street reputation. The last thing they want is for a customer to strap something on or nail it down in such a way as to create a problem with the camper itself, and then start whining about it in forums. I’ve actually read a complaint about how easily the FWC rooftop luggage rack tubing can be damaged by wiping one end against an overhanging tree branch. Seriously. The writer did not wonder where that force would transfer to had the rack been beefed up, though he did note that the roof itself had been miraculously left intact. The FWC is built for what it’s built for, and hanging a minibike on garage wall hooks screwed into the camper’s back wall isn’t going to work.
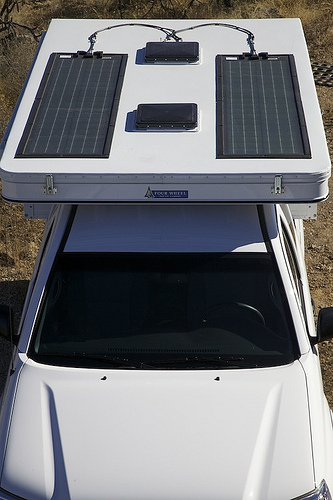
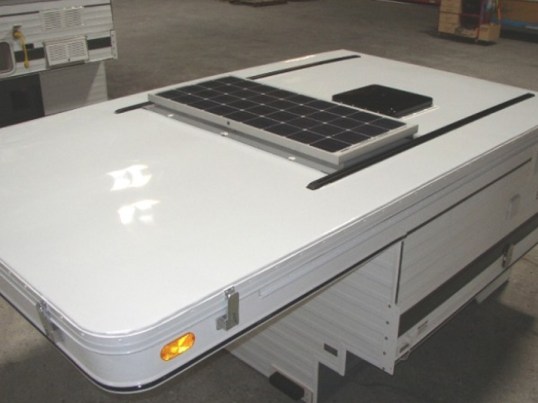
Here’s a 200W system based on two flexible Global Solar panels adhered to the roof. They are pricey and relatively inefficient, but work. Note that this FWC has its vents centered, something I didn’t know could be ordered.
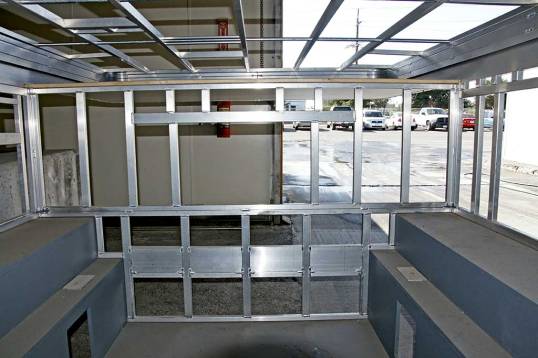
Before hanging up the phone, on a whim, I mentioned adding a 17-pound, 100W framed solar panel at each roof corner, using adhesive mounts. I mentioned my successful lift tests using the high-rate lift assist struts, and that each panel would be close to a lift strut, making roof loading a structural non-issue. That didn’t go over well, not at all. The issue was not weight, as I expected, but the nature of the roof itself, and the naughty term I’d used was “adhesive mounts”. The roof is a flat skeleton of rectangular tubing, with an aluminum skin overlaid. In spots, you can feel the lack of full support underneath by pushing down with your finger. Tom’s concern was the likelihood of any panel to lift or shake during travel, combined with the fact that the fatigue resistance of aluminum is pretty miserable compared to steel. If the mount is allowed to cause movement, the sheet will crack and leak at the flex site, requiring a tortuous skin removal process.
Mind you, I’m thinking about rigid strip mounts that are 20.5″ x 3.5″ in contact, and thinking that this will be a bummer if that aluminum roof sheet is just loosely draped over the top of the ribbing below. Tom was talking about how solar panel mounts should be screwed down to support ribs on the FWC, never adhered to a floppy aluminum skin. The problem now is that there’s no really accurate way to locate those ribs to screw into on a finished roof. You can get an approximation by feel, but when it comes down to drilling and screwing, it’s a gamble. Double bummer – must drill and use screws, but exactly where? Might be why the overpriced factory solar is so popular, and aftermarket roof installs are few. I asked about whether the top sheet is bonded in any way to the supports below, and it is: VHB tape. That’s very good because it prevents the sheet from moving on its own, and bad because if you do anything to hurt the sheet or cause it to vibrate, replacing it is a heroically arduous and expensive process. Thus sobered with the hard truth, I ended the call. Rib locations and obstructions would dictate how much of the roof’s real estate would be usable, and my plan to simply pop four 100W panels up at each corner was trash if I couldn’t find the physical structure to mount to.
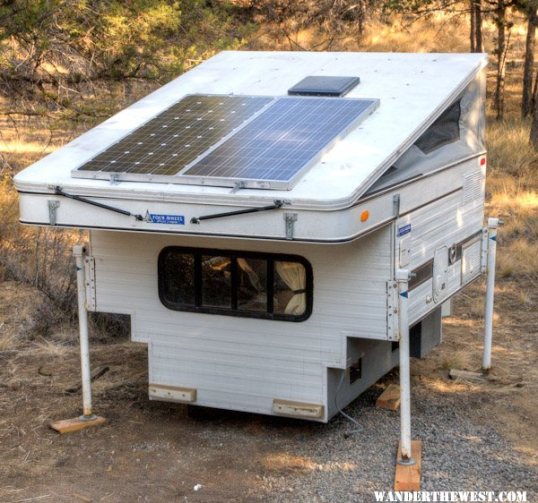
Here’s 240 watts of panels mounted on an old FWC, where the rivet-laden roof clearly shows where structural beams are.
But waitaminute! Given a strong enough adhesive bond above each support rib, couldn’t I lay VHB on top, stick the panel mounts down at each rib, and get much the same solidity as using a screw? Long mounts would probably only need to span a couple of support ribs to make a VHB and aluminum sandwich, though more would be much better. Solidly mounted at those multiple points, there would be no loading of unsupported sheet between them. It would all be on the ribs. All I’d have to ensure is that all panel mounts span at least two structural ribs, that the panel and mount make a stiff assembly, and that the resulting panel locations “work” without interfering with roof vents or the solar wire terminal, or run off the start of the taper near the roof’s edge. Lack of success here means cutting way back on that power and convenience thing, so it should be an interesting decision to make.
Centered vents again. This is a photographer’s camper. He had the vents centered, replaced the front one with an escape hatch vent, and had panels added. The panels double as a nocturnal tripod platform for long-exposure night sky shots.
But first, time for a little touchy-feely on the camper’s roof. A quick grope showed that only ribs running front to back were prominent, and that the most significant of these straddled the roof’s dual vents and stayed some distance from the roof’s perimeter. A vague edge taper that looked like it began 6 inches or so from the edge was actually a full foot away. That one detail meant that I was dealing with a mounting area much smaller than I’d expected, the pinch between edge and vent making large sections of the roof unusable for solar panels. I began to see why FWC limited their mounted solar options to one roof panel, albeit a sizable one.
This photo gives some idea as to why only the front-to-back ribs are easy to find. Everything else is hit or miss.
FWC’s current roof-mounted solar panel is a 160-watt unit supplied by Zamp. That’s a pretty big panel, but how big, where is it mounted, and with what type of mount? Is there a photo anywhere showing the FWC’s roof rib layout? A call to FWC for the latter yielded nothing, as did a Google search. What did turn up were a couple of photos showing panel placement and mounts. The panel was between the two roof vents, oriented crossways and centered left to right. It tended to be located a set distance from the front vent no matter how long the roof was, and covered over the solar power connector. That made sense to me, as those few who had left it unshrouded had warned of rain intrusion and terminal corrosion. The SAE plug used in making a solar connection does not offer the same protection as the tethered plastic cover. What was notable was that the panel’s leading and trailing edges were supported by a full-length, continuous aluminum mount going from side to side and of the same length as the panel, and that this panel and its extruded aluminum mounts appeared to stop about a foot or so from the roof’s sides – right where the roof taper begins.
Tracking down this panel showed it to be 58-3/8″ long, which just happened to stop it and its mounts right on top of the outermost full-height roof structure. And there was a reference to just three screws being used to fasten each mount to the roof, one at the central rib next to the side of the vents, and two at the full-height perimeter. Those are lathered with sealant. Not a lot of overkill on holding power for such a large component, but it apparently works just fine. Unlike the long mounts considered in previous posts and comments on this blog, FWC was not bothering to try to intercept anything with their mount but ribs spanning from front to back, with the side benefit of blocking off air from getting under the panel during highway travel. Theirs was a common “Z” mount, a simple zigzag profile of aluminum that bolts to the back of a panel frame, lifts it off the roof and provides a flange to bolt it down.
This is FWC’s older 100-watt option. Notice the end-to-end panel support and the sealant buttered over the six mounting screws.
So, it seemed natural to try to adapt this proven mount style in an attempt to at least double the factory’s solar wattage. After all, I’d begun with a 600-watt target using lightweight semi-flexible solar panels, and when those threatened durability problems, weight constraints cut back conventional framed panels to a grudging 400 watts total. But that was before the roof surface I could use shrank to slim pickings. Where was I going to find room for an additional 240 watts, still be able to lift it with the roof, and keep it from fatiguing the aluminum skin?
Since I was stuck with a raging head cold, the only way to explore this was to lay out the Grandby’s roof to scale in drawing software, then start plopping scale solar panels down, using only long side-to-side extruded mounts that are certain to rest on the three or more principal ribs that I knew about. I began with a single 160-watt panel and tried to supplement it without any success, then laid down Renogy 100W mono-crystalline panels, since I already have two of them. I managed to get a total of three of them up there without too much difficulty, but that was it. 300 watts max.
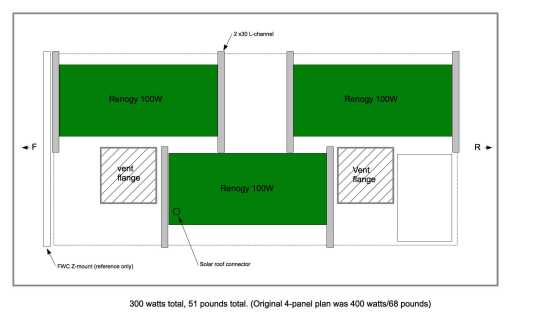
With solar panels constrained to areas where roof beams are available, these Renogy 100W panels just squeak by for 300 watts.
I then toyed with Aleko 12V & 24V panels, which are available in a very wide range of wattages and sizes. They tend to be shorter and wider than Renogy’s panels, at least in the 100W size. 24-volt panels double the voltage but cut the amperage in half, so they don’t produce any more total power but do allow sizable solar arrays without needing heavy gauge wires to the controller. They’re also appropriate for ground panels, which typically have to send their power down long runs of wire that resist amperage, but not voltage. Unlike the Defiant, neither advantage applied in the case of my Grandby’s rooftop, and topped out my existing MPPT controller with just three 100W panels, so I kept going with more common 12V panels on mind, to allow future expansion.
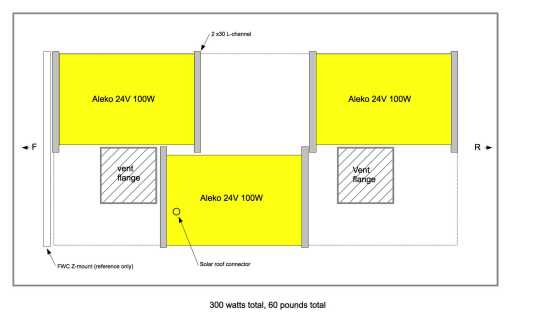
Swapping in Alecko 100W panels opens up a little more usable free space here.
Three 100W Aleckos fit in such a way as to open up a sizable gap between them, one big enough to pack in a 60W panel. In fact, if weight were not an issue, additional 20W and 10W panels could also be jammed on to total 390 watts. The 360-watt configuration seems livable for both weight and power, but the only nagging question is the serious suitability of VHB tape for the conditions that it will face on the roof. The temperatures can get high, and the actual working contact patches are quite small, which is why FWC leans toward screws. Since the rooftop solar connector must remain accessible, their Z-mount or the panel itself must also be removable for servicing. In their case, the entire panel and mount assembly can be unfastened and removed. In my case, I can use screws too, if I’m dead certain of proper drill locations. If not, then I would need to get around the need for accuracy with VHB tape, and the mounts themselves are best judged as unable be removed from the roof in any practical way without damaging the skin.
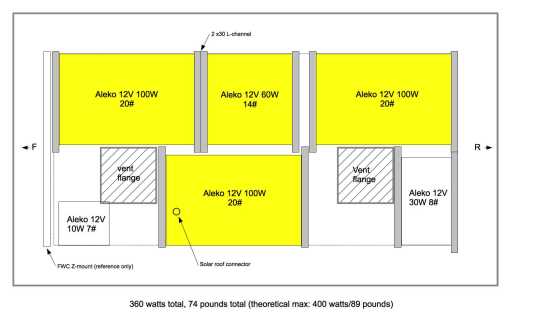
Here’s the same layout with a 60W panel added to total 360 watts. 390 is technically possible, but not practical.
But the question remains about the usability of VHB tape in this application. Just how much holding power is typical? That depends on the adhesive chosen, and in this case the #4941 family may be as good as anything as an example. It typically will take 22 pounds of pull from one edge to peel it back off, and somewhere over 85 pounds per square inch to pull the bond apart in one shot. Shear, or pulling the bond sideways, can separate it at 70 pounds per square inch. The largest panel on the roof will weigh 20 pounds, and the manner of blocking road airflow underneath it will greatly limit lift. Given three contact points per mount at a measly 1 square inch apiece should more than take care of needs. Maximum sustained temperature to hold that bond is 194 degrees, which should be enough, considering that the aluminum panel mount will act as a heat sink, and any wind from travel movement will act to cool the joint. 3-day water immersion tests show no effect on bond strength.
So for the roof, VHB tape in place of screws is a possibility. What could possibly mess that up? Thermal expansion shouldn’t be much of an issue, since the roof and panel mounts are the same material, and the tape can handle sideways movement up to three times its .045″ thickness. Add in a little paranoia, and the potential trouble points finally appear. Being a welded assembly, any three roof ribs are not going to be in perfect alignment for flatness. The tape and its foam center layer can accommodate some unevenness, but the tape wants to see a hearty 15 pounds of shove per square inch during attachment for the best bond quality, and whichever rib is lowest may not attain that without two or three times that pressure. A serious misalignment of ribs can result either in a failed bond at the low rib, or at best a tall stretching of the foam as the gap encourages the foam to creep over time. This creep becomes permanent, and can set in at very low constant loads. 3M advises that static pulling loads be kept under 1 pound for each 4 square inches of tape in order to avoid this deformation. VHB tape is made to resist momentary high loads, not constant loads for long periods of time.
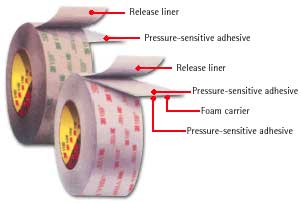
The foam carrier version is the one being considered here.
That foam layer is also slightly compressible, and potentially introduces the same problem it’s trying to prevent: aluminum sheet flex and fatigue. If a length of VHB tape is applied along the entire bottom of the long panel mount, any roof sheet stuck to it will be held motionless. That’s good. However, with the panel’s weight in place and bearing down on the three support ribs underneath, the tape foam actually bearing the load is quite small and may compress very slightly on bumpy roads, like washboard dirt trails. The surrounding foam stuck to the roof sheet does not compress because it has nothing to compress against. The potential result is that the aluminum sheet on either border of the load-bearing area may be forced to flex, if only a tiny amount. The amount is not as much a concern as the effect of long-term repetition on aluminum, which has little fatigue resistance.
Washboard roads are famous for encouraging spontaneous disassembly of fasteners, and in this case will present some unknown degree of potential for roof cracks from metal fatigue. The only way around this that I can see is to limit VHB tape application to being directly above the VHB tape already present below the roof. Not knowing precisely where the edges of that lower tape are makes this an unrealistic approach. Decreasing the VHB tape’s foam thickness and compression would also help, but this would inherently limit its ability to conform to rib misalignment, and harm overall bond strength. So the same inability to accurately locate drill points for screws also has a potential effect of the use of adhesive panel fasteners. This roof sheet flex of perhaps a few thousandths of an inch exists in theory, but whether the result will be a problem in practice is hard to say, particularly because the VHB foam underneath the sheet may take up half of the sheet flex with its own compression. Should I take the adhesive approach over screws, I’ll be banking that this potential will not flesh out into an actual problem over time.
The creep (or permanent foam stretch) is worse news for trying to suspend the panels underneath the bed overhang in storage, using only VHB tape. Suspending 9 pounds per rail requires a 36-inch run of 1″-wide tape at minimum (4 inches per pound), and that’s without any bouncing or vibration. Adding screws at the rail ends starts to seem like a pretty good idea, since sooner or later, the foam would stretch enough to visibly hang below the Formica facing. How sturdily the Formica is held to the plywood above is also an unanswerable question.
So, my take is that, given roof panel mounts long enough to span several roof ribs, adhesive tape is a workable approach. It’s a gamble in the log run however, both from the potential effects of vibration on the aluminum roof skin, and the basic integrity of the bonds after years of exposure. Once applied in this way, the panel mounts must be considered inseparable from the roof. Whether adhered or drilled for fasteners, the mounts will consist of thin aluminum L-channel extrusions, with the panels attached by self-tapping screws applied through the upper sections and into the panel frames. Which way I will swing on bonding vs drilling will wait until the proverbial last moment, probably depending on my confidence level in locating structural ribs underneath where each panel mount must go. Suspense!

Voice of experience here in HOME projects only. I learned the hard way that adhesives are a real problem long term, even when utililized in homes where there is zero movement. I heavily favor the bolt/screw option as it provides easier access/removal/reliability and the thought of re-skinning sounds very expensive. The holes drilled can be an issue relative to the elements, but there are an array of ways that can effectively solve that issue. Danger Will Robinson!
Point taken to heart, Matt! A couple of days ago, I noticed an add-on truck window vent stuck on with VHB tape starting to work its way loose from one end. Of course, that’s after nine years of full exposure, but is a reminder that there are limits.
In my mind there is no contest in the adhesive attachments vs positive mechanical attachments, cotter pins, safety wire or lock nuts won me over years ago.
“Years ago” may be the key here, some of the modern adhesives used in body work (in place of welding) are seemingly wondrous compounds. Then again you never ever plan on taking that that glued (or welded) body panel off again, I wouldn’t glue a water pump on.
My thoughts on a fiberglass roof still go to artificial gutters mechanically attached to the side of the roof (three sets). Risers & bars across the top with length wise supports between them for the panels. It works well on VW pop tops & high rise roofs on vans.
Yep, that’s one of the issues with really good adhesives – once it’s on, don’t plan on removing it for any reason. In the case of roof bars to mount things to, FWC’s approach is to lay twin Yakima slide tracks on top of the main outside roof beams, since messing with the aluminum assembly along the roof perimeter would not go well.
Totally different idea… Jeep Wranglers have a similar problem in that a fold down soft top has zero support ability. One of the ways off road Jeepers carry stuff on the roof is a framework that bolts to the body… aka The Mighty Ferds body. Would have to be able to fold or better, use hydralics (thinking about struts used for tailgates and hoods). That would eliminate having to use an aluminium skinned roof. No idea how it would work, but….. :0) Just another idea for you to mull over.
And Happy New Year!
Oh sure, dump it in my lap to work out! 😉 Thanks, Mary. Actually, I have liked the lift strut as one way to swing up large solar panels from the side.
my goodness but things have gotten complicated since I last checked in with your blog!
Happy New Year!
Well I’m very glad that I can learn from your working out these problems long before I get anywhere near having to deal with this myself. And you do it with such thoroughness of research that I know it will probably be done right, without oops situations cropping up.
Having read so many other full timers’ experience in mounting solar panels on vans and RV’s, I had no idea of the gotchas that come with the thin aluminum roof on a FWC for mounting things. I almost wish I’d bought a van.
What do you think of ordering the pricey rack system with the tracks, and bolting some rigid panels to that? Unless they have perfected the semiflex ones by the time I’m ready to buy, I would rather just steer clear of them for roof mounted purposes.
Thank you, Ming. The main goal for me is to stave off those “oops” situations, but it doesn’t always work because we don’t know what we don’t know yet. It’s for that reason that I stall and research and wait for a sense that it’s unlikely that something significant is still out there, waiting in the weeds. As of today, I’m finally ready to order solar panels and extrusions suitable for using as mounts.
Dealing with the FWC’s roof is a little like trying to bolt a bike carrier onto a Formula 1 race car, but most users of FWC’s ante up for the proper factory equipment to do the job, like solar and roof rack options. Most units are not used full-time, which affects the perceived PITA factor. Those who want to seriously load up the roof but still stay with a pop-up will usually go for other brands which use mechanical cranks or hydraulics to force the roof up, though those units generally take smaller half-ton trucks out of the equation. The FWC fills the needs of a small niche of campers, and is not a mainstream product.
Knowing what I know now, and with my own goals in mind, I feel that adding the Yakima rack system option as a base for adding solar panels would have been worthwhile despite the cost. It pretty much eliminates the installation risks I’ll be facing, and allows the potential to add significant loads without as much risk of warping the roof.
oh the joys of having small niche interests, why do I keep doing this to myself? There is so much extra work involved. What comes first, the tendency to fiddle with things, or the pickiness to get things just right? 😛
You’ve got me nearly convinced on the furnace, though I already have a Buddy heater and would like it for the flexibility of using it in the outside shelter.
And you’ve got me convinced to go for the factory options of the roof rack and maybe their solar panel, augmented by ground deploy units. Thanks again for figuring out the details with the wiring and charge controllers, I must go reread that post.
As an aside, I had planned to buy a couple of 50 watt lightweight panels to rig up my own lightweight small suitcase setup. Might that work for you?
I think the pickiness to get things just so comes first, leading to the tendency to fiddle with things until the original goal is completely forgotten. And hey, I’m not trying to convince anyone to do what I do – that might leads to run-ins with law enforcement. I’m simply describing what I’ve found while making my own choices. The furnace fan will help take down the battery, so that’s another point for the Mr. Heater. If you camp in a normal way, the factory solar is a good way to go, and their online equipment listing/manuals may spell out what controller(s) they use in their own installations. That would let you know how much ground panel wattage you could add.
Suitcase panels? You’ll need to talk to reader Bob G about that 😉 If you’re serious, you’ll need to back them with something rigid and find a way to keep the junction boxes from being knocked off.
no, I was not implying that you were trying to convince anyone, I’m just surprised at how many of the questions that come to my mind regarding the picky details of outfitting the FWC end up being addressed in exhaustive detail in your posts! (toilet, storage, heater, solar, tire inflation…)
It’s uncanny, and I’m very grateful for the coincidence.
That coincidence is probably because budgetary constraints prevent any do-overs that won’t be painful, and some topics related to being prepared involve personal safety. Heading out with something not properly addressed or realized can mean months immersed in problems, so I find it best to try to anticipate daily or occasional activities/needs, and picture how it is I think I’m going to do them. I think the term “exhaustive detail” might be better described as “exhausting detail”, but be that as it may, you in particular are definitely going to like one or two posts coming up in the future!
Do you ever get the feeling that you are trying too hard? Glad you talked this over with the manufacturers.
I’ll say it again: suitcase panels fold up and fit neatly behind the seat of your pickup. Whatever bother they are to deploy is patently subjective, but in any case nothing to the bother of damage to your camper from trying to do things it is not designed to do.
As for anything under the overhang: my experience is that you need all that clearance to allow for bouncing and jouncing. It may look like a lot of extra room, but the clearance while parked is not the clearance you get while traveling on dirt roads, or even across potholes on city streets. And certainly I can vouch for the fact that steel screws in aluminum in this context will work themselves loose sooner rather than later, and you can’t just tighten them up again because the purchase has been wallowed out.
This is what turned me off truck campers. Aluminum frames were too fragile and wooden ones too heavy for the situations I would get myself in.
Well, if you look into the classic process of Industrial Design, there is not considered to be any such thing as trying too hard. There is only a failure to come up with a solution that meets all of the required design criteria, or using too many billable hours to come up with something. If a project were easy, there would be no particular reason for a client to appear at your doorstep and offer to pay you money to come up with a solution. Considering that I no longer have billable hours and still enjoy learning new things, I’m not sweating the difficulty level. Frustrating, yes. But it’s all part of the game.
A suitcase panels approach assumes that I will have easily-accessed space in the rear of the truck cab for at least 400 watts-worth of them, which is unlikely. Cases consisting of twin-50W panels weigh more than I would prefer to handle, and cost more per watt than I would like to pay. While they are the most convenient ground panel type to use, they are not as convenient or secure as rooftop panel installations. They are at particular risk in LTVAs and RV parks overnight. Since I already have two 100W panels suitable for ground panel use, I’m not enthusiastic about ignoring them to invest in the equivalent suitcase wattage.
You make a good point about clearance to the truck cab’s roof, though for an F-250 I’m more concerned about that gap changing from frame twist than vertical movement. I’m currently exploring an underbed storage option that does not use this camper/cab gap at all.
Screws that loosen up in aluminum tube are, in my mind, less of a “flimsy aluminum” issue than they are a reflection of poor design. If the designer approaches aluminum in the same way he does steel, the fasteners become a crude form of hole reamer. Fasteners are meant strictly for tension/compression loading, not shear loads. And if anything is flexing, it should not do so in a way that creates an overload on the first fastener in a row instead of loading them all at the same time. Often, it’s not practical or affordable to live by the rules in this, but loosening fasteners are a sign that either a product was poorly designed, or that its development/testing process was aborted early in order to make it more profitable. Truck campers in general are fairly notorious for drooping and coming apart when the going gets tough, which is the second reason why Four Wheel and All Terrain are still in business and doing well. They are neither too fragile nor too heavy for difficult conditions, and they do give up a lot in order to reach that balance. My task for my modifications is to meet my needs, but do so in a way that doesn’t violate the unit’s narrow design balance. That’s a headache, but as you can tell from the heavy comments on this type of post, it’s also fun.
Lol. I surrender. I am the one trying too hard.
I found suitcase panels perfect for myself because
1. I change camping units too often to invest much money in “permanent” installations. A portable $500 investment I can easily shift to another camper when necessary is about right.
2. I find it more interesting to do without “excess” electricity than to tie myself in knots going for the max possible. Two 100W panels and two golf cart batteries are a system where I will never run out of power, unless I face several whole days without sun, in which case I will fall back on my trusty and quiet little Honda EU1000 . It doesn’t happen all that often. If you insist on 400W total, then deploying and storing four suitcase units will be a continuing irritation. Two, however, are not.
Hey, I get it. You want to use the inventory you have already. And not everyone thinks “doing without” is a proper response to a perceived power shortage. Nor do I, always. But it’s usually the first thing I think of. :o)
Where I splurge is on water. There’s 32 gallons in my little trailer, and another 23 in a portable tank in the back of my truck. Some people might find that ridiculous, but it means civilized living in the far boonies for a week and change. Two weeks in a pinch.
A daily shower is something I will bend heaven and earth to keep. But power? Not so much.
Wow on the water! Very nice. If I showered every day my skin would disintegrate, but it would be nice not to have people run away for once…
Everybody’s different. I’ve found that I don’t mind staying indoors in bad weather, but I do not like the weather to dictate what I can and can’t do there, or how comfortable I can be. I am also not willing to try to store or run a generator with its gas can, so I’m insisting on a solar system large enough to “never run out of power” with no exceptions, at least for critical devices. When the “excess” is not used, that helps extend battery life. Actually, 400Ah with let’s say 500W of panels starts to look a little thin for that, for what I do and where I go. I think if I had a generator, I’d feel the need for something else as a backup system. But solar strikes me as reliable enough that it’s more of a capacity-for-needs issue. Either it meets your needs, or you’ll need to invest in something else to bail you out. If technically possible (which is the challenge for me here), I’d prefer to add more solar rather than some other type of system.
Ha. My “boonie” shower experience is hardly something that will disintegrate skin. With a deadman switch on the shower head, it’s only a gallon or two. But as long as it’s hot, it’s enough to set me up for the day.
The little Honda generator weighs just 30 pounds, and is certainly no more trouble to store than two or three extra solar panels. And it’s a lot more dependable when it comes to shade or cloudy days. When I had a class C I got around the gas can inconvenience by tapping into the gas line with a marine type bypass switch. As it was gravity feed, I still needed something to empty it into, but one of those little backpacker stove type gas containers was plenty. I only used it a few times, and then mainly because I also towed a motorcycle at the time.
But with “enough” solar on hand, I suppose charging from the alternator can serve as adequate emergency backup in case of the occasional zombie apocalypse.
The key to powering my personal boonie stays is simply that with only two or three hours of light for reading, 15 seconds of coffee grinding, and a couple of laptops to keep up with every day, I really don’t need much power. I suspect that in your new digs you won’t either, but having it in the bank can be a comfort.
In any case, I look forward to seeing what you eventually settle on.
I’ll be kind of curious to see how a technical overabundance of battery capacity works out, myself, Bob. My laptop and cellular modem will be practically nothing, but the e-bike charger pulls 120 watts via an inverter for 2-5 hours at a stretch, and I’ve observed the draw from an Engel compressor fridge pretty much bork the daily initial recharge on a 200W/230Ah system. The FWC uses a Dometic unit that is probably not as efficient, so it’ll be one of those things that I’ll be thrilled to find I’ve been unnecessarily pessimistic.
This may be apples and oranges, but I recently read about using VHB tape on fiberglass trailers. You can follow it here if you want:
http://www.casitaforum.com/invboard/topic/18251-roof-mounted-solar-panel/page__hl__vhb+tape__st__30
“Whether you use VHB tape or epoxy, one problem that has shown up with a few Escape solar panels is the failure of the bond between the gel coat & the fiberglass shell. At least one panel was lost when the gel coat tore loose while driving during very high crosswinds. While there have been few failures, Escape is now sending bolt through hold down kits to owners with taped or epoxied solar panels. ”
Apples and oranges, perhaps …. but interesting.
It may be apples and oranges, yes, but was less so in the past when getting any kind of decent paint bond with aluminum was difficult. There are now primers that work well, and the FWC roof is some type of baked enamel. Doesn’t mean that when pull comes to yank that the VHB tape couldn’t out-power the paint bond.
We tend to think of fiberglass as a unified mix of resin and spun glass that can do no wrong, but tain’t so. Still, I toured one small shop in 1970 that was molding entire full-fendered race cars in fiberglass, monocoque. That even included attachment points for engine and suspension, without any subframes. I’ll bet that was a fun way to push the envelope, albeit expensive.
Doug,
I know you have your heart set on having the solar panels secured to the roof and not placing them on the ground. Have you considered utilizing the lift-jack plates installed at the four corners of the camper? Do you think you could use them to support a suitable foundation for the solar panels? Maybe even incorporating a locking feature for theft prevention! You would of course still have to stow the panels while underway (inside the swing-away hitch carrier you were considering?), but they would be easier to mount/dismount on mounts at that user friendly level. Just a thought. Good luck with your project.
Paul k
I have fooled with ways to use the jack mounts to hold panels, Paul, but only as permanent articulated panel-holders rather than temporary ones. The problem keeps returning to shadowing and/or fixed vehicle parking positions once the roof is raised. As temporary mounts for panels, I like the opportunity to slow down theft, but the way I’m picturing it, such a system would offer the same PITA factor as ground panels but with none of its benefits.
Your ponderings on this remind me vividly of my own thrashing about with my solar install. I have to keep reading to see what you ultimately decided on!
Parker
Wow, reading this post over again shows it to be tedious and hard to follow, the main value being simply that when the stakes of failure are high, a lot of thought and “what if’s” are needed. A later post will show what I wound up doing, and that even that was not quite what I’d hoped, leaving room for a little paranoia. But it’s done and does not seem prone to leakage. Still, it’s another “don’t do this” post.
Heh. I can’t wait to let my solar system finally get some sun so I can see how it works. Too little sun up here, and too many tall trees. You do what you can, right?