
The StowAway Cargo Box

This cargo box is mounted to the rear hitch receiver. How am I going to get in and out of the camper? Good question!
One of the big laments about using a Four Wheel pop-up camper for anything other than traditional camping is the limited storage space for long-term live-in arrangements. Traditional camping with these things involves enjoying the great outdoors, which in turn typically involves propane stoves and/or BBQ grills, lanterns, chairs, table(s), canopies, propane cylinders, showering equipment, and what-have-you. That’s a good thing, but imposes a regimen for the FWC that does not appeal to me: emptying out the floor of the camper before you can enter and use it, and then packing everything back inside in order to leave a campsite. It’s fun in the short term, but wearing for extended trips.
Since the FWC alone can technically be fully set up for camping in maybe three minutes and accommodate a furtive quasi-stealth sleep-only overnight with only a rearrangement of cushions, it seems a shame to clog up that inherent ease and speed with the need to scatter equipment all over the ground at every stop. So, many people who are going to be out there for awhile will add dedicated storage space, whether that may involve a trailer, a roof rack, a hitch platform, or a hitch cargo box.

The StowAway arrives in two cartons. This one contains the swing arm and box lid.
The decision process for a Four Wheel requires a little more finesse, since keeping this camper’s full capabilities requires choices that may be different from what you’d pick for a van or even a hardside truck camper. Any storage option you choose will compromise something, so the goal is to choose in such a way that you keep your own priorities straight – as much as possible.

The frame slips into the hitch receiver, and you can retain it with the supplied pin, or with your own locking hitch pin. The crosspiece is further away from the bumper than I figured it would be.
In my case, I ruled out trailers pretty quickly. Although there are some pretty darned impressive off-roading trailers out there that can serve as storage, or full outdoor kitchens or pop-up tents, I kept in mind two things. The first is that common ball hitches really are pretty limited in how much angle they can handle, and the affordable trailers based on these pose one of these “sooner or later…” issues. The same goes for torsion suspensions, which can work their way apart in certain off-road conditions. That left true off-road trailers, designed and engineered for the job, which are way, way beyond my means. The second thing I kept in mind is that the Mighty Furd is a gorilla in a phone booth when it comes to driving off-road. Many trails are tight and have limited opportunities to turn around, and wheeling the big Ford around sometimes feels like maneuvering an aircraft carrier into harbor, solo. Most of it is simply the effect of a miserable turning circle, and overall length. Adding a trailer to that and then blocking off the view of it with a truck camper in the bed would teach me lessons about going down unfamiliar trails, as in: don’t. I’d prefer to have more leeway than to be forced to continue on while conditions become not suitable for a big, stock vehicle – or to not go down an interesting trail at all, for fear of becoming trapped. Nope.

The swing arm added. This is the trickiest part of the procedure for one person, as the hinge pin needs to dive down through four washers and the main nylon bushing. I added a little lithium grease, though that may not be the best choice for dusty conditions. Dry lube doesn’t last as long though, and I won’t be popping the hinge apart to relube it once a month.
I already planned to festoon the camper’s roof with solar, so that ruled out rooftop storage, which I personally would be unable to get to safely, anyway. FWC offers foldaway rear wall steps as an option that to me resemble a climbing wall, but putting up and taking down boxes and bags, solo, does not strike me as a viable option in the long run.

Set the box in place, align its four bolt holes to the frame’s, and drop the bolts in.
Hitch platforms absorbed much of my time, because they are affordable, versatile and strong. Find a truly weatherproof box or two to add, and presto. Trouble is, there’s that pesky thing called a camper entrance door just in back of it, so you need to weed out all the affordable stuff to platforms that either swing out of the way or slide rearward to offer walk-in clearance. That tends to lower weight-carrying ability. You could stick with a wide platform and just leave an empty aisle in the middle, but that just wasn’t working out for me.

The huge oval washers prevent the box from tearing off, and I added these optional D-rings to allow tying stuff down as needed.
So it struck me that if I were going to go for an articulated hitch platform of some type, I may as well look over the cargo boxes that were often offered to make a full system. There’s quite a range out there, from modest to humongous. In my case, I decided to make size, weight capability and cost secondary. It would need to offer a decent shot at being rain and dust proof behind the truck, offer reasonably quick entry to the camper door without screwing up the step-up approach, offer running lights and a lighted license plate holder, and if it swung out, be able to be locked in an open position against wind. More important than any of these was the demand that complaints about the product be few, and that the company’s customer service be accessible and responsive.

The lid is held on with three slide-in plastic pins, and can stay open on its own. I included a stay bar to prevent wind trying to blow the lid opening further and damaging the hinges. When not engaged, it hangs clumsily from the lid. Overall value: debatable. The sealing gasket is apparent in this shot.
Enter the StowAway2 Cargo Box. A significant-to-me plus is that these things are made from linear low density polyethylene. That’s what a lot of outdoor sports equipment is made from (like kayaks) because it weathers well and is tough as all get out. I chose the “standard” 12.5 cubic foot smaller one, mainly because I prefer its old-school rubber lid gasket to the gapped rain gutter style seal of its larger 16 cubic foot kin. That’s a big difference in box volume, but that translates to just two inches difference in every dimension between the two. That’s about where my inner cheapskate starts piping up, considering the gasket situation and difference in cost. If I were doing highway trips, either seal type would be fine. Out in the boonies though, it’s a dust cloud back there, and you have to go with your gut. They come with a ten-year materials and workmanship guarantee – though bouncy off-road use is not covered of course. Load in the full 200 pounds and start slamming it around, and you’ll probably tweak the frame somewhere. I use the warranty as a testament as to the integrity of the cargo box, lid, and hinges.

There are two dimples in the wall for drilling and mounting the included lighted license plate holder. There is supposed to be a third for passing wire through to the inside of the box and its wiring harness, but it was missing. It was an easy matter to measure and locate the third, and drill.
I went against the norm and ordered a white box instead of the usual black. Yep, that will show dirt much sooner and keep it, thanks to the deep textured surface. (That texturing is necessary because of the way LLDPE looks when you try to mold it with a smoother surface finish.) But I’m sick of everything always being black, and the FWC is white, anyhow. Both will get dusty, and both will need washing. I also figured that as an unventilated box, a black one will get mighty hot in full sun, which would limit what could be safely stored inside. Fabulous! I just managed to functionally justify my fashion choice!

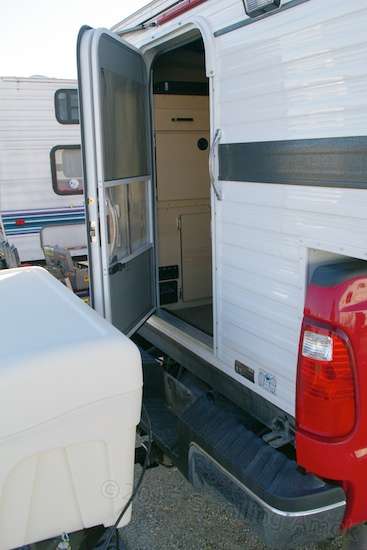
Voila! This shows the generous clearance that the swing-out frame provides to getting at the camper’s door. The carrier’s frame is an inch or so higher than the first bumper step and makes entry a little clumsier, but it’s not so bad that I’m going to do anything about it until I’ve lived with it for awhile.
The order showed up just a few days later, in two boxes. That’s good, because shipping weight is about 100 pounds total. It was well packaged, and orderly to the point of being OCD-compliant. Each assembly and accessory had its own labeled box, and each parts group came in a thick Zip-Lock bag containing a thick round-cornered card identifying it, specific contents and quantities, tools needed to assemble/install it, and when appropriate, instructions with a clear diagram on the back. Amazing. All parts were good quality and without burrs, incomplete paint or marginal fit. I’d expected assembly to be challenging because of component weights and the general awkwardness of aligning them to slip pins or other fasteners in. I’d expected misaligned holes. Neither of those expectations were met, happily. It pretty much just slipped together, and in no time I was left to just stand around, looking stupid. It was a nice experience, as such things go.

A similar shot to one earlier, I’ll just point out the double gasketing at the rear lip, the license plate wire coming in and connecting to the harness, and the latching mechanism. The wire terminals were pre-lubed with dielectric grease to keep them corrosion-free, which is an unusual, hidden touch.

The wiring harness comes ready to plug in. All you need do is use the included three zip ties to hold the wire to the frame, out of harm’s way. Those ties are removable, too.
Unexpected bonus: there’s just enough gap to allow entry into the camper without having to swing out the box first, which opens up overnight parking possibilities at rest stops and the like. It also removes the temptation for practical jokers to close the opened arm and barracade me inside the camper at such stops.

The swing arm hinge, showing the drop-in pin used to lock the arm either closed or at 90 degrees open. The arm can open over 180 degrees, but can’t lock there.

That locking pin in the previous photo is Tier 3 of the total locking system. To open the arm, you must pull that pin, then go here and unscrew that brass-colored handle. That’s a big bolt that threads into a matching nut on the swing arm. Then yank the red handle above upward, and the catch mechanism releases. The catch locks automatically when reclosing, but the other gizmos should then be engaged to prevent any unplanned adventures. That bolt needs to be checked now and then, as road vibration can loosen it. It’s really an anti-rattle device. It’s retained, so it can’t drop out and become lost.

That thing is really perched out there, isn’t it? Those are optional wheels underneath, to allow much easier moving around when removed from the hitch. I’ll probably leave them on until they pose a ground clearance issue, and the odds are pretty good that they will, I’d say. With a wrench, it takes about three minutes to deal with them.

This gives a pretty good idea of how far out the box hangs.

And this gives a pretty good idea of why. It’s designed to allow opening the lid with the truck’s tailgate on.

And here’s the first true mod!! But, it’s just a bolt-on. These Quick Fist rubber clamps require just one hole each to mount to the box with screws and nuts. I naturally added a fender washer on the inside. They look and act like rubber, but since they claim to be UV resistant, they may instead be urethane.

My trusty Ace Hardware mini-shovel in hiding, at a height that stays out of the way of the camper door swing, but is high enough to not foul the swing release access. All manner of off-roaders and firefighters use these Quick Fist clamps, since they are available in various sizes.

And today’s project is almost done! Just load up the packaging, and head for the recycling dumpster! I good day indeed.

Now that is slick! So happy you were able to satisfy those esthetic needs. 😉 Seriously, that looks very practical and downright cool at the same time. Well done!
It’s a fashion statement. And there’s a big 1″ plug in the bottom for washing it out. Think how much ice and bottles of whatever you could pack in it!
Oh Yes! Bottles and bottles of Perrier and some of my homemade tea on ice! LOL Sounds great! From the size of that thing I could stay stocked for months!
So. Nonsense aside, I can’t wait to see what is going to wind up in there. Packing will be trial and error for a while. Downsizing is always interesting. Of course, you have been on the road for several years so you have a better idea of what you need. I think I missed a lot of the “Well I thought I would need/use that, but I have not used it in a year” that a lot of people seems to go through out here. But of course, I did not have much space at first and that kind of trims off the fat to start with. I went in the other direction. Now that I have space in my little trailer, I keep thinking of things that I have in storage that I could use on the road. I also find myself at thrift stores thinking, well ‘that’ will fit, then when I try to make it work… Ah well. Live and learn. I am sure you will have fun packing up the Intrepid!
I always genuinely get a kick out of people who enjoy the process of figuring out how to jam five pounds into a three-pound bag, because it’s something that I find very slow and wearing to do. Bins and trays technically help, but add another layer of complexity. Between the physical fit and keeping most-used items fully accessible without digging, I’m bad at it and am amazed when someone else can just waltz into my half-finished scatter and button it up a half-hour latter, humming happily. So no, I won’t have fun packing up the Intrepid. I’d have to find a space freak to enjoy it!
Oh, man! We both wish I was there. Organizer is my middle name. 🙂
After I’ve made the first efforts, maybe I should set up a Paypal donation “Disaster Recovery” promo to pay for airline tickets.
Wonderful! I’ve been thinking about getting something like this if I buy another van so it’s good to have your experience with it. Thanks for all the details.
You’re welcome, Linda. If it helps, a non-swing frame is also available, and some of its competitors are listed at etrailer.com.
Hey Doug THE Box Looks good. I like the flatbed p up with a slide in. Then both sides can b boxed in for storage.
R u n Q yet?
I am here this year with my horse, Chips n Dog Mic.
Keep on posting, Bill
Yep, never thought of installing a slide-in FWC on top of a flatbed, making the wheel housing cutouts open for inserting body boxes or something. I’d also look at a flatbed version of the FWC camper, which allows radical changes in floorplan and much more usable space. Can’t afford either approach due to the cost of the flatbed itself, but I’m sure someone could scrounge around and cobble up something at their home base.
No plans to go to Quartzsite this year. Having recently put on a thousand extra miles simply commuting to Prescott and back, they’d have to be giving away gold bars to make it worthwhile for me.
It looks good & that is a nice fit with the door back there!
Have you been out camping in the new rig yet? Just curious.
Nope Rob, I haven’t been out in it and won’t until it’s modded and ready for first tests. That’ll be quite awhile, perhaps late February.
Great storage solution!
hey, nice box! It should add nicely to your storage needs. Does it affect your departure angle? I’m thinking of trenches across the road left by water runoff. I have a hitch receiver and have already experienced it scraping bottom crossing such a trench, similar to water bars expressly built for the same purpose.
I have visions of a custom box bolted on the swing out mount that houses an outside kitchen, like what you find under the back hatch of teardrop trailers. The problem with projected use is that when I’m not out camping, it would make more sense to take off the box and put it in storage until the next trip, which sounds like quite a pain and not something that you would want to do regularly.
Would there be enough room to swing down a tailgate if you don’t swing the box out? What about if it’s swung out to 90 degrees?
What do you think of the custom bumpers that have 2 halves that swing outwards that you can strap all manner of gear to?
Have fun packing!
Ming, the StowAway does affect departure angle, though the arm that goes into your hitch receiver does quickly curve upward to give some lift to the frame. Lift is supposedly something like five inches, but the sheer amount of added overhang makes the whole deal very situation-dependent. My biggest concern has been the Ford’s large dual exhaust tips behind the right rear wheel. I expect the main issue with the StowAway, as with any platform extending out, will be a steep downward slope suddenly flattening out. For me, I’ll probably have prior warning, since the Hollywood bike carrier’s projecting stalk clearance isn’t that great. Assuming that you do not add the storage wheels underneath, I would think that whatever simple change in level in a drop-off that lightly grounds your hitch receiver will not usually pose a problem with the StowAway. A drop-off combined with an angled approach would.
Slick idea on the outside kitchen, and I assume you’d go more elaborate than their “tailgate grill station” version. For getting whatever you make into storage, their wheel kit simplifies that so that you’re not dragging it over the ground – but the main challenge is keeping weight low enough that you’re able to horse the unit out of your hitch receiver, or lift it back up to align and insert. If used seasonally, wheels are easy enough to add and remove, since they do compromise ground clearance. Technically, the only issue that makes the StowAway a pain to remove or install is really your ability to position it so that it’s on the ground with the stalk end resting in your receiver, then lift your end and shove. I can do it alone if I empty out the box, though with the box mounted, you can’t see how things are going. Though pretty quick, the PITA factor makes it and wheel removal more appropriate for seasonal use, or monthly. For two people or one hale and hearty one, weekend tailgating would be no big issue.
I sold my own tailgate, but by measurement, there is more than enough clearance to open the unit with the box perpendicular to the bumper, and at 180. That’s one reason why you’re asked make, model, year, and presence of a rear tire carrier when ordering.
If you’re referring to Aluminess, they are my first preference over and above the StowAway, the advantages being many. There is great variation in storage choices, the weight capacity is higher at 150 pounds for each arm (off-road rated), the vehicle’s hitch receiver is not tied up, they use powder-coat paint, and rusting is of no concern anyway. I can only see one drawback: cost. I’m not familiar with any other similar unit, since trying to copycat it in steel would be an invitation to suspension collapse and rust.
As of now, I’ve just begun electrical system mods and have altered my design approach from “workable” to “will work better”. I’m doing what can be done, and waiting for certain key parts to be delivered. Behind schedule, but worth the delays.
I just ordered a white stowaway not black based on your observations. Think I’ll be happy with it!
I hope so, Judith! I still am with mine. Internal temperature is the main thing with me, and it works. And welcome, by the way! I know you’ll like the way the system works, but the big plus here is that if you don’t like the color for some reason, you’ll have someone to blame! 🙂