
Solar Demystified
These are 195-watt solar panels, and where you put them is up to you or your rig’s limitations.
I’m no expert on solar systems, but that of course doesn’t stop me from having opinions and expressing my ignorance. Since I’m currently having to engineer a simple solar system for another camper, I thought it timely to write this epistle on what to consider before it’s time to cough up your hard-earned dough.
I know that I’m supposed to break this up into smaller, frequent posts, but I find the loss in continuity disruptive, and kind of a gimmick to boost readership numbers. I have no sponsors, so there’s no point in artificially pumping up visits to impress commercial interests enough to give me money. Yeah, I’d like to have something for you every day just for its own sake, but that ain’t gonna happen. I almost have a life. This blog is based on providing complete and useful information or references, as well as inane trivia, in single packages that don’t force you to wait for the next installment. But at some 7,800 words, it does require tolerance on your part for unending tomes of ignorance. Enjoy.
For the purposes of this article, I’m sticking with simple, almost-affordable systems that you can easily design and build yourself. More costly and sophisticated systems, no. I’m electronically-challenged, and bottom feeder systems are my realm. They are relatively easy to design, install, and wire up.
Where to begin
It’s tempting to assume that the first order of the day is to wonder how many solar panels you’ll need, because that’s what going solar is all about, right? Our attention turns to what is most visible. In an RV though, it’s all about batteries, not solar panels. But even that is jumping the gun. You need to first sit down and consider what you want to be able to do during your typical day, when and for how long, and using what equipment. Without that knowledge going in, you’re likely to either build a system that will be inadequate, or to overspend, which I consider to be a mortal sin.

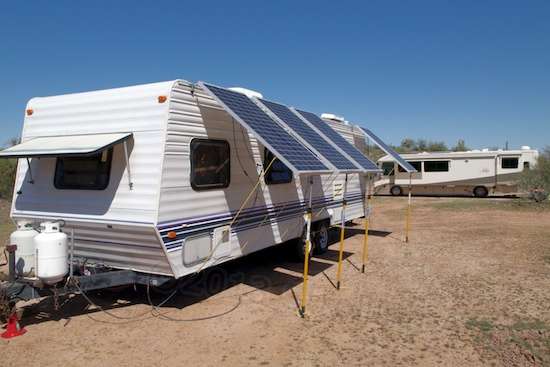
When you want to run a 27″ computer monitor and a pile of hard drives for most of the day, solar gets serious. The controller for this system is on the right, and the battery pack is in a closet just in back of it.
It’s not that you can’t just shoot from the hip and buy a prepackaged system in the hope that it will do the job. It’s just that, if it turns out to be undersized, upgrading it will probably turn out to be costlier than it would have been if originally sized properly. If it’s oversized, you’ll have no usage problems, but will have added needless weight and cost.
This first step is the most tedious and troubling of any that follow, but if you can accomplish it, everything else will seem easier and will fall into place. In regard to devices that consume power, what is it that you want to do each day? Run an electric refrigerator/freezer? Spend time on a computer? Watch television or play a DVD movie? Build a list of activities and unashamedly chart out realistic durations, not what you “should” be doing with them in some form of idealistic self-denial. We’re looking for worst-case here.
Each of your activities will then point to particular devices, obviously, and a probable running time for each. Do they run directly off 12 volts DC, or do they require a 110-volt AC inverter, which also consumes power even just idling? This is where you start researching and, if possible, measuring. Most AC devices have labels on the back that indicate the maximum power they use in amperes, and sometimes, watts. This is good when you have nothing else to go by. Even better is to break out an inexpensive 110V measuring device called a Kill-A-Watt, which inserts into the power cord plug and can measure both momentary power and average power used over time. You can plug it into each device one at a time, or into a power strip plug to measure whatever is plugged into that gang of devices. Very handy. And if you have a violence-oriented tool like a grinder, you can measure the very high startup load it requires, and then know what size of inverter you’re going to need to be able to use it. Laptops may list what their power supply must be capable of providing, but again, these are maximums. Hang on to this device list.
Inverters
Power inverters are a story in themselves. Power inverters change 12VDC into 110VAC (household current). Inverters consume power whenever they are turned on, and also take a chunk out of any DC power they convert into AC. Devices which can be run off both 12VDC or 110VAC should always be run off DC power for the sake of efficiency. 12V “car” adapters for laptops are generally more efficient to use than an inverter and their 110VAC power bricks, but be careful here. Laptops do not run on 12 volts, and any adapter is actually a voltage conversion device that will absorb some power. Cheap car adapters can get too hot to hold, while better ones barely get warm. That extra heat is energy lost, and a lot of it. A lot.
The usual tendency of people is to simply go out and get the largest, cheapest, big-ass inverter they can find, and call it a day. The thing is, inverters use up power in proportion to their capability. So big, cheap inverters use lots of power simply by being turned on, and absorb much more energy when used at less than their maximum rated power. If you aren’t going to be able to actually use 1200 or 2000 watts of power, don’t buy that large of an inverter or you’ll be wondering why your battery seems to gimp out so quickly. Size the inverter to cover your own maximum load, and no more.
The common cigarette plugs used to connect inverters up are pretty poor at handling loads much over 80 watts, and you may find that your little 150 watt inverter is complaining about low voltage when put to the test. It’s far better to wire them with direct connections to your battery, or use what are called SAE connectors to hook them up. Marinco Marine cigarette plugs are the best I’ve found, but even they can present problems at well under 150 watts. Exceeding the connector’s true ability (which is always lower than its rated claim) results in melted and deformed connectors that get too hot to touch. Low voltage from a poor connection ramps up amperage, and that stresses connectors. The key is that if anything gets uncomfortably warm, it’s a signal that it needs to be eliminated or replaced with something else.
Inverters come in two flavors, modified-sine or pure-sine. Pure-sine inverters create AC power that perfectly matches what you would find in your AC outlets at home. Modified-sine inverters chop that signal up a bit, but they are still usable in most devices. The key word here is “most”. You may find that your modified-sine inverter manual cautions against using it to power small battery chargers, or that it causes your desktop computer to go nuts when trying to boot up. Electronic devices are designed for pure sine, and some will not tolerate anything less. If you buy a modified-sine inverter (or even a cheap pure-sine inverter), first make sure that you will be able to return it if it proves unworkable.
Back to The List
So you have a list of devices now, and a list of either amps or watts. Each one should also include how long it runs, and at what time of day (daytime or nighttime). Fill in the holes as best you can, especially for the bigger, key devices. You can safely ignore momentary devices like coffee grinders, and very low-power devices that normally run a long time on household batteries. But pay attention to anything that’s on most of the day or night, since time can counter low power draw.
I personally hate this next part (I’m also math-challenged), but it’s necessary. Watts are watts regardless of voltage. If a small device uses 6 watts and a large one uses 200 watts, they can be compared directly regardless of whether one is connected to the battery and the other must go through a 110V inverter to run. It’s apples to apples.
Amperes are more troublesome, but they need to be converted to watts in order to get a crude baseline for what minimum solar panel sizing you’ll be looking at. The formula for conversion is: Amps times Volts equals Watts (A x V =W).
Thus a 12VDC device which claims that it pulls 2.1 amps will equate to 25.2 watts. A 110VAC device that pulls 2.1 amps equates to 231 watts. Yowza! Big difference! So go down your list and convert away to get watts for everything of significance.
Accursed Calculations
Formulas aside, the simplest way I know of to make this jumble of wattage numbers useful is to head for a solar calculator on the Renogy website. You basically just plug the wattage numbers into the lower section for each of your significant devices, add the expected usage time duration and a sunlight duration (average sun hours per day) as listed on their chart for your location, and it will calculate the minimum amp-hour capacity of battery needed to safely support that load. Deep cycle battery capacities are rated in amp-hours. If you move around the country as I do, you’ll want to select the “worst” state that you camp in, solarly speaking. Their calculator asks for your your controller’s efficiency, and I explain the two types below, but use the default PWM efficiency (80%) unless you know you will have a MPPT controller. Note that the result is a recommended battery capacity based upon a 50% discharge level, but I think it’s a good one. They recommend both 12 and 24-volt battery capacities, so since you will most likely be running a 12-volt system, pay attention only to that. It also recommends the panel wattage needed to support that device, both as a minimum and a preferred size, to ensure a timely recharge. They refer to the needed solar panel wattage as “system size”.
I order to save a little time, you can group together in the calculator any devices which will be operating for the same duration each day. For example, if you have a device that will operate four hours at 36 watts, and another that will also be on for four hours at 80 watts, you can lump them together in the calculator as one device that pulls 116 watts, if you like. I’ve mentioned knowing at what time of the day each device will operate, that is, day or night. This serves as a sort of indicator as to how seriously you should regard battery capacity choices. Proper solar panel choices will supply an abundance of power for laptopping during the day, but if you surf or watch DVDs on it mainly at night, the load is all on the battery, since the solar panels are out of action then. Yes, for a laptop you can use its onboard battery for awhile and let it recharge the next day, but if you have skimped on your solar panel sizing to save money, you may find that the extra daytime demand created by the recharging laptop compromises or delays getting a full and complete house battery recharge.
Should you practice some kinky lifestyle that uses more of the available energy at night, when the battery must handle it all, you may want to consider the recommended battery size as your new minimum. Or, if you are a glutton for punishment, this can be calculated by adding up all of the nighttime loads. Feed those devices into the online calculator again, estimating the durations for each, but this time, enter the charge controller efficiency at 100% (since it is no longer operating and absorbs no power) and the Average Sun Hours Per Day at 0 (zero). That will give you the battery capacity needed to get each device through the night (you hope). Add those capacities up, and you’ll know what kind of battery horsepower you’ll need to get you through the night. Pervert. The standard calculation you’ve already done will include these loads, but you may wish to know just how much damage you’re doing after dark, when the solar panels can’t help ease the load on the battery.
A special case is a 12-volt electric fridge, or refrigerator/freezer. These cycle on and off all day, and spend more time on than off in hot weather. How do you estimate those power draws when you’re trying to properly size your battery? A reputable manufacturer will provide it to you. They will list ambient temperatures, thermostat temperature settings, current draw when cycled on, and what percentage of time the unit spends pulling that power. Some will average it out as amps per hour for you, which you can convert to watts per hour.
What I suggest is to take your worst-case scenario and use that as your requirement. If your fridge may well be stewing in 95-degree heat for a month out of the year, and the manufacturer states that the unit will be pulling an average of 1.7 amp-hours at those temperatures when you’ve set the thermostat at 40 degrees, then 1.7 Ah is what you need to be able to support with your battery. Sure, evenings will be cooler and you can instead use the average of high and low daily ambient temperatures, but also keep in mind that deep cycle batteries don’t run like new as they age. They fade over time, so it’s your call. In this case, 1.7Ah over 24 hours means that you’ll need 40Ah of battery capacity just to support that fridge. At a 50% discharge limit, that points to an 80Ah battery, minimum. I also advise you not to trust vague claims about low power usage and consumption boasts that don’t mention the conditions they got their numbers in. The cheaper the fridge, the more power it will consume. There’s no free lunch here. On “normal”, comfortable days, it will seem like you’ve wildly overspec’ed your battery. When the crunch comes, however, you’ll be enjoying well-preserved foods and medicines while everyone else is whining or panicking.
Disregarding the above distraction, at this point you will have a long list of gizmos, complete with the individual panel wattages needed to support them, and the battery amp-hours required to power each. Add up all the values to get a total battery capacity and solar panel wattage. I recommend that, if financially possible, you pay attention only to the recommended panel size, not the minimum. Sticking with the minimum panel size will get you through on a sunny day, but when the haze and overcast comes, you risk not getting a complete recharge. That’s not just inconvenient for you, since the battery voltage will drop much faster during use, but will rapidly accelerate battery desulphation in the long run. Desulphation is the enemy of your battery and your wallet.
Battery Trivia
Batteries very rarely get a chance to “wear out” from too many cycles. What kills them is sulphation, which is deposits that cover up the internal lead plates. This essentially takes that part of the plate out of action. The fake upside is that your recharging seems to complete more quickly, since there is less plate available to react. The downside is that it also discharges more quickly, since it has been robbed of its original surface area and hence capacity.
Batteries that stay topped up and never discharged much more than 10% can last a very, very long time. Batteries that spend much of each 24-hour day discharged will tend to sulphate, and those that repeatedly suffer incomplete recharges will expire quite quickly. When should you replace a battery? You can break out a voltmeter or hydrometer if you’re into that kind of thing, but really, you should replace it when it stops performing adequately for you. How quickly or slowly that point is reached is entirely up to you, not your battery. The battery is but a hapless performer in a play written by you. It can be an inspiring play, or a tragedy, based on your choices about your battery capacity and your usage of it. Let’s look at some key factors that affect how often you’ll have to replace your batteries, regardless of type.
First is the amount of time spent discharged. The less time a battery spends discharged, the more slowly sulphation will occur. A battery that is most heavily used just before it is recharged will sulphate heaps more slowly than a battery that is discharged heavily right after sunset, and then sits all night in that state. This translates into real life as an encouragement to become one of those awful “early to bed, early to rise” people. (I’m a night owl by nature.) Of course, trashing hybrid Walmart batteries does not have quite the financial impact that killing mil-spec AGMs does, but let your wallet and your conscience be your guide. More on battery types in a minute.
Second is the amount of discharge you impose on the battery. Batteries only have so many cycles (discharge and recharge events) designed into them, and higher discharge levels greatly affect how deeply you’ll be cutting into or expanding that expected average. Picking a premium AGM battery as an arbitrary example, discharging by just 10% before recharging can produce just over 5,000 cycles. Consistently discharging 50% pounds this down to just 1,000 cycles. Forcing it down to 100% discharge can get, at best, only 350 cycles out of it. Going below a 50% discharge on any deep-cycle battery damages it to some degree, and the more comprised the design is from cost considerations, the more damage will result.
This is where it is financially worth paying the price of adding battery capacity up front, in order to limit discharge to minimal levels. Losing additional dollars on the front end for more or larger batteries is more than paid back by a geometrically longer lifespan. If you’ve bothered to use Renogy’s solar calculator to determine the battery capacity you need, know that this amp-hour number you got assumes a 50% battery discharge level. That’s your minimum. If you double that capacity, you will be discharging just 25%, and more than recouping the additional up-front cost. The downside is not the initial purchasing cost, it’s the weight. Multiple deep cycle batteries are heavy enough to affect vehicle handling and fuel mileage and, in the case of a travel trailer, tongue weight and wheel loading as well. The majority of recreational vehicles on the road already exceed rated weight capacity at one or more contact points, so piling on lots of batteries can contribute to tire and wheel bearing failure if not done thoughtfully. It can help greatly to find the weight on each individual wheel (and trailer tongue) by arranging a “SmartWeigh” at an Escapees facility or event.
Adding battery capacity above the minimum level does not lengthen recharge time unless you begin using more of the “extra” capacity that is suddenly available. Once you end your normal usage pattern and begin dipping into deeper discharges, the existing solar panels, sized for the lesser usage, suddenly have more work to do. Recharge times become longer, especially in non-optimal sun conditions. It can even lead to an inability to completely recharge before the sun sets. Adding battery capacity will be more likely to carry you though a series of overcast days more easily though. It’s just that recovering during the eventual next sunny day may take much longer than normal, or even not complete. That gets us to…
Third is failing to get a complete recharge. This is quick death to a battery when allowed to recur. This is territory that you will land squarely in if you select and buy components merely based on blog or forum Amazon-related recommendations as to the cheapest way to create a solar system piecemeal. Go strictly by the numbers, and cheap-out by getting the minimum battery and the minimum panel, with a crappy bargain controller to charge it, and it will work. Then you’ll have problems to deal with, and return to the same sources to “fix” it. Learn just enough to know what you’re doing, and you’ll have a system that you never seem to have to think about. It will just keep working. The bigger the system, the more important proper component selection becomes.
How do you know how far down you’ve discharged your batteries? By looking at a voltmeter. I recommend one that can be plugged into a cigar outlet, or a small digital readout that can be permanently be wired into a battery connection. A conventional digital multimeter with probes can be used, but the inconvenience of using it, and the danger of accidentally shorting the connection with a probe make it a non-optimal solution. Many controllers and meters substitute green, yellow and red indicator lights in place of direct readouts, and I’ve found this to be error-prone. The lights never seem to jive with what the voltage level actually is. Each battery type has its own charge status curve as to what voltage reading indicates what charge level, so it’s best to consult the manual that accompanies your battery. If there is no manual, you’ll need to research typical voltage readings and battery charge status charts for your battery type.
Readings should officially be taken after the battery has sat for 10 hours with neither load nor charge applied to it, but this is not practical in RV use. Loads make the charge level seem worse than it really is, and when the sun is up, charging will give a reading higher than the battery’s real status. What I do is practice the “good enough for who it’s for” technique. That is, take a voltage reading a few minutes after shutting off any device that uses enough power to cause the voltage to sag. This can only be done after sunset, when charging has stopped. You’ll never get an accurate reading during the day, when the battery is in any stage of charging, but you will get a feel for how likely it is that you’re going to get a full, healthy charge. Your controller’s manual will list the voltages it’s shooting for during each stage of charging, and by watching your voltmeter, you’ll get a sense for how much of a dent your daytime usage is putting into the charge rate.
Decent controllers most often use three stages: bulk, absorption, and float. I’ve found that heavy use during bulk charging, or when the controller is working hard to take the battery up past 14 volts, will appreciably slow down the entire charge routine. Later, during absorption, the battery is held at over 14 volts for a programmed time to “pack in” the power. Once a half-hour has passed in this stage, my own 100/100 system can take substantial usage loads without affecting this bulk voltage reading (in full sun). That is probably thanks to the MPPT controller converting the extra panel voltage into a few more amps. In the float stage that follows, the battery is held at around 13.5 volts. Some controllers then shut off the charge after awhile, while some (like mine) keep it up until sunset. Here too, I am generally free to do as I like without dropping this voltage, since the panels are still producing power that is no longer needed to replenish the battery. An extraordinarily heavy power draw during the day can badly delay the charge if done early, and “soften” the charge if done during the later stages. You may then notice that your battery dips in voltage that evening at a faster clip than usual. By habit, I’ll usually use power before the sun rises high enough to get at the panels, and then leave things alone until after the battery has been at over 14 volts for awhile. This is where an easy-to-use or constant-on voltmeter really comes in handy. When voltage is a nuisance to check, it isn’t checked.
My general advice: don’t screw up your recharge. This is easy to do if your system is underpowered on solar panels for whatever battery capacity you’ve got. Leave the bulk charge stage alone to do its work. Strictly as an opinion, if you notice that it takes much over few hours for your battery to reach peak at 14+ volts, your panel system may be underpowered or is being robbed of efficiency somewhere along the line. Obviously, a battery that has been taken down to 50% capacity will take longer to bulk charge than one which was only lightly used. Still, if bulk charging is not over by 3:30 PM on a sunny day when sunset is at 5:30, you need more panel power. If you see that your usage is causing voltage readings to dip more than a couple of tenths while holding at the 14+ volt absorption stage, it’s best to back off and wait. Dropping the voltage during the float stage isn’t bad, but will soften the charge a bit if it drops to 13.0 volts. Yes, if you must get your work done, you must, but sabotaging a full charge has a greater effect on the battery than waiting and draining power afterward. On an overcast day, cutting back usage is a good idea, and you may have to exercise delayed gratification in order to avoid unduly punishing your battery.
Once again, the heart of any solar system is the battery, not the solar panels. Never buy panels first, and then install a battery to suit them. Your devices will run off the battery, not the solar panel. If you decide to buy a “solar kit” with panels and controller preselected, it must still be matched to whatever battery capacity you will actually need to charge.
Battery Types
There are many “deep cycle” battery types, though I will mention just four. That’s because the others have significant limitations which are not worth detailing here (in my opinion). And I will be speaking in generalities, since there are always exceptions.
The first battery type is a hybrid, a combination of starting battery and deep cycle battery. It’s just one kind of “flooded” or “wet” battery. Often referred to as marine batteries, they are designed to do double-duty as both starting batteries and trolling motor batteries. They do a decent job at both tasks, and because of technical limitations, excel at neither. They can withstand the violent surge needed by a starter motor, yet can be discharged much more deeply than an automotive battery, which would be damaged by deep cycle use. Available at auto parts stores and big-box retailers such as Walmart, they are relatively affordable (around $70). You can generally tell that a particular battery is a hybrid when it lists either CCA (cold cranking amps) or MCA (marine cranking amps) on its label. It should also list an Ah (amp-hour) figure, and if it doesn’t, avoid it – it’s an automotive starting battery in disguise. A marine deep-cycle can last 1-6 years, depending on how it’s used, while an automotive battery will tend to last less than a year. Hybrids tend to be much more sensitive to deep (50%)discharges than true deep cycle batteries, and won’t last very long when pushed repeatedly to that level. I’d recommend no more than a 20% discharge on a regular basis if lifespan is a consideration. Keep pounding it, and you can hope for a couple of years of use, at most. Most flooded batteries of all types that are intended for deep cycle use have removable battery caps so you can keep water levels topped up as needed (once a month, or more if it’s on a cheap charger). So-called “maintenance-free” types have no such caps, and stay as-is for life, a time period which is invariably less than refillable types. That’s because they must still breathe and vent water vapor, and eventually run out of water. Lots of folks swear by hybrids as RV batteries, and gleefully consider that they are getting by on the cheap each time they return to Walmart to replace them – every few years. I use a pair as “house” batteries on the Defiant to power its appliances and lights, and having just passed the two-year mark, they are beginning to sag quite a bit.
The second battery type is the true deep-cycle, another flooded type built expressly for such use. They can last anywhere from 4-8 years, making them extremely cost-effective. Check the water levels once a month, and you will find them to be trouble-free. The cost premium over hybrid batteries is more than paid back over time, especially since they will tolerate deeper discharges. That means that you can generally install fewer of them to do the same job if you like, saving weight and overall cost right from the start. Like hybrids, they are vented to the atmosphere, which means that they emit acid vapor during the charging cycle. Perched outside on a trailer tongue or inside a sealed box that is amply vented to the outside of the vehicle, this poses no problem. Installed in the interior of a van, motorhome or trailer and vented there, it’s not so good. Lots of people who do this poo-poo the cumulative effects of a constant sulfuric acid vapor bath on surrounding metal and especially wood structures. Check out the battery tray on your older car, which is in open air. Look at what it does to the plywood shelving underneath it in your garage. Breathing it in a confined and relatively closed space can’t be good for you, especially if you are already health-challenged with breathing issues. Since the gas is high flammable, the potential for a battery explosion exists if its closed space is shared by electrical switches, matches, lamps or heaters. If the battery(s) are not aggressively vented to outside air, I recommend another battery type. It’s your body, your rig, and your choice.
AGM (absorbed glass mat) batteries are a different option that allow installation in any battery position, and inside any interior space. They do not vent except in extreme overcharge circumstances, which requires a badly faulty charger. They offer a life expectancy of 4-8 years. Premium models allow extreme discharge and recharge rates, and better resist rough handling and vibration. They also offer improved corrosion resistance, and several internal features that improve internal performance and longevity. Their penalty is cost, which is several times that of hybrids. Unlike conventional no-maintenance batteries, they do not suffer from limited lifespans. Once they are installed and wired up, there is nothing more to do to keep them going. Whether their expense and safety is worth it to you is a personal decision that only you can make. I have several installed inside the Defiant, and they are still going strong to date. If I’d had a reasonable way to encase and externally vent conventional deep cycle batteries, I would have used those and saved money. But, I do not. The confined spaces they had to be installed in also contain electricals, and do not allow ready access in order to check and replenish water levels. My own decision was a no-brainer.
One caution to keep in mind is that AGMs are not all created equal. Optima offers AGM deep cycle batteries intended for double-duty underhood use in cars and trucks. It’s fine for that, but with a designed cycle life of just 350 cycles in one example, their premium cost may not be justified for your RV use. No doubt they would last longer outside of the extreme heat of an engine bay, but it does serve to inspire some research into just what you intend to buy.
Lithium batteries are the fourth choice, but as far as I’m aware, are still not quite ready for prime time. They offer spectacular capacities in very compact and lightweight packages. And, they can be discharged nearly to zero without any ill-effects, which doubles the size and weight advantages they already have. Cycle lifetimes are high, too. They are a dream come true. The drawbacks? Cost. And to this point, I have not found any offering a charger suitable for DC solar power. (A common battery or solar charger cannot be used.) They want 110VAC only, and I suppose you could use a gas generator in the field, or a conventional deep cycle battery pack and inverter, but that seems to cancel out much of the benefit in a solar-powered RV. Perhaps someone is addressing these issues now. I haven’t checked recently.
Voltage Choices
The only other battery consideration to make is voltage choice. All installations will output 12 volts to whatever you want to run. The question is just how you want to provide that 12 volts. You can install a 12-volt battery, or wire together two 6-volt batteries to get 12 volts. Any time that you have pre-existing battery frames that expect a certain physical size of battery, you can either stuff in two 12-volt batteries to combine their amp-hour ratings together, or instead install two 6-volt batteries and wire them together to get 12 volts. The advantage in this situation is that two 6-volt batteries having the same physical size of two 12-volt batteries will inherently provide more amp-hours capacity. This isn’t magic, but is merely the tendency of 6-volt batteries to be taller, so if you have the vertical clearance needed, you can jam in a higher capacity 6-volt into any given tray. The effective floor space they take up is essentially the same, so you can get more bang per square inch by using twin 6-volts. Outside of space constraints like that, I’m not convinced there’s any weight savings or other benefit, either way. The Defiant uses 12-volt cells only because it has three separate solar systems and I was initially uncertain of how its initial battery combinations would work out, so I wanted full interchangeability between one-cell systems, two-cell, and four cell. You will almost certainly use just one battery pack, whether it consists of one cell or several. If you have floor space constraints and will be using more than one battery, you may want to give 6-volt cells an extra look in order to conserve floor space. Just look through the capacity and physical size specs for whatever you are considering.
Battery Sulphation
Remember how I mentioned battery sulphation before? The battery killer? There are ways to combat it other than avoiding high discharge levels and keeping heavy use to just before recharging. Some upscale battery charge controllers include what is called equalization to occasionally apply charging voltages that are higher than normal. This is no miracle worker, but does reverse deposit formation when used regularly (at least once a month). My Morningstar MPPT-45 will also step in and apply equalization whenever it has determined that battery voltage has fallen below 12.2 volts (50% capacity). Equalization is generally not applied to sealed batteries like AGMs, but certain AGMs can handle it in controlled amounts. But there are also small desuphaters that attach to the battery’s terminals to try to reverse the damage long-term. They run full-time and do use some of the battery’s power to do so, so they should not be used if your battery is undersized and barely making enough power for your own needs. I have not used one of these, but I would stay away from cheapies here. There are also some 110VAC battery chargers that actively desulphate once the battery has been charged, such as Battery Minders and Battery Tenders. They work well, but cannot perform miracles. If you’re going to desulphate, do it early and on a regular basis. If you are regularly pounding your batteries down to 50%, I’d advise equalization of desulphation every week or two. To avoid damage, do not use a standard automotive charger on deep cycle batteries. And if you have an RV that includes a built-in trickle charger for the house batteries when you’re plugged into campground power, watch your water levels closely – they can overcharge and cause boil-off of the water. Mine has its own circuit breaker and has been turned off.
Panel Sizing
From your prior calculations, you now know the minimum and recommended panel wattage you need to survive. The rule of thumb here is that you should use 100 watts of solar panel for every 100Ah of battery capacity. That’s the minimum, and although I endorse it, I endorse it only as the minimum you should have. More panel power will charge only a little faster, since the solar controller will (or should) hold certain voltages for set times during the day, and additional solar panel power will not affect that (in full, strong sun). What it will affect is your ability to steal energy for using gizmos without delaying the recharge. It will also affect how well you can recharge your pack during overcast weather, where every last charging volt and watt counts.
Here’s where it gets squishy: If you are only discharging 20 or maybe 25%, you can expect to get away with the 100/100 rule. If you tend to discharge much more than that, you may find yourself barely completing a recharge by sunset, and not even coming close in overcast, even after cutting way, way back on your power usage. A 125/100 ratio gives you more to work with when you’re dipping farther toward 50% discharge, or the forces of nature are working against you. A 150/100 panel wattage to battery amp-hours ratio works well in overcast as long as you control your daytime lust for power. I consider my CPAP battery to be mission critical, and have implemented a slash-and-burn 200/100 ratio for it, since my kinky panel deployment limitations prevent recharging during travel, which can reach nine days without a recharge. That battery needs to be able to pop back into action the next powered day, regardless of location and conditions. It does. (My factory trailer wiring will not handle a 5-amp load from the house batteries, so that is not an option.)
Like when buying batteries, it pays to look around when trying to price solar panels. Do not assume that Amazon will have the lowest price, nor that the most popular sources will sell at the lowest price. What you are interested in is the bottom line price to your door or receiving point. Some panels are pricey but include shipping, while some are less than $1 per watt, but will drive you broke on shipping charges. It needs to have a sturdy aluminum frame, not plastic, and have glass rated for hail resistance. Yes, if you’re bucks-down and looking only for a short-term solution, you can shop Harbor Freight, but understand that in the long run they are no bargain, either for performance, longevity, or battery life. Get a real panel if you can, and pay only once.
With the exception noted below, what you will want is a panel with a nominal rating of 12 volts. That doesn’t mean that it actually puts out 12 volts, since rechargeable batteries require much more voltage to recharge than they produce. A nominal 12-volt panel will usually produce about 18 volts once connected to a battery. Panels intended for residential use can have nominal ratings of 18, 20, 24 volts or more. Those are great if you have the right type of controller, since they produce their wattage without forcing you to bulk up on expensive solar connecting wire sizes. I refer to a high panel to battery ratio as being “top-heavy” and, miracle of miracles, that also leads directly into the topic of solar charge controllers.
Solar Charge Controllers, or Solar Chargers
My own recommendation for selecting a solar controller is to avoid skimping, if possible. This is one area where you get what you pay for, and where the extra features serve to preserve the intended battery lifespan instead of merely being added bells and whistles. Regardless of type, what you want is a controller that can handle a passing cloud without getting confused and restarting the charge from scratch, which can overcharge the battery and damage it. Different battery types need different charging routines, and a decent controller is switchable to what you are using. This feature can also control battery equalization (covered later), which may be automatically deleted for certain types of batteries. If you boondock in hot or cold conditions, a temperature sensor needs to be onboard. Should your batteries be outside while your controller is inside, a remote sensor option should be included or available, since battery temperature is what really counts. Smart chargers also know when you are pulling out more power than they are putting in, and will, after a time, restart a full charge rate to the battery to replenish it.
There are two types of solar charge controllers, PWM and MPPT. One is not inherently better overall than the other and, given the big cost difference, it pays to make a selection wisely.
Pulse Width Modulation controllers are the more affordable type. If you’re using nominal 12V-rated panels, they are the default choice. What they bring to the party is good overall performance. Although they are less efficient than MPPT controllers, this is of little concern if your system is top-heavy (has much more than the standard 100/100 ratio of panel wattage to battery amp-hours). There’s just no financial payback to wring out more efficiency when you already have an abundance of panel power. You’re better off spending the saved purchase cost on getting a better PWM controller that will preserve battery life.
Multi-Point Power Modulation controllers are required if you are using a panel with a nominal rating higher than 12 volts, or if you are connecting your 12-volt panels in series so that their combined output is 24, 36 or 48 volts. Many residential panels are rated as 18 volts or above, and tend to be less expensive per watt than 12-volt panels. The advantage to more voltage is that your wiring from the panel to the controller need not be upsized. Wiring has resistance, but that resistance is not affected by doubling or tripling voltage. What does cause stress is pumping increased amperage through it, like if you connect two 12-volt, 5-amp panels in parallel through a wire sized for 5 amps. The voltage that you expect to see at the controller will be lost in the wire as heat. The only way around this is to limit wire lengths and/or use heavier gauge wiring, which is much more costly and harder to find fittings for. Much better to be able to connect the panels in series, which leaves amperage at 5 and doubles voltage to 24 or more. Only an MPPT controller can handle this higher voltage input, and at the same time convert that higher voltage into extra amperage on the battery side. That’s a big deal, if you have the extra voltage to start with. And even with a 12-volt rated panel, you usually do.
That ability to convert high voltage (anywhere over 15 volts) into amperes gives MPPT controllers an advantage over PWM controllers. Solar panel voltage decreases in hot temperature conditions, but increases in “cool” weather (under about 75 degrees). Thus, when starting up at sunrise after a cool night, panel output will quickly cross over the 12-15 volt threshold that the battery needs to charge. Once voltage is over that threshold and climbs to the normal 17-18 volt maximum (or more in the case of high-voltage panels), the MPPT controller is converting that overage into more amperage instead of throwing it away. The MPPT controller basically takes advantage of the extra panel output, while the PWM controller cannot. Once the panels start to roast in the hot sun, their output drops, sometimes all the way down to 12 volts or less. If this occurs, both controller types are on an equal footing. Outside of that, the MPPT controller is providing a little (or a lot) more current, all the time.
This “little more current” is also applicable in bottom-heavy solar systems, where panel wattage is marginal (100/100 or less) compared to the battery that must be charged. In this case, every little bit more helps, and the extra panel output in those cold desert mornings can be taken advantage of. An MPPT controller can help make a marginal solar panel system less marginal, particularly in cooler weather or under a hazy sky. The Defiant uses MPPT controllers only, since two of its three battery packs are at that marginal 100/100 ratio. It is overkill on the third 200/100 pack, where a PWM controller would have sufficed. I got it because of fear – fear that I might need to boondock under the pervasively gray skies of the Upper Midwest, where every watt counts. I’m also selecting a PWM controller for a top-heavy system I’m building for another camper, although it may not stay that top-heavy in the long run. But budgetary constraints make the PWM controller a necessary choice anyway.
Should you pay the big bucks for an MPPT controller because it’s more efficient and can crank out more amps? For the geek factor? Not necessarily. The PWM controller is a far better value in amply-powered systems, and in places where temperature usually gets pretty roasty. Everything else being equal, employing an MPPT controller in those conditions can be a literal waste of money.
One last caveat is that there are certain cheap Chinese MPPT controllers kicking around that are real bargains. That’s because they aren’t really MPPT controllers. If you insist of shopping by price, at least check buyer comments online, and deeply.
Solar Wire Considerations
Wire gauge sizes from the solar panel to the controller can be calculated here. The solar panel specs that they ask for are (or should be) listed in the spec sheets for any reputable solar panel you may be considering. When using the online calculator, keep in mind that they are assuming the use of either one panel, or multiple panels wired in series to boost voltage. If you’re going to be wiring a couple of panels in parallel to boost amperage instead, be sure to double your Amps entry, which they also call Operating Current. Two 5-amp panels, wired in parallel with positive to positive and negative to negative, will produce 10 amps total.

This is a 10-gauge solar wire terminating in an SAE plug with 10-gauge wire leads. An SAE wall outlet takes the power through to a controller inside.
The Renogy site also asks for an Acceptable Power Loss in the range of 2-5%. All wires by nature have some resistance, which causes some voltage drop. Longer or skinnier wires mean a greater voltage drop. This question is basically asking how much energy you’d be willing to sacrifice toward heat, in order to avoid having to shorten your wire run or upsize the wire gauge (thickness). In other words, how willing are you to torpedo your daily battery recharge in order to cut your costs for wire? Whatever efficiency loss you choose here is amplified by the time it reaches your battery, negating your more costly monocrystalline panels and your pricey, more efficient MPPT controller. Some loss will always occur, but my advice is to keep it at 2% or less, if you are physically able to. Still, you generally don’t want to have to go fatter than 10Ga wire, just for the sake of practicality. (Wire gauges are inverse – a 10Ga wire is much thicker than a 14Ga wire.) So try to locate your solar panels fairly close to your controller in order to keep your wire size down. You’ll find this more of a challenge for ground-based panels, particularly where you’ve wired them in parallel to push more amps. The connection between your controller and your battery is at least as important, especially for MPPT controllers that will boost amperage. That online calculator won’t help you here, and your controller’s manual should list acceptable distances and wire sizes for that. If you haven’t bought one yet, simply look online for it. Not available? Look for a better controller.
Low Voltage Disconnects
Many quality solar controllers feature a separate set of load terminals, which allow you to connect devices to the controller instead of to the battery. These terminals offer a Low Voltage Disconnect (LVD) feature, which will chop off power to the device(s) should the battery’s voltage drop to a point where it might be damaged. If, like me, you lose track of time or fail to check on how the battery is doing, this can prevent financial heartache. They will then reestablish the connection at some higher charging voltage. But there are two caveats here.
One is the voltage at which many of these LVDs kick in. Most engage when the battery has reached 11.5 volts (or even less), which is below 0% charge for both Flooded and AGM batteries. With a serious power hog that can temporarily drop voltage by 0.3 volts just by being turned on, this means a probable “resting” or true remaining capacity of 0% for a hybrid or 15-20% for an AGM. So it’s safest to look at LVD load terminals solely as last-ditch, crisis intervention schemes that are better than nothing. Relying on them on a regular basis, out of carelessness, will still cripple your battery.
The other caution is to never use load terminals for any power inverter device (that changes 12VDC power into 110VAC power). It may well damage your controller. I don’t understand or care to understand the technicalities involved, but don’t need to. You may notice this caution buried somewhere in the controller’s user manual. Hook inverters directly up to your battery. Load terminals are also limited as to how much amperage you can pull through them, often the same as the rated input amperage they can handle. The better inverters simply limit the current draw, choking your device. The poorer ones die.
Separate LVDs are available to add on, but you need to be equally careful about what voltage they cut off at. A non-adjustable one that cuts power at 10.5 volts will serve merely as one more device to absorb precious power.
You don’t need to be an electronics geek to either select components for or to assemble a solar system. The manuals of reputable manufacturers can make installation easy, and provide an intelligible explanation for what their products do. Just do some research, since it’s your money that you’re spending. I’ve probably forgotten something important, but the above should help demystify solar in a halfway-understandable way. If it’s only made things worse for you, well, at least you’ll know the topics that you need to research further. Remember, my advice is worth every penny you paid for it!

GREAT post, the ultimate in “how things work”. Really looking forward to seeing you.
Gee, Matt, thanks. I’ve got your trip on my calendar and find myself practically counting down the days to see you both!
Hey, very nice. MS Swankie Wheels posted a link to this on Facebook. I’ve also written about this stuff, so it was great to see some one else’s perspective on solar power systems for vans. I have an Excell spreadsheet solar calculator on my web site that may be a little easier to use than the Renogy one as it has many sample devices that you can select instead of having to work out their electrical use. It won’t be as accurate, but close enough.
Thank you, Romana. I could not locate that solar calculator on your site, so feel free to post the web address in a reply.
Great article! I can’t say I understand most of it, but it’s enough to get a lay person thinking about what direction to go, and I will certainly make a list of the items I would run off solar to start. Definitely better to “get it right” the first time. Thank you for taking the time to write this all out.
Thanks, Shawna. No need to understand all of it if you’re not going to build a system yourself, but you did pick up on the most important part, where to begin, on which it’s all based. Walk into a good solar store with a list of devices and how long each will operate, and they can get you into the ballpark of what will work for you. Apart from that, simply researching each area further will probably expose you to better guidelines or explanations. It can be overwhelming and unnecessary to try to absorb everything in one shot, but systems are built one component at a time, and methodically getting more familiar with each, over time, will help you piece a workable whole together. The goal is to get what will do the job reliably, without either overspending or asking for trouble.
No need to post something every day, I have been back a few times to reread this great post, ALL in one spot. Your simply worded guidance is helping me develop my solar plan. Excellent job, you open the door but dont overwhelm the reader.
Yay! That’s kinda what I intended, Ron, just using the post as a general reference that one returns to as needed for this or that. I find it more difficult to return to what I want when it’s broken into a series of posts, and more of a nuisance to bookmark. Thanks!
I am delighted that you Don’t force us to wait for the next installment. I have been asking a lot of questions about solar lately. You have answered them all and even given answers to questions I was not aware of! 🙂
Thanks for such great information. I have read this, through twice. Yes! All 7800+ words of it. I will, no doubt, come back to this often. We are going to have to start calling you….
(Do please state the next few words in hushed tones, quiet reverence, total awe… okay that may be going a bit far! Lol)
The Solar Whisperer
Thank you, Rachel. Perhaps someday, I will attain True Solar Enlightenment.
I just realized, I was the last post out here, two years ago, and yes, I am rereading this again! You can look at that two ways. Either I’m a very slow learner, or I just appreciate getting, the words of wisdom, from the great Solar Whisperer himself! I have found a place, where I might be able to stay, if I can figure out some way to heat my little camp trailer. It was down to 38 degrees last night and Yes, this is September, and I’m in Southern Arizona. But I am at about 4500 feet here, and they do get below freezing some hundred plus days out of the year. So I’m looking at the possibility of adding a regular RV furnace to my little world.
https://m.ebay.com/itm/Suburban-NT-16SE-RV-Camper-16000-BTU-Furnace-NT16-SE-/152597254578?_trksid=p2054897.l4275
It has an amperage draw of 2.8 ah. Which I know is a fairly significant draw. I went back up there and I found the renogy calculators, and I’m going through all of it, trying to figure it out. I even went out there in Googleland, to a post online, where someone said “Please, just tell me which batteries to get!” You could almost hear the wail of desperation, jumping off the page. I felt an incredible soul connection with them! 😉
There are so many variables to this little world of mine, that it makes it hard to figure out, if I’m even anywhere close, to having the kind of power that I need to make this happen. Like mounting the little furnace outside, so I don’t take any chance on getting any of the propane residue inside, and insulating the duct work, so that I do get some heat by the time it gets to the trailer. Of course, that means that I will be losing some of the residual heat from the furnace itself. But I have some peculiar issues that make me very cautious when it comes to inviting chemicals of any kind into my home . These are not the kind of parameters that most people usually have to deal with. But I shall persevere! I just wanted to let you know, how much I appreciate the fact, that you did this great big long post, with all of the links, for people like me who struggle to understand how this all works.
So thank you! Again!
You’re welcome. I sent an email regarding the furnace…
Thanks! I hope I can find a NT12 SE!