
Roll-Down Trailer Windows
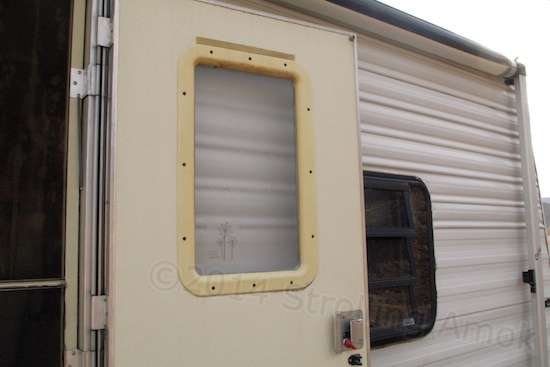
The window. Fixed.
Just before a major trip to town yesterday, I discovered that the window on the trailer door had somehow slipped down about an inch, opening an impromptu 1/4″x12″ fresh air slot at the top of the window. That explained the draft during the cold, high wind here the day before. Repairs would have to wait though, since a combination laundry and grocery run would prevent taking the time to disassemble the thing and figure out what would be needed to fix it.
So today, I removed the screws squeezing the inner and outer plastic window frames together. Ugh. Small pins molded into both frames that retain the edges of the glass had sheared off at the bottom, letting the glass slowly slide down from its own weight. I’m not sure why, though the door has had an unhappy existence in terms of sag, and takes some shoving now
and then to open or close. Foam rubber gasketing on both sides of the glass was not only atrophied with age, but was haphazardly strung around in a way that made it obvious that I was not the first person to play with its innards. It was either that, or someone at the factory in 1994 was high on crack when the window was first installed.
So, a dedicated run to the hardware store was in order. I’d need new foam gasketing that was quite thin and narrow, plus a tube of bonding sealant in case I had a combined thickness issue one way or the other. Naturally, the old foam was an unusual size and softness, and I’d have to make do with a roll of generic window seal. Once back at Rancho Begley, I was able to flip both frames upside down, to get some retaining pins back in action to support the bottom edge of the glass. Using foam strips both inside and out was too thick, and would prevent the support pins from engaging, so I used the bonding sealant between the glass and the outer frame, and put the foam around the perimeter of the inner frame.
It now being about four o’clock, I couldn’t leave the sealant on the window and outer frame to set up, since that takes about a day, and the low air temps would slow it even further, so I added painter’s tape to help hold the glass into the outer frame. This assembly went back into the door, and self-adhesive foam gasketing around the perimeter of the inner frame allowed me to pop that into place, too. The nine screws holding the two frames together went in easily, and I appear to have lucked out on combined thickness. The gasket is nicely compressed, so between the gasket, the sealant and the pins, it should hold. Naturally, I added a line of sealant on the outside, where the glass meets the frame. I also ran a line around the outer frame and the door, along its top and sides. Don’t want to let rain seep into the door interior by way of the frame edges. The wood framing inside the door is already compromised by rot, so there’s no point in adding to it.
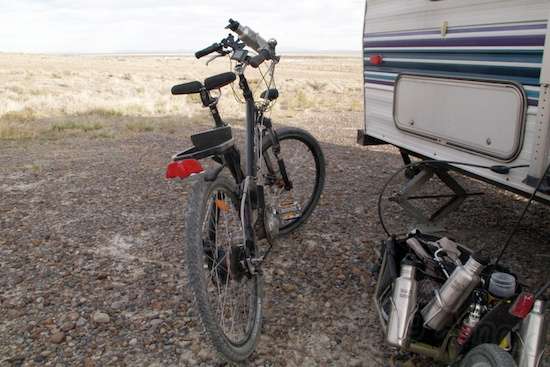
The pack mule in repose.
Four o’clock? Why so late? Well, the bike tire adventures continue. My “make-do” fix for the week, after I blew the Maxxis tires and tubes out, put me into a new set of Michelins, but with crappy Bell tubes loaded with Slime sealant. It didn’t work, twice. On the way home yesterday, with the bike trailer loaded with clean laundry and food, I got to the edge of town with about five miles to go, and the rear tire went flat. Disappointing, yes, but while in the other end of town, I’d been feeling paranoid and picked up a can of Fix-A-Flat For Bikes at the hardware store, for “someday”. I never thought I’d have to use it so soon, you betcha.
It’s basically a small aerosol can with a flex tube and screw-on valve fitting. It worked. The can’s valve was bad and leaked all over the place, but the tire went up, and stayed up. Unlike Slime, which is a thick green goo, this was a white foam. Made it home okay, much to my surprise.
The pressure held overnight, so I decided to go for broke and use the bike again for today’s adventure, sans trailer. Different day, same story. 2/3rds of the way through town, the front tire started going soft, and it was a race against time to get to where I knew there was an air pump. This is where you throttle up and don’t care about the battery reserve. I went about another mile before it gave out, and walked the remaining quarter-mile to the air pump. I was able to make it about the same distance to the hardware store then, but just.
Not knowing what lay ahead, I picked up another crappy tube just in case, a Crescent wrench to let me remove the rear tire on the road, also just in case, and a full-size can of automotive tire sealant, different brand. By the time I got back to the bike outside, the front tube was now empty. This time, the can behaved and in the sealant went, putting the tire at a decent pressure. Once done, I found the offending goathead thorn just by blind luck, and it was at the edge of the tread. Grrr. Back at the air pump, I pressured up to where I wanted to be, about 45 PSI, and took off for home. I could tell pretty quickly that pressure was lowering again, so I stopped and slowly walked a few yards, leaning the bike way over onto the side I’d seen the thorn in. It held nicely from that point on. I made it home, and pressure had held at 35.
I took shallow comfort in knowing that my Michelin self-sealing tubes would likely show up this Friday, and in knowing that last evening I’d ordered puncture-resistant tire liners, a real valve removal tool so I wouldn’t have to endure the plastic ones shearing off, real tube talc to let the tube shift around when it needs to, a somewhat compact air pump, and a handlebar carry-bag big enough for the wrench, patch kit, tire lever, valve tool, emergency tube, etc. Real cyclists balk at the thought of the performance hit that liners, self-sealing tubes, and all those tools cause. But that’s recreational riding, which is on a different plane than distant transport duty. Not to mention that adding a couple of pounds to an e-bike that already weighs as much as two ordinary bikes just isn’t going to affect speed or “feel” that much.
Oh, for the days when flat tires were a real oddity! My takeaway from these little adventures of late is (so far) that downtown Wendover has more goathead thorns than the surrounding countryside.
When Slime is added to a tube, don’t blindly follow the instructions. Don’t simply add the goo and then obediently rotate the tire. Put in more than they recommend. Pull out the tube and squeeze it all around like a tube of toothpaste to distribute the stuff. That’s how self-sealing tubes are delivered.
And don’t leave camp without the means to deal with all aspects of a flat tire, because an e-bike is heavy enough that walking a flat is very tough on the tire and tube. In the case of a flatted rear, it’s hard on the rim too, and the tire is prone to completely separate from it.
Lastly, the belt-and-suspenders approach is probably best when cycling out West. Don’t rely on just one system to deal with the threat of punctures. Double up. Tire liners (added or built-in) and self-sealing tubes. Of course, it’s preferable to prevent or stop a leak than it is to pull, patch, and reinflate a tube, but over long distances, being able to do both is even better. One long walk out here kind of drives that home.
I can tell ya, until those tubes and liners I ordered show up, that aerosol can of puncture sealant is going along for the ride!

I remember my son talking about goatheads when he lived in socal. Too bad they dont make tire balls for bicycles. They are often used for dirt bikes.
http://www.tireballs.com/
Wow, I had to look that one up, Ron! Neat concept. They probably never will go to bicycle sizes since narrow rims came into vogue, and the tire carcasses are so flimsy. Technically, someone with a “fat tire” bike could probably improvise something. One look at the installation and maintenance requirements is pretty sobering. They look like just the ticket for motorcycle racers though, who don’t mind the expense and effort to keep them working, since the performance advantage is there. Thanks for mentioning them!
I used to keep a cheap mountain bike at my mom’s in Arizona and got so sick of flat tires that I bought closed cell inserts for the tires. These do away with the need for inner tubes. I always thought that with time these would most likely break down and disintegrate. Most likely they will but I don’t get down there too much anymore so gave the bike to my brother-in-law. Any way it was much better than getting flat tires all the time. Everything out that way is trying to attack your tires.
How true, Michael. Back east, I don’t give tires a thought. Here, it’s like guerilla warfare. The closed cell inserts are quite an idea, and I will check them out. Thanks!
Thanks for the idea Michael , in searching I also ran across these.
http://www.solidtiresdirect.com/storefront/Amerityre_26_x_1_95_Solid_Bike_Tire-details.aspx
Interesting page, and I wonder what they mean by “low-duty”. They have one street tire in my rim width, a 26 x 1.50, which won’t do for me, but may for someone else. Thanks, Ron!